This site is supported by our readers. We may earn a commission, at no cost to you, if you purchase through links.
You’ll want to create tight, even cornrows that lie completely flat against your scalp, avoiding any lumps or raised sections that’ll show through later.
When sewing your wefts, maintain consistent tension throughout each stitch, securing the hair without pulling so hard you create puckering, and don’t go overboard with thick wefts either—thin, strategically placed pieces blend better and create that seamless look you’re after.
The magic happens when you master the balance between secure attachment and natural movement, plus there are specific tools that can transform your technique completely.
Table Of Contents
Key Takeaways
- Master your foundation braids first – You’ll need to create tight, uniform cornrows that lie completely flat against your scalp’s natural contour, avoiding any lumps or raised sections that’ll show through your finished style.
- Control your tension while sewing – You’ll want to maintain consistent, firm pressure throughout each stitch without pulling so tight that you create puckering or cause scalp discomfort.
- Don’t overload with hair – You’ll achieve better results using fewer, thinner wefts strategically placed rather than piling on thick bundles that create obvious bulk and destroy the natural look.
- Focus on seamless blending – You’ll need to match your natural hair density and texture while ensuring your tracks lay flat against the braids for that professional, undetectable finish.
Flat Weave Foundation
Your flat sew-in journey starts with creating the perfect braided foundation, which is like building a smooth runway for your hair extensions to land on.
You’ll need to master simple, uniform braiding patterns that lay completely flat against your scalp, because even the tiniest bump can turn your sleek style into a lumpy mess that screams "amateur hour.
Master those braids or wear your mistakes like a neon sign advertising beginner status.
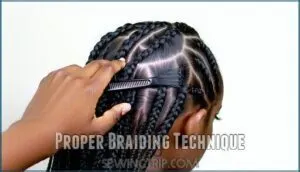
Proper Braiding Technique
The foundation of every flat sew in starts with your braiding technique.
You’ll create neat, sturdy anchor braids that follow your head’s natural contour.
Start with straight back cornrows, keeping uniform braid size throughout.
This guarantees proper hair density distribution and maintains scalp health.
Here’s your step-by-step braiding roadmap:
- Section hair evenly – Use a rat-tail comb for precise parts
- Maintain consistent tension – Not too tight, not too loose
- Braid in the direction your head curves – This prevents bulky spots
- Keep braid size uniform – Consistent width creates a smooth foundation
- Focus on scalp health – Avoid excessive pulling that causes discomfort
Achieving precise parts may require a specialized styling tool.
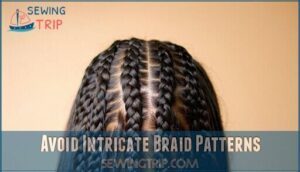
Avoid Intricate Braid Patterns
Simple braids work wonders for your flat sew in dreams.
Complex patterns create bumps that prevent smooth foundation results.
Keep your cornrows uniform and straight-back for proper head contour.
This braiding technique allows wefts to lie flat against your scalp.
Maintain consistent braid uniformity and appropriate tension throughout.
For added structure, consider using synthetic hair.
Your hair density determines spacing, but simplicity always wins for that flawless sew in weave finish, with proper head contour and consistent braid uniformity.
Sewing Technique
Your sewing technique can make or break your flat sew-in, so you’ll want to get this part spot-on.
Once you’ve mastered proper client positioning and tension control, you’ll create that smooth, professional finish.
That smooth, professional finish is what makes everyone wonder where your hair ends and the extensions begin, showcasing your mastery of tension control.
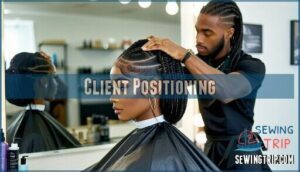
Client Positioning
Getting your client positioned correctly transforms your sew in weave from amateur to professional.
Proper client positioning during sew in installation creates the foundation for flawless results, ensuring even placement and ideal head angle throughout the process.
- Upright Posture: Keep your client standing straight to maintain natural head contours
- Mirror Use: Position mirrors so clients can see progress and stay comfortable
- Head Angle: Adjust positioning based on which section you’re working on
- Client Comfort: Check in regularly to prevent neck strain and fatigue
- Flat Sewin Success: Proper positioning directly impacts how smoothly tracks lay against the scalp
To prevent issues, remember to check for threading and tension regularly.
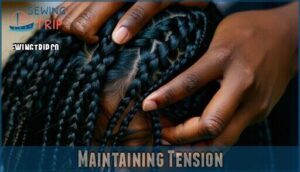
Maintaining Tension
Perfect tension transforms your sew in installation from amateur to professional.
Your sewing game changes everything—master the tension, master the transformation.
Your stylist’s steady hands maintain consistent pressure while stitching each weft, preventing weft slippage and ensuring scalp comfort.
Thread strength matters—too loose creates gaps, too tight causes headaches.
| Tension Level | Result | Fix |
|---|---|---|
| Too Loose | Weft slippage, visible tracks | Increase stitch tightness |
| Perfect | Flat, seamless blend | Maintain tension consistency |
| Too Tight | Scalp discomfort, pulling | Reduce pressure slightly |
Master sew in techniques require balancing cornrows with proper braiding technique for flawless results, achieving a flat, seamless blend and ensuring scalp comfort with consistent pressure and the right thread strength.
Avoiding Bulkiness
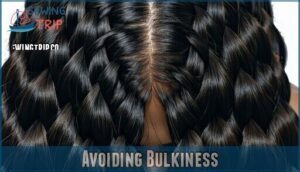
You don’t want your sew-in looking like you’re smuggling a pillow under your hair, so resist the urge to pile on every bundle you bought.
The secret to that sleek, natural look is using fewer wefts and focusing on proper placement rather than maximum volume.
Don’t Overdo The Hair
Less is definitely more in the case of hair bundles for your sew in.
You’ll want to use minimal bundles to achieve natural volume without creating bulk. Choose lightweight wefts that match your natural hair texture rather than going overboard with thickness.
Two to three bundles typically provide realistic density while maintaining that coveted flat finish we’re all after, which is essential for a natural look with minimal bundles.
Focus on a Flat, Natural Look
Natural looking sew in extensions start with realistic density, not dramatic volume. You’ll want subtle volume that mimics your hair’s natural texture rather than creating an obvious fake look.
Perfect your cornrow technique on mannequin heads before working on clients. Customize weft sizes based on each person’s head shape and desired fullness for seamless blending. Understanding fabric’s drape properties can also influence how naturally extensions blend.
Here’s what flawless, undetectable sew in styles look like:
- Hair moves naturally without stiffness or obvious tracks showing
- Density matches your natural hair pattern with minimal styling needed
- Blending appears effortless from every angle
Blending is Key
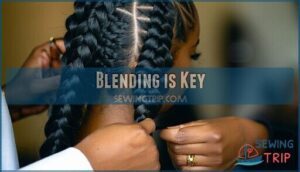
You’ve got your braids looking smooth, but now comes the real magic trick – making everything blend like it grew from your scalp naturally.
The secret lies in three simple steps: creating flat braids as your foundation, sewing those tracks super tight against your head, and keeping your tension perfectly even throughout the whole process.
This process requires attention to detail to ensure that the braids look natural, and by following these steps, you can achieve a seamless look.
Flat Braids
Your braids are the secret sauce to that glass-smooth finish everyone’s chasing.
Keep your braid size consistent – think pencil-thin cornrows that follow your head’s natural curve.
Braid direction matters big time; straight-back patterns create the flattest foundation for your hair weft.
Uniform spacing between each row prevents lumps and maintains scalp health while supporting different hair density levels.
Considering a zig-zag braid pattern allows for versatile styling options.
These braiding techniques aren’t just busy work – they’re your ticket to foundation uniformity.
When your cornrows lie flat as pancakes, your weave will blend like butter on warm toast.
Tight Sewing
Your stylist’s hands hold the secret to flawless installation through tight sewing techniques.
Stitch Security depends on pulling each thread snug against the scalp without causing hair damage.
Proper Thread Type and Tension Control create Knot Strength while maintaining Scalp Comfort.
When your hair weft sits flush against braids, you’ll avoid hair tightness that damages your hairline.
Perfect tension makes all the difference.
Even Tension
Consistent tension transforms your sew in from bumpy mess to seamless finish.
You’ll want steady pressure throughout each stitch – not death-grip tight, but firm enough to hug those cornrows.
This weft spacing technique prevents puckering while maintaining scalp comfort.
Think of it like tuning a guitar string: too loose creates gaps, too tight causes buckling, which is crucial for perfect track uniformity and achieving a seamless finish.
Master this sewing technique for perfect track uniformity every time.
Helpful Tools
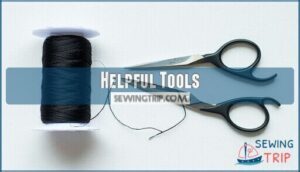
You’ll need the right tools to make your sew-in look professional and lay completely flat against your scalp.
These three game-changing items will transform your install from bumpy to beautiful, giving you that sleek, natural finish you’re after.
Wool Pressing Pad
When you’re ironing extensions flat, a wool pressing pad becomes your secret weapon for perfect heat distribution.
This thick cushion protects delicate hair from scorching while creating that smooth, professional finish you’re after.
Here’s why wool pressing pads rock for sew in tutorials:
- Superior heat distribution prevents hot spots that damage extensions
- Fabric protection keeps your expensive hair bundles safe from burns
- Pad thickness creates even pressure across the entire surface
- Easy cleaning methods maintain hygiene between styling sessions
For quality results, consider using a specialized pressing surface.
Sizing Spray
Sizing spray becomes your secret weapon for locking tracks in place.
This lightweight formula adds hold strength without weighing down your hair texture.
You’ll love how it works with different product ingredients to create structure.
Apply with gentle spray application across each weft before sewing.
The heat protection bonus keeps your sew in hair safe during styling.
Following this sew in guide tip guarantees your sew in weave stays put.
Your sew in tutorial just got easier with proper sizing spray technique.
You can also find weave product solutions online, using heat protection and a secret weapon for a secure sew in weave.
Smoothing Spray
Smoothing spray becomes your secret weapon for that glass-smooth finish you’re after in your sew in hair. This lightweight formula works magic on every hair type, from coarse to fine textures.
Here’s your application methods breakdown:
- Mist lightly – Don’t drench the hair, just a gentle spray
- Work through sections – Focus on visible tracks and blend areas
- Seal the wefts – Light coverage prevents shedding
- Add shine – Creates that healthy, natural glow
- Maintain hold strength – Keeps everything in place all day
Your sew in maintenance routine isn’t complete without this finishing touch.
Frequently Asked Questions (FAQs)
How do you sew flat felled seams?
Like threading a needle through silk, you’ll trim one seam allowance shorter, fold the longer edge over it.
Then stitch close to the fold for a clean, professional finish that won’t fray.
Can you sew a sleeve in flat?
You can absolutely sew sleeves in flat.
It’s faster and creates cleaner, more professional results.
Pin the sleeve to the armhole before joining side seams, then stitch everything in one continuous flat construction.
How do you sew a flat-felled sleeve?
Some believe flat-felled seams require complex machinery, but you’ll master this technique easily.
First, sew your sleeve seam with wrong sides together.
Trim one seam allowance, fold the other over it, then topstitch down for durability.
How do you create a flat fell seam?
You’ll create a flat fell seam by sewing fabric pieces together, trimming one seam allowance shorter, folding the longer allowance over it, then stitching down the folded edge for durability.
Can you flat fell straight seams?
You can absolutely flat fell straight seams.
Start by sewing your regular seam, then trim one seam allowance shorter.
Fold the longer allowance over the shorter one, encasing the raw edge, and topstitch down flat.
How do you sew a quilt?
You’ll layer your quilt top, batting, and backing, then baste them together.
Start quilting from the center outward using straight lines or patterns.
Secure edges with binding, creating neat mitered corners for a professional finish.
Why is my sew in not flat?
Like a lumpy mattress ruining your sleep, your sew-in isn’t flat because your braids aren’t tight enough, you’re using too much hair, or your stitching technique needs work.
Tighten those foundation braids first.
How do you sew a flat stitch?
You’ll master flat stitching by keeping your thread taut and sewing close to the weft’s edge.
Use an overcast stitch, pulling tight after each pass.
Double-check your tension—loose stitches create bumps that ruin flatness.
How do I prepare my hair for a sew-in?
Before your royal sew-in appointment, you’ll want to shampoo and condition with oil-rich products like Argan Oil.
Air-dry thoroughly, then apply moisturizer focusing on ends and edges.
Clean, hydrated hair creates the perfect foundation.
How do you curl your hair with a flat iron sew in?
Start with 300°F heat and clamp small sections for 3-5 seconds.
Wrap hair around the iron, hold briefly, then release.
Work from bottom layers up, using heat protectant spray first to prevent damage.
Conclusion
Ready to transform your sew-in game from messy to flawless?
Mastering how to get a flat sew in comes down to three non-negotiables: foundation braids that hug your scalp like they belong there, consistent tension that secures without strangling, and strategic weft placement that creates seamless blending.
You’ve got the techniques, tools, and insider secrets—now it’s time to practice until muscle memory kicks in.
Trust the process, and you’ll be creating salon-quality results that’ll have everyone asking for your secrets.
- https://www.lipstickalley.com/threads/how-do-y%E2%80%99all-think-sew-ins-get-this-flat.4787875/
- https://www.tiktok.com/discover/how-to-lay-flat-tracks-for-sew-in?lang=en
- https://www.reddit.com/r/BlackHair/comments/qjdous/i_got_my_first_weave_and_i_hate_it_any_tips_on/
- https://www.youtube.com/watch?v=pmiQgp7r-Lc&pp=ygUII3R0a2VsbHk%3D
- https://properbrewingco.com/

