This site is supported by our readers. We may earn a commission, at no cost to you, if you purchase through links.

Your favorite jeans don’t fit anymore. Maybe you gained a few pounds, or maybe they shrunk in the wash. Either way, you’re not ready to let them go.
The good news is you don’t have to toss them or let them collect dust in your closet. You can make jeans bigger using alteration techniques that work for the waist, thighs, hips, and calves. Some methods require basic sewing skills, while others need nothing more than water and patience. The approach you choose depends on how much extra room you need and where the jeans feel tight.
Table Of Contents
- Key Takeaways
- Assessing if Your Jeans Can Be Made Bigger
- Tools and Materials Needed for Jeans Alteration
- Letting Out Seams to Increase Size
- Adding Gussets or Panels for Extra Space
- Expanding The Waistband for Comfort
- Stretching Techniques for Slight Size Increases
- Tips for a Professional-Looking Finish
- Frequently Asked Questions (FAQs)
- Conclusion
Key Takeaways
- You can expand jeans by letting out existing seam allowances (usually half an inch), adding fabric gussets or panels to tight areas, or stretching denim with water and heat for up to an inch of extra room without sewing.
- Check your jeans’ fabric content first—denim with 1-3% elastane stretches 1-2 inches, while 100% cotton relies purely on seam work and has almost zero natural give.
- Professional-looking alterations require matching thread colors (golden or copper tones), reinforcing stress points with bar tacks, and using topstitching that follows original needle holes to make your work invisible.
- Side panels and gussets should extend at least to the knee for balanced expansion—shorter inserts create bunching and bulging where they stop, ruining the fit.
Assessing if Your Jeans Can Be Made Bigger
Before you start cutting or sewing, you need to know if your jeans can actually be made bigger. Not every pair has the hidden fabric or stretch potential to work with.
If your machine struggles with thick denim seams, you might need to upgrade to one of the high-speed sewing machine models built for heavy-duty alterations.
Let’s look at three key things to check before you commit to any alteration method.
Check Seam Allowance for Letting Out
Before you even thread a needle, flip your jeans inside out and hunt for that hidden strip of fabric folded along the side seams—that’s your seam allowance, and it’s the difference between a quick fix and a full-blown reconstruction project. Most quality jeans pack about half an inch of extra fabric in there.
If you’re unsure which best stitch for denim will hold up under stress, a straight stitch or triple stitch typically works well for reinforcing those side seams.
Before you thread a needle, flip your jeans inside out to find the hidden seam allowance—that half-inch strip determines whether you need a quick fix or full reconstruction
Run your fingers along the waistband and inseams to gauge what you’re working with—this seam analysis determines whether simple garment alteration and repair will cut it or if you’ll need to bring in panels for a proper clothing alteration.
If you’re new to this and want to build confidence before tackling tricky alterations, check out this guide on how to start sewing your own clothes to master the basics first.
Identify Areas That Need Expansion
Put those jeans on and move around—squat, sit, twist—so you can pinpoint exactly where the fabric’s fighting you, whether it’s the waist digging in, the thighs pulling tight, or the hips refusing to budge. To address these issues, consider evaluating your jeans for fit problems.
Mark your expansion needs with chalk:
- Waistband gaps or cuts into your comfort zones
- Thighs strain when you walk or sit
- Hips create pulling across pockets
- Rise feels too restrictive front or back
- Calves won’t accommodate your body measurements
These marks guide your fabric choice and jeans stretching techniques—you’re mapping your path to comfortable jeans that actually work with your fit preferences, not against them.
Consider Fabric Content and Stretch
Your denim’s fiber blends dictate what’s possible. Check the care label—jeans with 1–3% elastane content give you about 1–2 inches of real stretch, while 100% cotton has almost zero give and relies purely on seam work.
Denim weight matters too—lighter fabrics around 10–12 oz move easier than stiff 14–16 oz heavyweight builds that resist textile manipulation no matter how hard you pull. Understanding fabric stretchability is essential for determining the best approach to alter your jeans.
| Fabric Types | Elastane Content | Stretch Limits |
|---|---|---|
| Rigid cotton | 0% | Minimal yield |
| Light stretch | 1–3% | 1–2 inches max |
| Heavy stretch | 4–5% | 2+ inches possible |
| Blended weaves | Varies with polyester | Moderate recovery |
Tools and Materials Needed for Jeans Alteration
You don’t need a fancy sewing studio to alter your jeans—just a few basic tools and some fabric will get you there. The right supplies make the difference between a quick fix and a frustrating mess.
Here’s what you’ll want to grab before you start cutting and stitching.
If you’ve never made one before, check out this step-by-step guide to sewing a bucket hat to see the full process in action.
Essential Sewing Supplies
You’ll need the right gear to transform those tight jeans into something you can actually breathe in. Start with a ballpoint or universal sewing needle—it glides through denim without snagging.
Grab these essentials:
- Heavy-duty thread in matching colors for invisible, durable seams
- Sharp fabric scissors and a seam ripper for clean unpicking
- Measuring tools and fabric markers for precise waistband adjustments
Your sewing machine should handle thick textile manipulation without choking.
If you’re working with heavy fabrics like denim or canvas, an industrial sewing machine for quilting thick materials can power through multiple layers with ease.
Choosing Additional Denim or Fabric
Your denim selection makes or breaks a successful jeans alteration. Match the weight—11 to 13 oz midweight works for most everyday pairs—and check the stretch percentage if your originals contain elastane.
Color coordination matters too: prewash new fabric twice to remove excess dye and preshrink it.
For sustainability options, raid old jeans for perfectly matched panels that already share your garment’s structure and fade.
Measuring Tools and Marking Supplies
Precision starts with the right measuring arsenal. You’ll need flexible tapes—60 inches accommodates waist and hip circumference—plus sewing gauges to nail those seam allowances down to 1/8 inch. Mark dark denim with tailors chalk or white fabric markers for visible lines that wash clean later.
- Transparent measuring rulers verify grain alignment along longer seams
- Small acrylic gauges set consistent needle placements between 1/8 and 2 inches
- Chalk wheels glide smoothly across textured denim without skipping
Letting Out Seams to Increase Size
Letting out seams is your first move when you want to squeeze a bit more room out of jeans you already own. You’ll find extra fabric hiding in the side seams and inseams—most jeans have at least half an inch tucked away.
Here’s how to release that hidden space and turn tight jeans into comfortable ones.
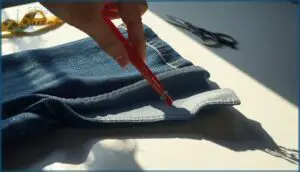
Locating and Unpicking Side and Inseams
Before you can break free from tight jeans, you need to find where the fabric hides extra room. Side seams run down the outer leg from waistband to hem—that’s your first target. Inseams sit along the inner leg, connecting front to back denim fabric panels.
Flip your garment inside out and check both for seam allowance, usually 1/4 to 3/8 inch. Grab your seam ripper and carefully lift those stitches without damaging nearby pockets or topstitching.
Measuring and Re-sewing for Extra Room
Once you’ve unpicked those side seams, lay your jeans flat and use a tailor’s measuring tape along the opened seam line. Mark 1.5 cm increments with fabric chalk—that’s your new stitching guide for measurement techniques and alteration planning.
Set your machine’s thread tension to match the original, then stitch parallel to your marks. This seam reinforcement keeps your waistband proportional and your jeans looking sharp, not homemade.
Reinforcing Altered Seams
A fresh seam won’t hold long without backup. Add bar tacks at each seam endpoint—dense zigzag stitches that lock stress points before they tear. Use thread one size lighter than your main stitch to avoid cutting the denim.
For waistband alterations or high-flex zones, slip a narrow denim strip beneath the seam allowance and zigzag across it. This fabric support turns fragile jeans alteration into bombproof garment reconstruction.
Adding Gussets or Panels for Extra Space
When you’ve maxed out the seam allowance and still need more room, adding fabric is your next move. Gussets and panels let you expand jeans in the waist, hips, or thighs without sacrificing the overall structure.
Here’s how to create and attach extra fabric where you need it most.
Creating a Gusset Pattern
A diamond-shaped gusset gives you the extra room you need without starting from scratch. You’ll draft this piece on paper first, ensuring each measurement works with your jeans’ existing construction. Here’s how to nail your pattern drafting:
- Mark the crotch depth you want—usually 2 inches at center for comfortable ease
- Measure along the opened seam—about 4 inches each direction from the crotch point
- Add seam allowance of ½ inch around all edges for clean garment reconstruction
Cut your gusset on the bias for natural fabric stretching.
Cutting and Attaching Side Gussets
Once you’ve nailed your gusset patterns, grab denim that matches your jeans’ weight and prewash it to prevent shrinkage.
Cut your pieces carefully—accuracy matters because even a 1-inch mistake shrinks your total ease by about 2 inches after sewing.
Pin the gusset right sides together along one opened side seam, aligning your marked stitching line with the original jeans alteration seam, then stitch at 2.5 mm length for fabric selection that holds.
Inserting Panels for Thigh or Waist Expansion
Full-length panels transform tight thighs and snug waists by replacing your side seams entirely. You’ll draft each panel by subtracting jeans circumference from body measurements, dividing by two, then adding 1 to 1.5 cm seam allowances. This garment reconstruction method distributes fabric selection smoothly from waistband to hem, giving you:
- Consistent ease through the entire leg
- Reduced strain at any single point
- Smoother visual lines than small inserts
- Room to reposition pockets if needed
- Professional-grade denim alteration results
Extend panels at least to your knee for balanced clothing alteration—shorter inserts bunch and bulge where they stop.
Expanding The Waistband for Comfort
The waistband is where most jeans feel tight first, and it’s also one of the easiest places to gain extra room. You can remove the existing waistband and rebuild it with added fabric or elastic inserts to create a custom fit.
Here’s how to expand your waistband without compromising the structure of your jeans.
Removing and Measuring The Waistband
Start your waistband removal by inspecting how it’s attached—topstitching or hidden seams. Use a seam ripper to carefully release stitches without damaging belt loops or fabric. Measure across the front and around side seams to record the current circumference. Check for interfacing inside that might limit expansion methods.
| Measurement Point | Tool | What to Record |
|---|---|---|
| Inner diameter | Flexible tape | Available expansion space |
| Waistband fold to seam | Tape measure | Distance at multiple points |
| Belt loop position | Ruler | Length and placement |
| Facing/lining width | Caliper or tape | Constraint measurements |
Document everything before planning your sewing strategies for garment care.
Adding Denim Extensions or Elastic
Once you’ve released the original waistband, you’re ready to add breathing room without replacing everything. A denim extension lets you splice in fabric along the waistband or body panels—match fabric weight and color fade so your alteration disappears. Elastic inserts work beautifully for flexible seams that give when you move. Here’s how to nail the fit:
- Anchor-stitch elastic to both garment and extension for even tension control across the waistband.
- Match denim fibers and weaving patterns so your fabric stretching blends seamlessly into the original jeans alteration.
- Reinforce junctions with double stitching to prevent stress tears during clothing alteration wear.
This seam reinforcement protects your work and keeps everything intact through daily adventures.
Sewing and Finishing The New Waistband
Pin your extended waistband to the jeans with right sides together, matching center back and side seams. Stitch using a 5/8-inch seam allowance for solid waistband construction.
Press seam allowances toward the band, then topstitch all around to lock everything down—this elastic integration and waistband reinforcement gives you clean denim repair with real staying power. Your jeans alteration just leveled up.
Stretching Techniques for Slight Size Increases
Sometimes you just need to squeeze a little more room out of jeans that are almost perfect. Stretching won’t add dramatic size, but it can give you that extra half-inch or inch you’re after without a single stitch.
Here’s how to stretch your denim using water, heat, and a few clever tricks.
Water and Heat Stretching Methods
Damp stretching unlocks fabric relaxation. Spray lukewarm water on tight zones like the waist, then pull the denim by hand five to ten times to gain up to an inch of ease.
For waist expansion, insert a waistband stretcher into damp jeans and leave it overnight.
Heat application works too: use a hair dryer on moderate settings over misted areas, but skip high heat to avoid shrinkage that reverses your stretching jeans work.
Manual Stretching and Wearing Techniques
Your own movements drive fabric relaxation and comfort optimization without tools. Wear your tight jeans around the house for two to three hours daily, doing gentle stretching exercises like lunges and squats to loosen waistband tension and thigh areas. Body adaptation happens gradually:
- Track your measurements weekly to monitor safe fabric stretching progress
- Perform seated bends to ease hip pressure points
- Avoid aggressive pulling that frays seams
- Document wear patterns to identify problem zones
- Combine consistent movement with light jeans stretching methods for natural expansion
Using Conditioners or Waistband Stretchers
Hair conditioner softens denim fibers for easier waist expansion—apply a dime-sized amount to damp fabric, then gently stretch. A waistband stretcher provides controlled pressure over several hours to widen tight spots without seam damage. Test conditioners on hidden areas first to verify fabric safety.
Combine both stretching methods with patient, repeated sessions for gradual denim relaxation that respects your jeans’ construction limits.
Tips for a Professional-Looking Finish
You’ve put in the work to make your jeans bigger, so don’t let sloppy finishing ruin the transformation. A few smart techniques can make your alterations look like they came straight from a professional tailor’s workbench.
Here’s how to nail that polished, store-bought look.
Topstitching and Seam Matching
Your altered jeans deserve topstitching that looks factory-fresh. Use polyester topstitching thread in golden or copper tones for seam reinforcement.
Matching the original color keeps alterations invisible. Set your stitch length between 2.8 and 4.0 mm, then test on scrap denim first.
Maintain topstitch alignment by sewing 2–3 mm from the seam edge, following existing needle holes whenever possible to disguise your DIY sewing work completely.
Matching Thread and Hardware
Thread colors matter more than you’d think when you resize jeans. Use core-spun polyester-cotton thread in golden or tobacco tones to match factory topstitching, ensuring seam durability through wash cycles. Check colorfastness tests before sewing—cheap thread bleeds.
For waistband hardware, stick with brass buttons around 15–20 millimeters and 9.5-millimeter rivets that mirror your original finish, keeping jeans alteration techniques invisible.
Care Instructions After Alteration
Once your hardware’s in place, wait three to five wears before washing your resized jeans—that gives new seams time to settle and prevents puckering.
When you do wash, flip them inside out and use cold water with mild detergent to protect seam stability and color preservation.
Skip the dryer heat; air drying maintains fabric stretching properties and keeps your alterations looking sharp through every wear.
Frequently Asked Questions (FAQs)
How do you make jeans waist bigger without sewing?
Think of your waistband like a stubborn gate—you can coax it open with Warm Water Techniques, Heat Methods, or Fabric Softening.
Try Stretching Jeans with a waistband stretcher, or use Mechanical Devices for extra room, all without sewing.
How do I Make my Jeans more baggy?
If you want more bagginess, pick denim types with minimal stretch and loosen up your jeans by stretching the waistband and thighs.
Try fabric stretching with water or heat, or add panels for higher bagginess levels and custom jeans fit.
How to make jeans longer?
To make jeans longer, try Seam Letting by releasing the hem allowance, or use Hem Extensions with matching fabric for extra length.
Careful Fabric Selection and precise Length Adjustments keep Denim Alteration clean.
Garment Stretching helps, but Denim Fibers limit gains.
How do I Make my Jeans feel tighter?
To make your jeans feel tighter, try Waistband Adjustments with elastic insertion or use Heat Shrinking—wash in hot water and dry on high.
Tailoring Techniques like Denim Modification or adding waistband clips also improve Jeans Fit for comfortable jeans.
How to stretch jeans?
Stretching jeans is like coaxing a stubborn door open—you need the right leverage. Spray lukewarm water on tight spots, apply gentle heat with a hair dryer, then pull the damp fabric outward repeatedly until it relaxes.
How do you change the waist of a jeans?
You can adjust your jeans waist through seam adjustment, waistband modification, or fabric stretching. Let out side seams up to one inch, insert denim panels for waist expansion, or use a waistband stretcher for minor denim alteration.
How can I increase my jeans size?
You can increase your jeans size through seam modification, waist expansion with gussets, or denim stretching using water and heat. Fabric choice matters—denim fibers with elastane respond better. A waistband stretcher helps too.
Can you alter jeans to be bigger?
Yes, you can alter jeans to be bigger through gussets, waistband stretcher tools, and letting out seams.
Denim fabric’s weaving and fiber content determine size limitations, alteration costs, and fabric stretching potential for waist expansion.
Can you stretch out jeans?
You can stretch jeans using wet denim relaxation, mechanical stretching devices, or heat stretch methods. Cotton fiber responds well to waist expansion techniques.
Proper jeans care and fabric stretching preserve your fit gains through smart denim care tips.
How to loosen the waist of jeans?
When denim hugs a bit too close for comfort, you’ve got options. Try waistband adjustment with elastic inserts, fabric relaxation through denim stretching techniques, or strategic waist expansion methods to reclaim breathing room without sacrificing your favorite pair.
Conclusion
Tossing jeans because they don’t button is basically a fashion industry plot to keep you buying new denim every season. You’re smarter than that.
Now you know how to make jeans bigger using methods that actually work—whether you’re letting out seams, adding gussets, or stretching fabric with water and heat. Pick the technique that matches your skill level and the fit issue you’re facing. Your jeans aren’t done yet. You just gave them a second life.


