This site is supported by our readers. We may earn a commission, at no cost to you, if you purchase through links.

You need to measure your body and compare those numbers to the pattern company’s size chart. This eliminates the guesswork and guarantees your finished garment fits your body instead of someone else’s proportions.
Table Of Contents
Key Takeaways
- You need to measure your actual body and compare those numbers to each pattern company’s specific size chart instead of using ready-to-wear clothing sizes, because pattern sizing follows completely different standards than store-bought garments.
- Your high bust measurement determines the right size for tops while your hip measurement guides bottoms selection, and understanding the difference between these measurements reveals whether a pattern’s assumed cup size matches your body proportions.
- Finished garment measurements printed on the pattern tell you the actual dimensions of the completed piece, not your body size, so subtracting your body measurements from these numbers shows you exactly how much ease the design includes.
- Most bodies span multiple pattern sizes from shoulders to hips, so you’ll often need to blend between sizes by drawing smooth transition lines on the pattern and testing adjustments with a muslin before cutting your final fabric.
Key Measurements for Pattern Size Selection
Getting the right fit starts with taking the correct body measurements. Not all measurements matter equally—some are far more important than others depending on what you’re sewing.
Here’s what you need to know to pick a pattern size that’ll work for you.
High Bust Vs. Full Bust Measurements
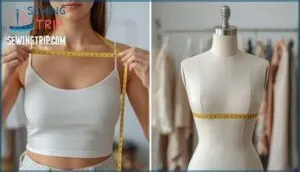
Here’s the thing—your high bust measurement and full bust measurement tell completely different stories about how a pattern will fit your body. High bust sits directly under your arms, while full bust includes your chest volume.
This difference matters because pattern sizes assume a specific cup size. Misses’ patterns expect about two inches between these measurements, designed for a B cup. Women’s patterns work with one inch difference, accounting for a C cup.
When your actual measurements don’t match these assumptions, fitting challenges emerge. You’ll face design ease impact issues—too much fabric in some areas, tightness in others. That’s why comparing your body measurements to the pattern’s size chart prevents costly mistakes.
Hip and Waist Measurements for Bottoms
When you’re shopping for pants or skirts, your hip and waist measurements become the real decision-makers—and they work differently than bust measurements do. Hip measurement determines your overall size, while waist measurement affects fit through darts and seams. These two work together to shape how a garment hangs on your body.
Consider these key points:
- Accurate hip measurement is taken at the fullest part of your hip
- Waist definition impact changes based on where seams sit on your body
- Rise measurement matters for how pants position at your natural waist
- Shape considerations mean curvier bodies may need different size blending
- Ease preferences influence whether you choose fitted or relaxed bottoms
When selecting pattern size for bottoms, compare your body measurements directly to the size chart. This prevents the frustration of garments that fit your hips but gap at the waist, or vice versa.
Taking Accurate Body Measurements
Getting your measurements right is where everything else clicks into place, so slow down and do this step properly. Use a measurement guide designed for sewing to understand consistent placement of your tape measure. Take body measurements over proper undergarments you normally wear. Keep your snug tape measure level and parallel to the floor.
You’ll need a partner’s assistance for accuracy—measuring yourself leads to twisted tape and skewed results. Regular re-measuring catches changes in your body, making sure you choose sewing pattern sizes that actually fit. Consistent placement matters more than perfect tightness.
Measuring Over Undergarments
Your undergarments matter more than you might think—they change your body’s shape and affect how a pattern will fit you.
When you take measurements, wear the same type of bra and underwear you’d normally choose for the finished garment. A supportive bra lifts your bust and shifts your silhouette, while a minimal one sits differently on your frame. Your everyday undergarments create the body shape you’ll actually be wearing the finished garment over, so measuring in them gives you accurate numbers that match reality.
Keep your tape measure snug but not tight as you work over the fabric of your undergarments. The tape should lie flat against the surface without sinking into skin or bunching up on the material. This consistency lets you measure the same way each time, which matters more than squeezing for the tightest possible reading. You’re not trying to find your smallest measurements—you’re finding your true working measurements.
When choosing consistent undergarments for measurement accuracy, remember these key points:
- Wear the same bra style you’ll use with your finished garment to avoid distortion
- Keep undergarment choice consistent between measurements to track changes accurately
- Let the tape rest flat over fabric without compressing skin or fabric bunching
- Prioritize consistent placement and technique over maximum tightness
This approach to measurement accuracy makes certain your body measurements align with how you’ll actually wear your clothes.
Comparing Pattern Size Charts
Pattern companies organize their size charts differently. You’ll find variations between Misses’, Women’s, and Plus sizes, as well as differences between U.S. and European sizing systems.
Each brand also has its own approach to how they size and grade their patterns.
Misses’, Women’s, and Plus Size Differences
Pattern categories serve different body types and proportions. Misses’ patterns fit women around 5’5" to 5’6" with a B cup (2-inch difference between high bust and full bust). Women’s patterns accommodate similar heights but with a C cup (1-inch difference) and larger overall measurements. Cup size matters because it shapes how bodices fit across your chest. Women’s sizing increases waist and hip incrementally more per size than Misses’. Your high bust measurement determines tops, while hip measurement guides bottoms. One should also consider that unisex sizing is available for patterns designed for an average build.
Here’s how they compare:
| Category | Bust Range | Waist-Hip Difference | Cup Type |
|---|---|---|---|
| Misses’ | 29–48" | ~8" bust-waist; 9–10" waist-hip | B Cup |
| Women’s | 38–60" | Larger increments per size | C Cup |
| Plus (12W–38W) | 38–60" | Greater variance by age | C+ Cup |
Choosing between categories depends on your body proportions and where you carry weight, not just dress size.
European Vs. U.S. Pattern Sizing
Across the Atlantic, pattern sizing works differently than you might expect. European patterns usually use metric measurements and follow the EN 13402 standard, while U.S. brands rely on imperial units and proprietary charts. A U.S. size 8 equals European size 38, though size charts show significant measurement differences.
American patterns include more ease—sometimes 2–4 inches extra—creating looser fits. European patterns run "true to measurement" with minimal built-in ease. This means a European size 38 and U.S. size 8 labeled identically can differ by up to 3 inches in bust and 4 inches in hip.
American patterns add 2–4 inches of ease for looser fits, while European patterns fit true to measurement, creating up to 3-inch bust and 4-inch hip differences between identically labeled sizes
Conversion challenges arise because brands don’t adhere to standardized sizing. When shopping internationally, you should keep in mind that US sizes differ from European sizes. Always check finished measurements on pattern tissue rather than relying solely on size numbers for accurate choosing pattern size across regions.
Using Brand-Specific Size Guides
Each pattern brand drafts garments using different fit models and measurement standards. McCall’s, Simplicity, and Butterick—though now under the same parent company—still maintain distinct size charts. Some brands add generous ease for comfort, while others draft closer to body measurements.
That’s why comparing your body measurements directly to each brand’s finished garment measurements matters more than trusting size numbers alone. A size 12 from one pattern brand won’t necessarily match a size 12 from another. Always pull the pattern envelope and check the specific size guide provided.
Your measurements might fall between sizes or align better with one brand’s fit model over another. This approach gives you control and prevents costly fabric mistakes.
Using Finished Garment Measurements
Your pattern envelope shows finished measurements for the garment, not your body measurements. These numbers tell you how much room the design includes for movement and style.
Learning to compare your measurements against these finished ones is the most reliable way to pick a size that’ll actually fit you well.
Locating Finished Measurements on Patterns
The pattern tissue itself holds the blueprint for your garment’s final dimensions, printed right alongside the cutting lines. You’ll find these finished garment measurements in three key places:
- The pattern envelope back panel lists measurements for each size
- Tissue markings show dimensions at critical points like bust and hip
- Digital patterns display measurement symbols in their assembly instructions
Check seam allowances too—they affect your final fit. These numbers guide you in choosing sewing pattern size and selecting the correct size before understanding garment ease.
Understanding Garment Ease
Ease is the breathing room between your body and the garment—and it’s what separates a fitted jacket from a tent. Functional ease lets you move without restriction. Design ease creates the silhouette you want. Negative ease pulls fabric close to your body for stretch fabrics.
Your style preferences and fabric choice determine how much ease you need when understanding garment ease in sewing pattern design ease.
Comparing Body and Finished Measurements
Think of it this way: your body measurements tell you where you’re, but the pattern’s finished measurements show you where the garment will actually land. Subtract your body measurements from the finished garment measurements to find the fit ease. This measurement guide helps you catch discrepancies early and plan alterations before cutting fabric.
Style considerations and personal preferences drive your choices when selecting the correct size and choosing sewing pattern size.
Tips for Choosing Between Sizes
You’ll often find your measurements fall between two pattern sizes. The right choice depends on how you want the garment to fit and where you’re willing to make adjustments.
Let’s look at practical ways to address those in-between measurements.
Deciding When Between Two Sizes
When your measurements land squarely between two sizes, you’ll need to decide which direction gives you the best starting point for the garment you’re making. Prioritize fit areas that are harder to alter when selecting the correct size. For fitted bodices, size up from your high bust measurement rather than down.
Blending sizes works well when choosing sewing pattern size for tops with relaxed fitting. Consider making fitting muslins to test alteration difficulty before cutting your fabric. The style impact and pattern design guide whether you size up or down between two sizes.
Considering Ease and Fit Preferences
Your fit preference matters just as much as your measurements when deciding which pattern size will work best for your project. Consider these factors when evaluating ease:
- Personal Ease affects how the garment feels against your body
- Design Ease is built into the pattern for the intended silhouette
- Fit Style preferences vary from close-fitting to relaxed
- Comfort Preferences influence your desired silhouette and clothing fit
Pattern fitting requires balancing measurements with how you want the finished garment to drape and move.
Blending Multiple Sizes for Custom Fit
Most bodies don’t fit just one size from shoulder to hip, so you’ll often need to grade between sizes to match your natural proportions. Start by taking body measurements at key points where you’ll shift between pattern sizes. Draw smooth lines between sizes on your pattern pieces to blend gradually. Test your adjustments with a muslin fitting before cutting your fashion fabric.
| Blending Techniques | Shift Points | Common Issues |
|---|---|---|
| Combining sizes smoothly | Bust to waist | Awkward seam angles |
| Drawing gradual curves | Waist to hip | Distorted grain lines |
| Maintaining grain lines | Shoulder to bust | Poor drape |
Adjusting Patterns for Better Fit
Even a perfectly selected pattern size rarely fits straight from the envelope without some tailoring to your body’s unique proportions. Length adjustments often come first—you’ll mark and alter patterns at designated lines before cutting fabric. Bust alterations address the difference between your high bust and full bust measurements, ensuring a proper fit across the chest.
For clothing that flatters, consider blending sizes by moving smoothly between different measurements at the waist and hip. Muslin fitting lets you test these changes before committing to fashion fabric. Ease adjustment means removing or adding room based on how you want the garment to drape.
Taking accurate body measurements guides every alteration you make. Start with common pattern alterations for length, bust, and hips—these three changes solve most fit issues. Adjusting patterns for fit transforms choosing the right pattern size from guesswork into precision.
Frequently Asked Questions (FAQs)
How do pattern styles affect size selection?
Fitted designs with minimal ease demand precise sizing. Loose styles with generous ease forgive measurement variations.
Pattern selection depends on design complexity and your personal preference for clothing size and fit.
Choose your size based on fabric considerations and expected alteration needs.
When should I make a muslin mockup?
Complex designs with fitting challenges benefit most from a muslin mockup before cutting your fabric.
First time working with a pattern or unfamiliar silhouette? Making a toile helps you test the pattern fitting process and avoid costly mistakes in your final material.
Can I adjust patterns after choosing my size?
Patterns aren’t set in stone. You can make alteration techniques like shortening or lengthening pieces, blending sizes across different body areas, and adjusting ease for better drape.
Muslin mockups help identify fit issues before cutting your final fabric.
What if my measurements span multiple sizes?
Blending sizes works well when your measurements don’t match one size on the chart. Prioritize fit in the most important areas first. Choose your pattern size based on bust for tops and hip for bottoms.
Then grade smoothly between sizes along seamlines. Make a muslin fitting sample to test your adjustments before cutting your fashion fabric.
How often should I retake my measurements?
Your body shifts like seasons change. Retake your measurements every three to six months to catch body changes and measurement drift from fitness impact or seasonal variation.
Consistent accuracy in your body measurement guide guarantees your measuring body for sewing efforts match current body measurement charts, keeping your size selections precise.
Conclusion
You’ve spent hours wrestling with patterns that promised perfect fit but delivered disappointment instead. That cycle ends when you apply these tips for choosing the right pattern size with precision.
Measure your body accurately. Compare those measurements to the pattern company’s chart. Check finished garment measurements and adjust for your preferred ease.
These steps transform pattern selection from guesswork into a predictable process that delivers garments shaped for your proportions every single time.
- https://curvysewingcollective.com/a-guide-to-pattern-cup-sizes-and-a-handy-reference/
- https://worldofsewing.com/simplicity-and-new-look-pattern-size-charts/
- https://blog.cashmerette.com/2016/03/plus-size-sewing-pattern-sizes.html
- https://en.wikipedia.org/wiki/Vanity_sizing
- https://www.reddit.com/r/SewingForBeginners/comments/1n9kdje/can_someone_please_help_me_understand_womens_vs/

