This site is supported by our readers. We may earn a commission, at no cost to you, if you purchase through links.
You’ve threaded your machine perfectly, chosen the right needle, and loaded quality fabric—but your stitches look terrible. Loops on the bottom, puckering across the seam, or thread that snaps mid-project. Nine times out of ten, tension is the culprit. Most sewers fiddle with that numbered dial randomly, hoping something clicks.
But tension isn’t guesswork—it’s a precise balance between your top thread and bobbin working together to lock stitches right at the fabric surface. Once you understand how tension discs, thread weight, and fabric thickness interact, you’ll stop fighting your machine and start producing clean, professional seams every time.
Getting tension right means knowing what to adjust, when to adjust it, and how each variable in your setup affects that delicate thread dance happening sixteen times per second under your presser foot.
Table Of Contents
Key Takeaways
- Tension works by balancing the pulling force between your top thread and bobbin thread so they lock exactly at the fabric surface—when this handshake is right, you get clean stitches on both sides without loops, puckering, or thread breakage.
- Different fabrics demand different tension settings: lightweight materials like chiffon need lower tension (2-4 range) to prevent puckering, heavy fabrics like denim require higher settings (3.5-4.5), and stretchy knits work best with looser tension (2-3) paired with ballpoint needles.
- Thread weight, needle condition, and bobbin setup directly impact tension balance—mismatched thread weights cause breakage, dull needles create skipped stitches, and improper bobbin winding throws off the entire system.
- Regular maintenance prevents most tension problems: clean your tension discs every 8-10 hours of sewing, test on scrap fabric after every thread or fabric change, and replace needles every 6-8 hours to maintain consistent stitch quality.
What is Sewing Machine Tension?
Think of sewing machine tension as the invisible handshake between your top thread and bobbin thread. When it’s working right, your stitches look clean and professional on both sides of the fabric.
If your stitches are pulling too tight or looping underneath, you’ll want to check out how to adjust thread tension control before starting your next project.
Sewing machine tension is the invisible handshake between your threads that creates clean, professional stitches
Let’s break down how this system works, what each part does, and why getting it balanced makes all the difference in your sewing.
How Thread Tension Works
Thread tension is the balance of pulling force between your needle thread and bobbin thread during stitch formation. As fabric moves under the needle, thread flows through guides and tension discs that squeeze it with controlled resistance.
This creates tension dynamics that lock both threads at the fabric surface, forming secure, even stitches through precise needle movement and fabric interaction.
Achieving ideal results requires understanding the importance of throughout the embroidery process.
Top Vs. Bobbin Tension
Your sewing machine tension relies on two separate systems working together: top thread and bobbin thread. Each plays a distinct role in stitch formation.
Here’s how they differ:
- Top thread flows through tension discs and the needle, creating fabric resistance as it pulls downward
- Bobbin thread feeds from below with its own tension adjustment in the case
- Thread interplay occurs where both threads lock together within the fabric layers
- Needle dynamics and tension adjustment determine which thread shows on each side
Balancing both creates proper tension balance.
For detailed advice on securing smooth stitches, review these bobbin tension fundamentals.
Why Balanced Tension Matters
When top and bobbin threads lock at the right point, you get clean, flat seams. If tension’s off, your fabric suffers visible problems that weaken every stitch.
Proper tension control protects your projects.
| Imbalanced Tension | Result |
|---|---|
| Top thread too tight | Puckering, fabric distortion |
| Bobbin thread too loose | Loops on underside, poor stitch quality |
| Mismatched thread weights | Thread breakage, skipped stitches |
| No tension adjustment | Lost sewing precision, unreliable seams |
Setting The Right Tension for Fabrics
Getting the tension right isn’t just about twisting a dial—it’s about matching your machine to the fabric you’re working with. Different materials pull, stretch, and behave in their own ways, so your tension setting needs to adapt.
Start by checking your industrial sewing thread types to ensure they’re compatible with both your fabric weight and machine capabilities.
Let’s break down how to set your machine for lightweight, heavy, and stretchy fabrics, plus how to use a tension chart as your quick reference guide.
Tension Settings for Lightweight Fabrics
When you’re working with delicate materials like chiffon or voile, you’ll want to dial your tension down to the 2 to 4 range on most home machines. Lightweight fabrics need gentler thread tension because tighter settings cause puckering along seams.
Pair this lower tension with a fine 60/8 or 70/10 needle and shorter stitch length—around 1.8 to 2.0 millimeters—to prevent those telltale holes and keep your seams smooth.
Tension for Thick and Heavy Fabrics
Denim, canvas, and upholstery fabrics demand higher tension settings—usually 3.5 to 4.5—to pull thread through dense weave sewing without loose top stitches.
Pair that fabric thickness with heavy duty threads and a 90/14 or 100/16 sharp needle for bulk seam management.
Test on scrap layers first, adjusting high tension techniques until stitches lie flat without puckering or skipping.
Adjusting Tension for Stretchy Materials
Jersey, Lycra, and other stretchy fabrics need looser tension settings—usually 2 to 3—to prevent collapsed seams and dog-eared edges. Pair those tension adjustments with a ballpoint or stretch needle and polyester thread for thread compatibility that flexes under load.
Add lightweight fusible stabilizers along seam lines for fabric stability, then test on scrap layers before calibrating tension and stitch width for your final sewing machine maintenance routine.
Using a Tension Chart
A tension chart maps how thread interaction affects balanced stitches across fabric weights, showing ideal sewing machine tension ranges for each material. Start with your manufacturer’s baseline, run test stitches on scrap fabric, then record settings that produce clean interlocks.
Fine-tune tension adjustment one notch at a time—small increments prevent overcorrection and simplify tension troubleshooting when thread tension feels off.
Key Factors Affecting Tension Balance
Getting your tension right isn’t just about twisting a dial and hoping for the best. Several behind-the-scenes factors work together to make or break your stitch quality, and understanding them puts you in control.
Let’s break down the four key players that affect your tension balance.
Thread Weight and Type
Think of thread weight like wire gauge—the number tells you how fine or thick your thread runs. A 30wt thread is heavier and bolder, while 60wt blends invisibly into seams.
Thread materials matter too: cotton, polyester, and fiber blends each pull differently through tension discs. Yarn construction and thread finishes affect drag, so thread selection and management directly impact thread quality and stitch balance.
Fabric Type and Batting
Your fabric selection sets the baseline for tension adjustment. Lightweight cottons need less resistance than canvas or upholstery weight materials.
When you add batting materials—polyester holds its loft and eases thread movement, while cotton batting grabs more—you’re changing fabric tension dramatically.
Quilting tips always stress testing fabric and batting considerations together, because their interaction with thread weights determines whether you’ll get balanced stitches or frustrating puckers.
Needle Choice and Condition
A dull or bent needle derails sewing machine tension faster than you can blink. Needle size directly affects thread tension—60 suits delicate fabrics, while 110 manages heavyweights. Matching needle material and eye size matters for thread compatibility.
Replace your needle every 6-8 hours of stitching, because even slight burrs cause skipped stitches and puckering. Proper needle storage prevents rust, keeping your tension adjustments reliable.
Bobbin Thread Considerations
Your bobbin thread weight shapes stitch balance more than most sewers realize. Polyester bobbin thread resists shrinking, while cotton pairs beautifully with natural fabrics.
Proper winding techniques prevent loose loops that throw off bobbin tension settings. Check your bobbin case regularly for lint buildup—it affects thread tension troubleshooting.
Match bobbin material selection to your top thread fiber types, and test bobbin tension adjustment on scrap fabric before starting any project.
How to Test and Adjust Tension
Getting your tension right isn’t guesswork—it’s a skill you can learn with a simple test. Once you know what balanced stitches look like, you’ll be able to spot problems instantly and fix them on the fly.
Here’s how to test your tension, read the results, and decide whether to adjust manually or trust your machine’s automatic settings.
Performing a Tension Test Stitch
Run a tension test on scrap fabric before tackling your real project. Set your stitch length to 2.5 mm, thread your machine with the same threads you’ll use, and dial tension to midrange. Sew a straight line, then inspect both sides for loops or puckering.
- Stop after 5–10 stitches to check thread interlock
- Adjust tension settings in small 1–2 step increments
- Record your observations for future fabric prep
Identifying Perfectly Balanced Stitches
Once you’ve sewn your test line, pull both threads gently to spot perfect stitch balance. Balanced stitches lock between fabric layers—no loops showing on top or bottom, no puckering at seams. Check the table below to match what you see with tension control adjustments you need.
| What You See | Thread Balance Clue | Fabric Interaction |
|---|---|---|
| Flat seam, even thread on both sides | Perfect tension control | Stitch quality is spot-on |
| Loops on fabric surface | Top thread too loose | Lower top tension setting |
| Loops on underside | Bobbin thread dominates | Raise top tension slightly |
| Puckering or rippling | Tension too tight overall | Drop tension, test again |
That’s your sewing technique standard for every new material.
Manual Vs. Automatic Tension Adjustments
Now you face a choice: twist the dial yourself or let your machine handle tension control. Manual override gives you sewing precision for silk, leather, and other tricky fabrics where thread management needs a human touch.
Automatic modes adjust on the fly, maintaining thread tension across mixed layers without constant fiddling. When automatic tension troubleshooting tips fail on thick materials, switch to manual sewing machine tension adjustment for final balance.
Troubleshooting Common Tension Issues
Even with the right settings, tension problems can still pop up, and they’re frustrating when you can’t figure out why your stitches look off.
The good news is that most issues follow predictable patterns, which means you can troubleshoot them systematically.
Here’s how to diagnose and fix the most common tension headaches you’ll run into.
Diagnosing Loose or Tight Stitches
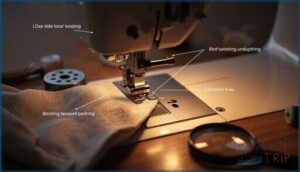
When your sewing machine tension’s off, you’ll know it—fast. Look at both sides of your fabric during stitch analysis. Loose stitches pull out easily and show loops underneath. Tight stitches create puckering and raised ridges on top.
Thread monitoring means checking if threads interlock evenly between layers. Run sewing tests on scrap fabric, inspect closely, then make tension adjustments based on what you see.
Fixing Thread Loops and Puckering
Thread loop prevention starts with re-threading your machine, presser foot raised, so thread seats properly in the tension discs.
Puckering fixes require lowering your tension and confirming needle size matches fabric weight.
Tension balancing means testing adjustments on scrap—if loops persist underneath, tighten your top thread slightly.
Loop reduction techniques include cleaning lint from your bobbin case, then running another stitch balance and quality check.
Resolving Skipped or Uneven Stitches
Skipped stitches reveal a mismatch between your needle sharpness and fabric stretch—ballpoint needles prevent snags in knits, while sharp ones handle wovens.
Check thread breakage by matching thread weight to needle size, then adjust stitch length for consistent fabric feed.
Recalibrate sewing machine tension using scrap tests, confirming stitch balance and quality before committing to your project.
Replace dull needles every eight hours.
When to Seek Professional Help
When repeated adjustments fail to correct stubborn tension issues, professional guidance becomes essential. A certified technician identifies internal problems like worn tension discs, timing errors, or bobbin case damage that home troubleshooting can’t resolve.
Schedule sewing machine repair and maintenance annually—trained specialists restore precision through calibration, cleaning, and part replacement, ensuring your machine delivers balanced stitches for years.
Advanced Tension Tips and Maintenance
Once you’ve got the basics down, there are a few pro-level tricks that’ll save you hours of frustration. Specialty threads need different handling, and your machine’s tension discs won’t stay clean on their own.
Here’s what you need to know to keep everything running smoothly for the long haul.
Adjusting for Decorative and Specialty Threads
Decorative threads put you in a whole new tension ballgame. Metallic thread, variegated fibers, silk settings, glow threads, and reflective yarns each demand their own thread tension adjustments to achieve perfect thread tension.
Lower your sewing machine tension for metallics to prevent breakage, use a larger needle for glitter options, and test every specialty thread on scrap fabric.
This thread and bobbin management approach ends the thread tug of war before it starts.
Cleaning and Maintaining Tension Discs
Lint, thread dust, and fiber buildup on your tension discs throw off your sewing machine tension faster than any dial adjustment. Regular disc cleaning tools—a soft nylon brush, lint-free swabs with isopropyl alcohol, and compressed air—keep those discs gripping thread evenly.
Your cleaning schedule should include:
- Brush discs after every 8-10 hours of sewing
- Use compressed air at an angle for stubborn debris removal methods
- Inspect for grooves that signal worn tension disc materials
- Wipe surrounding areas to prevent fiber reintroduction
Clean discs mean consistent thread tension and fewer frustrating adjustments.
Preventing Tension Problems With Regular Care
Beyond disc cleaning, your full regular maintenance routine keeps sewing machine tension stable for months. Wipe thread path cleaning areas weekly, check bobbin coordination after each swap, and verify calibration checks quarterly using a tension gauge.
Record maintenance dates to track tension disc care intervals—achieving perfect thread tension depends on consistent thread tension adjustment and control through proper sewing machine maintenance and repair habits.
Frequently Asked Questions (FAQs)
How do I know what my tension should be on my sewing machine?
Perfect tension appears when both threads lock exactly at the fabric’s center—no thread visibility on either side.
Start at your machine’s mid-range setting, test on scrap fabric, then adjust based on stitch quality and fabric thickness.
Which tension for which fabric?
Lightweight fabrics like chiffon need lower tension around 0–5, medium cottons work at 0–0, and heavy denim requires 0– Stretchy knits prefer 5– Always test on scrap fabric first.
What are common tension mistakes?
Like a blindfolded tightrope walker, you’re destined to stumble when you ignore tension basics.
Most sewers skip tension tests after switching fabrics or threads, causing thread breakage, stitch distortion, and fabric puckering from tension imbalance.
What should my sewing machine tension be set at?
Most sewing machines run best at a tension setting of 3 to 4 for medium-weight fabrics, but you’ll need to adjust based on your fabric type, thread weight, and stitch quality requirements.
How to know what tension to use?
Getting thread tension sew right starts with fabric analysis and a tension chart.
Test on scrap, check stitch quality, then dial in your sewing machine settings for achieving perfect thread tension and impeccable thread balance.
What stitch length and tension should I use?
Your fabric dictates both. Start with default settings—mid-range tension and 5mm stitch length—then fine-tune.
Check your tension chart for project specifics. Test on scrap to confirm stitch quality and perfect thread tension before sewing.
What is perfect stitch tension?
Perfect stitch tension happens when your top and bottom threads interlock precisely in the middle of the fabric layers, creating smooth, even stitches with no puckering, loops, or visible knots on either side.
How does tension affect stitch length?
When your thread tension is too tight, it pulls fabric together, shortening stitch length. Looser tension lets stitches spread longer. Balanced thread tension keeps stitch length consistent and quality high across all sewing machine settings.
What is the ideal tension for a straight stitch?
For most medium-weight fabrics, set your tension dial around 4 to Balanced upper thread and bobbin thread meet inside the fabric layers, producing flat, even stitches without puckering or loops.
How does the type of fabric affect thread tension?
What happens when denim meets delicate silk? Fabric density and surface texture dramatically shift thread friction, demanding tighter tension for heavy weaves and gentler settings for lightweight, slippery materials to maintain balanced stitches.
Conclusion
Tension is the invisible handshake between your top thread and bobbin—get it right, and every stitch locks perfectly. This essential sewing machine tension guide gives you the tools to diagnose problems fast, adjust with confidence, and maintain balance across any fabric or thread combination.
Stop second-guessing that dial. Test methodically, adjust deliberately, and clean your machine regularly. Master tension once, and you’ll never waste another afternoon ripping out crooked seams or fighting mysterious loops again.

