This site is supported by our readers. We may earn a commission, at no cost to you, if you purchase through links.
To fix this, start by identifying the root issue—often it’s a mismatch in chest fit or shoulder width.
Adjust the pattern by overlapping or pivoting neckline edges slightly at the center or shoulders.
If the fabric allows, redistribute fullness into darts or side seams.
For a quicker fix, consider adding small darts, tacks, or even adjusting the neckband length.
Always transfer changes to facings for a smooth finish.
With a little pattern alteration savvy, you’ll have that neckline behaving itself in no time.
Curious what’s next, and ready to tackle the next step with complete concepts in mind?
Table Of Contents
Key Takeaways
- Focus on identifying the cause of gaping, such as hollow chest shape or narrow shoulders, before making adjustments.
- Use techniques like pivoting pattern edges, adding darts, or shortening the neckband to fix the issue effectively.
- Always test adjustments with muslin to fine-tune fit and ensure seamless neckline drape.
- Transfer alterations to facings and ensure smooth edges for a polished, professional finish.
Identifying Neckline Issues
You’ll spot a gaping neckline when your garment stands away from your chest instead of lying flat against your skin, often caused by hollow chest shape, narrow shoulders, or incorrect pattern size.
A gaping neckline: when fabric becomes a runaway mystery, standing away instead of hugging your chest with polished perfection.
Before making any alterations to fix this common sewing frustration, you’ll need to pinpoint exactly why your neckline isn’t behaving—just like a detective solving the mystery of the runaway fabric.
Common Pattern Fitting Problems
Fitting challenges can quickly turn a dream project into frustration, especially with a gaping neckline.
Many issues stem from simple mistakes.
Avoid these pitfalls:
- Misjudging your bust cup size or overall size selection.
- Skipping accurate measurement checks.
- Choosing patterns that don’t drape smoothly over the bodice.
- Overlooking tiny neckline gaping fixes during sewing.
- Ignoring essential adjustments for neckline alteration.
The key to avoiding these issues is to be meticulous in the planning and execution phases, ensuring that each step is carefully considered to prevent simple mistakes.
Hollow Chest or Narrow Shoulders
Neckline alterations begin by evaluating your shoulder slope, posture influence, and upper body shape.
A hollow chest or narrow shoulders often leads to gaping necklines.
Use muslin fitting to identify excess fabric.
Adjust patterns by removing small wedges near the neckline or shoulder seam to maintain garment drape while ensuring smooth shifts for a polished finish.
Fabric and Interfacing Considerations
Choosing the right fabric and interfacing can work wonders for neckline stability.
Heavy interfacing or stiff fusings can create rigidity, while mismatched fabric and lining weights often lead to gaps.
Focus on:
- Soft, lightweight fusings for delicate or woven fabrics.
- Fabrics with gentle drape, like rayon, to minimize neckline sagging.
- Woven linings that support the main fabric without overpowering it, ensuring a balanced and stable finish.
Strap Placement and Width
Shoulder width and strap placement aren’t just details—they’re power players in tackling a gaping neckline.
Straps are the silent heroes, anchoring your neckline for a flawless, gap-free fit with impeccable balance and style.
Wide-set straps often slip, leaving your neckline unsupported. Adjusting the strap angle inward can fix falling straps while boosting neckline support.
Think of straps as anchors; they function to balance fit. This neckline fix guarantees sewing neckline alterations create a flawless finish.
Many designs feature different types of necklines to flatter various body shapes, ensuring a gap-free finish.
Adjusting Pattern Pieces
To fix a gaping neckline, you’ll need to adjust your pattern pieces with precision.
By pivoting sections and redrawing lines, you can create a smooth, well-fitted shape that hugs your body perfectly.
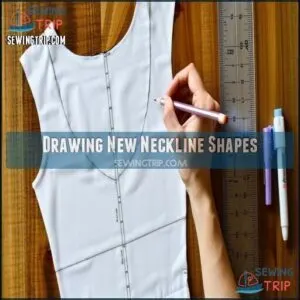
Drawing New Neckline Shapes
When tackling neckline shaping, precision matters.
Start by blending a smooth curve at the neckline edge—use a ruler for accurate pattern symmetry.
Never skip adding seam allowances to shoulder seams during neckline fitting.
For facing adjustments, trace the new neckline shape while extending 2 inches downward.
These simple pattern alteration steps guarantee your sewing neckline looks polished and professional.
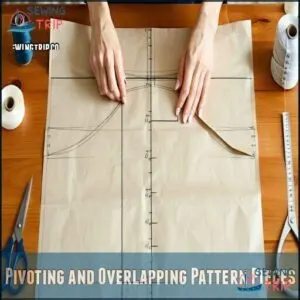
Pivoting and Overlapping Pattern Pieces
Start by identifying the pivot point—usually near the dart’s center—to tweak the neckline shaping.
Cut along the marked line, pivot the piece, and overlap the calculated amount. This overlap reduces gaping while increasing the dart.
For seamless blending, smooth out any jogs along edges. This precise pattern adjustment guarantees neckline fitting without distorting your pattern modification efforts!
Accurate body measurements are vital, so consider measuring every six months for the best fit.
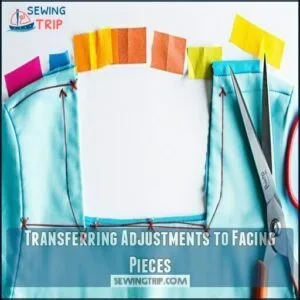
Transferring Adjustments to Facing Pieces
Once you’ve adjusted the main bodice, don’t forget the facing! Match the facing pattern by recreating the identical area alteration.
Use tape to secure the overlapping sections and extend the cutting lines. Smooth any jogs for a clean neckline shaping.
You may want to think about products for adjustments to make the process easier.
Precise facing alteration guarantees flawless neckline adjustments, keeping everything aligned and ready for your sewing neckline modifications masterpiece!
Blending and Smoothing Neckline Edges
Blending and smoothing neckline edges is where your pattern truly starts to shine. For curve accuracy, make certain every adjustment flows naturally into the original line.
Clean up uneven seams by focusing on notch placement and precise seam allowance. Don’t forget facing alignment; it keeps your neckline adjustment tidy.
Feeling fancy? Integrate the collar for a polished finish!
- Match notches for precise facing alignment.
- Use a curved ruler to guide neckline smoothing.
- Trim excess seam allowance for cleaner edges.
- Test collar integration for seamless pattern alteration.
Practical Alteration Techniques
You don’t need to start over when a neckline refuses to sit flat.
Simple fixes like pressing, shifting fabric into darts, or adding quick tucks can save your garment and your sanity.
Steam Pressing and Shortening Neckbands
To fix a gaping neckline, first, try steam pressing the neckband. This technique helps flatten the fabric and improves neckline shaping.
Shorten the neckband by 1-2.5cm to reduce tension and guarantee a snug fit. Band reduction prevents unwanted gaps.
One common issue is unrealistic alteration expectations due to fabric limitations. Use a tailor’s ham for curves and press carefully—small details transform sewing neckline adjustments into flawless results!
Moving Fullness Into Darts or Side Bust
Shifting fullness into darts or the side seam is a clever way to tackle a gaping neckline.
By manipulating the pattern, you can redistribute volume to better match your bust contour. Adjust dart placement to direct bust fullness precisely where needed.
Using specialized tools can help with accuracy. This pattern adjustment guarantees a smoother fit—saving your sewing project and your confidence in one go, which is a highly effective solution.
Adding Emergency Darts or Tacks
Got a gaping neckline? Pinch the extra fabric, baste it into a quick dart, and voilà—instant rescue!
This temporary fix is a lifesaver when sewing neckline fixes on the fly.
Whether you’re tackling fabric pinching or adding a dart as a design feature, these quick adjustments blend function and style.
Basting benefits? Total control over your sewing pattern adjustment!
Fabric and Interfacing Solutions
You can improve your neckline fit by using lighter lining fabrics and selecting interfacing that complements your main fabric’s weight.
Avoid stiff or heavy materials, as they can make the garment rigid and amplify gaping issues.
Choosing Lighter Lining Fabrics
When tackling that pesky gaping neckline, lighter lining fabrics are a game-changer. They enhance drape improvement and make adjustments feel seamless.
Here’s how to select the right one:
- Choose breathable fabrics for comfort factors and seasonal suitability.
- Opt for neutral colors to balance cost effectiveness and color matching.
- Pick soft, lightweight linings to simplify sewing neckline solutions.
Selecting Appropriate Interfacing Weight
When tackling a gaping neckline, don’t underestimate interfacing weight.
It’s like seasoning a dish—too heavy, and it overpowers; too light, and it lacks support.
For your sewing patterns, pick interfacing that matches your fabric.
Lightweight options maintain proper drape and neckline structure, ensuring stability and fabric compatibility.
Understanding GSM and OZ units helps in selecting the right interfacing.
Remember, weight impact is everything in perfecting your pattern alteration game!
Avoiding Stiff or Heavy Interfacing
Avoid heavy interfacing—it’s like wearing cardboard on your neckline.
Instead, choose soft interfacing that complements your fabric’s weight and drape. Mismatched interfacing can ruin neckline stability, causing that dreaded gaping.
Test lightweight options on scraps to verify fabric compatibility.
Remember, seamless sewing neckline techniques hinge on balance—too stiff, and it’s a no-go for sleek sewing pattern adjustments, which requires a seamless approach.
Considering Fabric Body and Drape
Fabric weight and drape influence how your neckline behaves.
Stiffer fabrics can exaggerate gaps, while lighter ones aid neckline stability.
Pair heavy fabrics with lining choices that balance their weight.
Interfacing compatibility is key—too stiff, and it’s trouble.
For better sewing neckline fitting, test fabric fitting with a mock-up to avoid garment fitting mishaps later.
Refining and Finalizing Adjustments
You’re almost there, but it’s time to verify every detail is perfect.
Refining the fit means smoothing lines, rechecking patterns, and making sure your neckline adjusts seamlessly with the rest of the garment.
Tracing Patterns for Revision Possibilities
Preserving your pattern is like keeping a backup of your best work. Before cutting or drafting design changes, trace patterns onto paper.
It’s handy for adjustment iterations and future alterations. Here’s how:
- Use tracing paper or drafting film.
- Mark sewing pattern adjustments clearly.
Knowing where to buy a tracing paper pattern can streamline the alteration process.
- Label neckline sections for clarity.
- Test sewing techniques on muslin to ensure a smooth process and achieve the desired outcome with precision.
Ensuring Smooth Shoulder Slope and Armhole
When refining your sewing neckline fitting, focus on shoulder contouring and slope blending.
A smooth shoulder slope guarantees seamless integration with the armhole, avoiding awkward gaps.
Adjust both front and back neckline patterns to align perfectly.
Drape correction matters—watch how fabric lies naturally.
Pin pieces first to test flow—think of it as a fabric rehearsal before stitching, considering the natural flow and seamless integration.
Addressing Full Bust Adjustments and Cup Sizes
Achieving a perfect fit with your neckline often hinges on a well-executed full bust adjustment (FBA), especially when your cup size doesn’t align with the pattern.
Use these tips:
- Test FBA techniques on muslin first.
- Adjust bust point for better pattern grading.
- Prioritize cup size accuracy.
- Verify smooth sewing neckline adjustments.
- Balance fullness without distorting the shoulders.
To ensure a good fit, it is crucial to follow these guidelines carefully and make adjustments as necessary to achieve a perfect fit.
Finalizing Neckline Adjustments for Optimal Fit
Once you’ve tackled bust adjustments, shift your focus to blending adjustments for a polished look.
Use a toile refinement to evaluate fit, ensuring the neckline sits smoothly.
Apply sewing neckline tips like reshaping curves for design integrity and closing any neckline gap.
Final stitching solidifies these sewing neckline adjustments and modifications, giving your clothing alterations precision and eliminating that dreaded neckline gape forever.
Frequently Asked Questions (FAQs)
How to adjust a neckline without altering darts?
Fix frustrating fit flaws fast!
To adjust a neckline without touching darts, shorten the neckband slightly, shift strap placement inward, or add a shaped bias strip.
These tweaks redefine neckline drape without dart disruption, and help to fix frustrating fit flaws quickly.
Can gaping neckline issues occur in knit fabrics?
Yes, gaping necklines can happen in knit fabrics too.
It’s often due to improper stretch recovery, neckline stretching during sewing, or a pattern not designed for the fabric’s stretch properties.
Test adjustments on scraps first.
What tools simplify neckline fitting adjustments?
Did you know 70% of sewing enthusiasts struggle with neckline gaping?
Tools like French curves, muslin fabric for testing, and seam rippers empower your adjustments, making frustrating gaping a manageable and even rewarding task.
Are neckline adjustments different for sleeveless garments?
For sleeveless garments, neckline adjustments often involve accounting for the lack of sleeves, which changes the garment’s drape and pull.
You’ll refine armhole curves and balance straps to guarantee the neckline fits smoothly.
How does neckline shape affect gaping issues?
Curvy cuts create complications—neckline shapes like deep V-necks or wide scoops often amplify gaping issues by exposing less structured fabric.
Opt for snug fits and balanced curves to keep your neckline lying flat and fabulous.
Conclusion
Fixing a gaping neckline can feel like taming a mischievous fabric—it’s sneaky, but you’re smarter.
By mastering pattern alteration for a gaping neckline, you’ll guarantee a flawless fit every time.
Whether it’s pivoting neckline edges, adding strategic darts, or tweaking the neckband, the right techniques make all the difference.
Remember to transfer adjustments to facings for a seamless finish.
With these tricks, your sewing projects won’t just fit—they’ll transform into timeless, custom-fit masterpieces you’ll love to wear!

