This site is supported by our readers. We may earn a commission, at no cost to you, if you purchase through links.

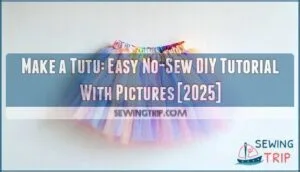
Cut tulle into strips twice your desired length, then tie each piece onto the elastic using simple loops. It’s like making friendship bracelets, but fluffier and way more dramatic.
The magic happens as you tie each strip, watching plain fabric transform into something that screams "I’m ready for my close-up!" Whether you’re crafting for a tiny dancer or channeling your inner child, this no-sew method delivers professional-looking results.
The secret lies in choosing the right tulle weight and mastering the perfect tie technique.
Table Of Contents
- Key Takeaways
- Supplies I Used
- What Kind of Tulle Should I Use?
- How Much Tulle Do I Need to Make a Tutu?
- Step 1: Measure and Create Your Tutu Waistband
- Step 2: Cut Pieces of Tulle
- Step 3: Loop and Tie Each Tulle Piece to Make The Tutu
- Step 4: Finish Tying All of The Tulle Pieces!
- How to Make a Tutu With Absolutely No Sewing
- Recommended Cutting Sizes to Make Tutu Skirt
- TIPS AND TRICKS, AND MORE HELP TO MAKE YOUR TUTU
- Frequently Asked Questions (FAQs)
- Conclusion
Key Takeaways
- You can create a professional-looking tutu in just 30 minutes using only tulle fabric and elastic—no sewing machine required.
- Cut your tulle strips to double your desired finished length, then fold each strip in half and loop it through the elastic waistband using simple knotting techniques.
- You’ll need different amounts of tulle based on size: 5 yards for children, 10 yards for small-medium adults, and 20 yards for large adults.
- Choose 6-inch wide tulle rolls and maintain consistent spacing between strips as you tie them around the waistband for the best results.
Supplies I Used
Imagine this: you’re about to create magic with just a handful of supplies! Start with tulle fabric—the star of your no-sew tutu show. Grab elastic strips (¾" to 1" wide work perfectly) for your waistband foundation.
Scissors become your best friend for clean cuts, while measuring tools make certain everything fits just right. Don’t forget a needle if you choose to secure your elastic ends.
Want to jazz things up? Embellishments like flowers, bows, or sparkly buttons add personality. Some crafters prefer ribbon as a waistband alternative—it’s totally your call!
Gather everything before diving in. To achieve professional results, understanding basic sewing supplies is vital for any sewing project.
What Kind of Tulle Should I Use?
Selecting the perfect tulle fabric transforms your tutu from ordinary to extraordinary. Your fabric selection determines whether you’ll create a structured classical tutu or a soft, flowing design that dances with every movement.
Transform ordinary fabric into extraordinary tutus—your fabric choice determines whether you’ll create structured elegance or soft, dancing magic.
Different tulle types serve unique purposes in tutu making. Consider these essential netting options when choosing your sheer materials:
- Stiff nylon tulle – Creates structured, classical ballet tutus that hold their shape
- Medium-weight dressmaking tulle – Perfect for softer, flowing designs with gentle movement
- Glitter tulle – Adds sparkle and visual drama to any tutu project
- 6-inch tulle width rolls – Easiest to work with, saving cutting time
- Diamond net tulle – Professional-grade option for flat, precise tutu construction
Choosing the right tulle fabric options is essential for achieving the desired effect. Choose tulle length guide measurements based on your desired fullness and fluffiness.
How Much Tulle Do I Need to Make a Tutu?
Getting your tulle calculation right means the difference between a wimpy wisp and a show-stopping masterpiece. Tutu sizing depends on who’s wearing it and how full you want the final look.
Here’s your fabric requirements breakdown:
- Child’s tutu: 5 yards of tulle (or 2-3 spools)
- Small/medium adult: 10 yards of tulle (or 4-5 spools)
- Large/extra-large adult: 20 yards of tulle (or 7-8 spools)
- Safety buffer: Always grab extra material
Your measurement guide should factor in desired tutu length too. Longer skirts demand more yardage, while shorter styles need less. Different tulle types affect volume, so stiffer fabrics create more dramatic results. Smart tutu making starts with proper planning—measure twice, buy once! Understanding the tutu making process is vital for a successful project.
Step 1: Measure and Create Your Tutu Waistband
Now that you know your tulle quantity, let’s tackle the waistband—the foundation that’ll hold your masterpiece together. Start with your waist measurement using a flexible measuring tape. Wrap it snugly around where you want the tutu to sit, then subtract 4 inches for that perfect stretch-to-fit feel.
Your elastic choice matters for comfort and durability. Adults need 1" elastic cord, while babies work best with ¾" strips. Cut your elastic to the calculated length, then create a secure loop by overlapping ends about ½ inch. Stitch through multiple times—no skimping here since this junction handles all the tutu’s weight.
| Elastic Type | Use For | Width | Secure Method | Comfort Level |
|---|---|---|---|---|
| 1" Elastic Cord | Adult Tutus | 1" | Stitch Ends | High |
| ¾" Elastic Strip | Baby Tutus | ¾" | Sew or Tie | Medium |
| Elastic Headband | Child Tutus | N/A | Use as-is | High |
| Ribbon | Decorative Waistband | N/A | Tie or Pin | Medium |
| Crochet Headband Trim | Baby Tutus | N/A | Wrap and Sew/Tie | Medium |
Keep knots secure for lasting charm!
Step 2: Cut Pieces of Tulle
Precision matters in the context of tulle cutting—messy strips create a lopsided tutu that’ll have you crying into your craft supplies. Start by laying your tulle flat on a cutting mat, smoothing out wrinkles like you’re petting a stubborn cat.
Stack 3-4 layers for efficient cutting, but don’t go overboard or you’ll end up with wonky edges. Your strip measurement should be double your desired tutu length since each piece folds in half. For a 12-inch finished tutu, cut 24-inch strips.
Keep strips 6-7 inches wide for that perfect fluff factor. Fold techniques help here—fold your tulle lengthwise first, then cut perpendicular strips.
Sharp cutting tools like rotary cutters work better than dull scissors that’ll fray your tulle into oblivion. Proper tulle preparation now saves headaches later. Using the right tulle cutting tools is essential for a professional finish.
Step 3: Loop and Tie Each Tulle Piece to Make The Tutu
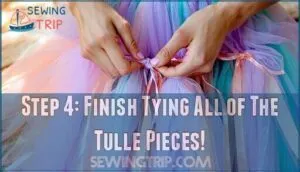
Now you’ll transform those cut tulle strips into your tutu’s magical layers. Start with Tulle Folding – grab one strip and fold it perfectly in half. This creates the loop you need for Elastic Attachment.
Slide the folded end underneath your elastic waistband. Here’s where Tying Techniques come into play: pull both loose ends through that folded loop you just created. Think of it like making a friendship bracelet, but fluffier!
Pull snug but don’t strangle the tulle – you want secure knots without crushing the fabric’s natural bounce. This loop method is your secret weapon for Tutu Layering that won’t fall apart during playtime.
Keep your spacing consistent as you work around the waistband. Each tying motion should feel rhythmic, like you’re creating a dance costume one knot at a time. Fabric Manipulation becomes second nature after your first few strips.
Step 4: Finish Tying All of The Tulle Pieces!
You’re nearly there! Continue tutu tying around the entire waistband, maintaining consistent spacing between each tulle strip. Check that your tutu knots are snug but not overly tight—they should hold firmly without damaging the tulle.
Focus on tutu finishing by ensuring even distribution around the elastic band.
Key steps for perfect tulle tying:
- Maintain consistent spacing between strips
- Secure each knot firmly around the tutu waistband
- Check for gaps and fill them with additional strips
- Fluff tulle layers for maximum volume
- Adjust any uneven areas for balanced fullness
How to Make a Tutu With Absolutely No Sewing
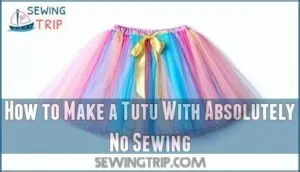
Creating a nosew tutu transforms ordinary tutu materials into magical fashion without threading a single needle. This DIY tutu method embraces nosew methods that’ll have you dancing in minutes, not hours.
No sew tips make tutu making accessible to everyone. You’ll loop tulle strips around elastic waistbands using simple knotting techniques. The beauty lies in experimenting with different tutu designs while following current fashion trends.
Here’s your tutu tutorial breakdown:
- Select soft tulle in vibrant colors or pastels
- Cut strips double your desired finished length
- Fold each strip in half and loop through elastic
- Pull strip ends through the folded loop tightly
- Adjust spacing evenly around the waistband
This DIY crafts approach lets you customize volume, colors, and embellishments without sewing skills.
Recommended Cutting Sizes to Make Tutu Skirt
Getting the right measurements makes all the difference between a tutu that’s too short or dragging on the ground.
You’ll cut your tulle strips to double the length you want your finished skirt, so an 18-inch tutu needs 36-inch strips.
Child’s Age – Recommended Length of Finished Tutu
Getting the right tutu length for your little one makes all the difference.
Here’s your sizing guide:
| Child’s Age | Waist Size | Recommended Tutu Length |
|---|---|---|
| 0-6 months | 13 inches | 6-8 inches |
| 6-12 months | 16 inches | 6-8 inches |
| 12-24 months | 18 inches | 8-10 inches |
| 2-4 years | 17-19 inches | 10-12 inches |
| 5-8 years | 20-22 inches | 12-14 inches |
Age groups need different skirt sizes for comfort and safety. Match child measurements to these tutu styles for perfect fit and fullness. Understanding tutu length is essential for a well-made tutu.
Recommended Length of The Crochet Headband Trim Used
Measuring your crochet trim correctly prevents a tutu disaster. You’ll want the headband to stretch comfortably around the waist without cutting off circulation or sliding down like a hula hoop.
Elastic width affects how the trim sits, so factor that into your waist measurement calculations.
Here’s your sizing cheat sheet:
- Measure snugly but don’t squeeze the life out of anyone
- Account for the trim’s natural stretch when calculating tutu length
- Test the fit before attaching tulle for maximum tutu fullness
- Keep extra trim handy for tutu waistbands adjustments and future tutu trimming needs
TIPS AND TRICKS, AND MORE HELP TO MAKE YOUR TUTU
You’ve mastered the basic tutu-making steps, but these insider tips will transform your project from good to absolutely stunning.
These practical tricks address common questions about tulle rolls, fluffiness levels, and waistband choices that’ll save you time and frustration.
Why Tulle on 6 (15 Cm) Rolls?
Six-inch tulle rolls revolutionize your tutu making experience.
Six-inch tulle rolls are the secret weapon that transforms chaotic tutu-making into pure crafting bliss.
Tulle Selection becomes effortless with this perfect Tulle Width for beginners. These Roll Sizes eliminate guesswork in Fabric Choice, providing consistent strips without tedious measuring.
Your Tutu Materials stay organized and manageable. This tutu fabric width prevents tangling while you work, making each tie smoother.
Smart yardage planning starts with choosing the right roll size.
Fluffy or Not?
When your tutu arrives flat as a pancake, don’t panic! Fresh tulle often looks lifeless straight from the package, but you can transform it into fluffy perfection with simple techniques.
Here’s how to achieve that dreamy volume:
- Shake vigorously to eliminate creases and wake up the tulle fabric
- Gently pull outward with fingers to create natural fluffy layers
- Steam lightly to refresh and fluff the DIY tutu material
- Add extra strips for maximum volume control and tutu texture
Why Crochet Headband Trim?
Beyond fluffiness, your waistband choice can make or break your DIY tutu project.
Crochet headband trim transforms ordinary tutus into professional-looking masterpieces. Think of it as your tutu’s foundation – sturdy yet stretchy.
Crochet Benefits Trim Options
Headband Styles range from simple waffle weaves to intricate patterns. For baby tutus, soft crochet trim won’t irritate delicate skin like traditional elastic alternatives might.
The 2.75-inch width eliminates folding or finishing raw edges – you’ll skip the crochet hook work entirely. These tutu trim options come pre-made in dozens of colors, letting you focus on tutu making instead of waistband construction.
Frequently Asked Questions (FAQs)
How do you make a tulle Tutu?
Ironically, creating ethereal beauty requires surprisingly simple steps.
Cut tulle strips twice your desired length, fold them in half, then loop through elastic waistband.
Pull tight, repeat until full, and you’ve crafted magic.
How to create a tutu for your ballerina?
Your little dancer deserves the perfect tutu!
Start by measuring her waist, then cut elastic four inches shorter.
Gather tulle strips, fold them in half, and tie onto the elastic waistband for magical twirls.
How do you fold a tutu?
Folding your tutu properly keeps it fluffy and wrinkle-free.
Gently gather the waistband, then fold the skirt in half twice.
Store it flat in a box or hang it to maintain that perfect poofy shape.
How do you make a two tier Tutu?
Double your fun and make two separate tutus with different lengths.
Create one shorter tier using 18-inch tulle strips, then make a longer second tier with 24-inch strips.
Layer them together for gorgeous depth and movement.
How much tulle do you need to make a tutu?
You’ll need different amounts depending on size: 5 yards for kids, 10 yards for small-medium adults, and 20 yards for large adults.
Spooled tulle works too—grab 2-3 spools for children or 7-8 for bigger sizes.
What can I make a tutu with?
Like a dancer’s dream taking flight, you’ll need tulle fabric, elastic for the waistband, scissors, measuring tape, and thread.
Add ribbons, flowers, or sparkles to transform basic materials into magical costume perfection.
How do you make a tutu stiff?
Spray starch transforms limp tulle into structured perfection.
Simply mist each layer, then iron on low heat.
You’ll create that coveted ballet-worthy stiffness that holds its shape through every twirl and leap.
What material is a tutu made of?
Soft as a cloud floating in summer sky, you’ll primarily use tulle fabric for your tutu.
This lightweight, mesh-like material creates that signature fluffy appearance.
You’ll also need elastic for the waistband.
Is it cheaper to make your own tutu?
Yes, you’ll save money making your own tutu! Basic materials cost $10-15, while store-bought tutus run $25- Plus, you’ll customize colors, length, and embellishments exactly how you want them.
How to wash or clean a tutu?
Hand-wash your tutu gently in cool water with mild detergent.
Don’t wring or twist the delicate tulle.
Instead, press out excess water carefully, then hang it to air-dry for best results.
Conclusion
Picture your finished tutu twirling in perfect pirouettes, each tulle strand catching light like captured moonbeams.
You’ve just discovered the easiest way to make a tutu without threading a single needle or wrestling with complicated patterns.
This no-sew method transforms simple materials into dance-worthy magic in just half an hour.
Whether you’re creating costumes for little ballerinas or adding sparkle to dress-up boxes, you now have the skills to craft professional-looking tutus anytime inspiration strikes.


