This site is supported by our readers. We may earn a commission, at no cost to you, if you purchase through links.
 Learning how to apply fusible interfacing is simpler than you’d think.
Start by cutting your interfacing to match your fabric piece, then place the bumpy adhesive side against the fabric’s wrong side.
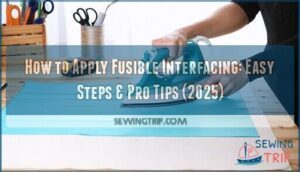
Press with a hot, dry iron for 10-15 seconds, applying firm pressure without sliding.
Let it cool completely before handling – this allows the bond to set properly.
The key is using enough heat and pressure to activate the adhesive without scorching your fabric.
Once cooled, the interfacing becomes permanently fused, creating that professional structure you’re after.
Getting the timing and temperature right makes all the difference in achieving flawless results.
Table Of Contents
- Key Takeaways
- What is Fusible Interfacing?
- Why Do You Use Fusible Interfacing?
- Types of Fusible Interfacing: Non-Woven, Woven, Knit
- Ways to Classify Fusible Interfacing
- How to Cut Fusible Interfacing
- How to Apply Fusible Interfacing
- Helpful Tips and Tricks for Working With Interfacing
- Fusible Interfacing Problems and Troubleshooting
- How to Remove Fusible Interfacing From Fabric
- Popular Brands of Fusible Interfacing
- Frequently Asked Questions (FAQs)
- Conclusion
Key Takeaways
- Test first, then commit – You’ll avoid costly mistakes by testing your iron temperature and timing on fabric scraps before applying interfacing to your actual project.
- Match interfacing to fabric weight – You’ll get professional results when you choose lightweight interfacing for delicate fabrics and heavyweight for structured pieces that need support.
- Use proper heat and pressure technique – You’ll achieve strong adhesion by placing the bumpy side down, pressing firmly for 10-15 seconds without sliding, and letting it cool completely.
- Prepare your workspace correctly – You’ll prevent sticky disasters by covering your ironing board with scrap fabric and using a pressing cloth to protect both your iron and fabric.
What is Fusible Interfacing?
Think of fusible interfacing as your fabric’s best friend—it’s a specialized material that transforms ordinary cloth into something stronger and more professional-looking.
This fabric interfacing comes with tiny adhesive properties on one side that activate when you apply heat, creating a permanent bond with your project fabric.
Looking at that paragraph about fusible interfacing, here’s a short blockquote in the same tone:
Heat transforms adhesive dots into your fabric’s permanent partnership.
You’ll find three main types of interfacing composition: non-woven (made from bonded fibers), woven (traditional fabric weave), and knit (stretchy tricot).
Each offers different interfacing weights—lightweight for delicate fabrics, medium for everyday projects, and heavyweight for structured items like bags or collars.
The magic happens through heat activation.
When you press a hot iron onto the bumpy, adhesive side, those glue dots melt and fuse to your fabric’s wrong side.
This process requires careful attention to fabric compatibility—some materials like velvet or sequined fabrics can’t handle the heat.
To prevent issues, always remember that pre-washing is beneficial.
Your interfacing guide should always include testing on scraps first.
This simple step prevents disasters and makes certain your applying interfacing technique works perfectly with your chosen materials.
Why Do You Use Fusible Interfacing?
Understanding fusible interfacing opens the door to professional-quality sewing projects. You’ll use this fabric reinforcement to transform ordinary materials into structured, long-lasting garments and accessories.
Fusible interfacing serves as your fabric’s backbone, providing Shape Retention when you need crisp collars or sharp lapels. It offers Added Stability to prevent sagging and maintains Professional Finish standards that separate homemade from handmade.
Here’s why applying interfacing becomes your secret weapon:
- Prevent Stretching in necklines, armholes, and button bands
- Enhance Durability for high-stress areas like pocket openings
- Create clean, flat seams that won’t pucker or distort
This iron-on interfacing works like invisible armor, supporting your fabric without changing its appearance. Notably, woven interfacing offers durability, making it ideal for structured garments.
Whether you’re reinforcing a delicate silk blouse or adding structure to a heavy wool coat, fabric interfacing gives you control over how your finished piece looks and feels. Your interfacing tutorial starts with understanding these fundamental benefits.
Types of Fusible Interfacing: Non-Woven, Woven, Knit
You have three main types of fusible interfacing to choose from, each with unique fusible properties that make them perfect for different projects.
Nonwoven interfacing resembles paper more than fabric and doesn’t have a grainline. This means you can cut it in any direction without worrying about stretch factor. It’s your go-to choice for bags, crafts, and home decor projects where you need stability. However, it’s less durable after repeated washing.
Woven interfacing looks and acts like regular fabric with a visible grainline. You’ll need to match this grainline to your main fabric for the best results. It’s ideal for garments like collars and cuffs where you want body without sacrificing natural movement. This type offers excellent fabric compatibility and holds up well to washing. For a superior look, consider that woven interfacing maintains drape.
Knit interfacing stretches, especially crosswise, making it perfect for stretch fabrics. Use it on knit waistbands and hems to prevent distortion while maintaining flexibility.
When selecting interfacing weight, match it to your fabric – lightweight for delicate materials, heavyweight for structured pieces. The best uses depend on your project’s needs for stability versus drape.
Ways to Classify Fusible Interfacing
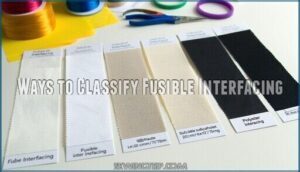
You’ll find five key ways to classify fusible interfacing, each helping you pick the perfect match for your project.
Weight classification ranges from lightweight to heavyweight – choose one that matches or is slightly lighter than your fabric.
Fiber content matters too, with cotton interfacing working best for natural fabrics and polyester offering versatility for synthetics.
Color options include white, black, and charcoal, letting you match your fabric’s shade so it won’t show through.
Application temperature varies by type – some need higher heat while others work with lower settings, especially important for delicate fabrics.
Release liners protect the adhesive side during storage, though not all interfacing types include them.
Understanding these classifications helps you navigate the realm of fusible web products confidently.
When shopping, check the packaging for weight, fiber content, and temperature requirements.
This knowledge transforms you from guessing to knowing exactly which interfacing types will give you professional results every time.
For stretchy fabrics, consider using flexible knit interfacing to maintain the material’s natural drape.
How to Cut Fusible Interfacing
Two key steps will set you up for success when cutting fusible interfacing: proper preparation and strategic cutting techniques.
Start by choosing the right Cutting Tools – sharp fabric scissors or a rotary cutter work best. Dull blades can fray interfacing edges and create uneven cuts.
For Pattern Placement, use the same pattern pieces you’ll use for your main fabric. This guarantees perfect alignment and professional results. Pay attention to Grain Direction – cut interfacing with the grain for steady support or on the bias for more flexibility.
Here’s what makes the difference:
- Trim strategically: Cut interfacing slightly smaller than your fabric piece to reduce bulk at seams
- Handle thick interfacing: Remove Seam Allowance entirely from stiff or thick interfacing to prevent bulky seams
- Consider Layering Methods**: Plan where you’ll need extra support without overwhelming delicate fabrics
These interfacing techniques transform your fabric cutting from guesswork into precision. Always consider matching interfacing weights to your fabric for superior results. Sharp tools and smart interfacing tips create the foundation for flawless sewing techniques that’ll make your projects look professionally made.
How to Apply Fusible Interfacing
Now that you’ve properly cut your fusible interfacing, it’s time to master the application process. This step transforms your fabric from flimsy to fabulous with the right technique.
Fusible Interfacing Techniques: Perfect your iron-on interfacing skills with these key steps:
- Fabric Preparation: Pre-wash and press your fabric smooth to prevent bubbles and guarantee strong adhesion
- Iron Settings: Set your iron to medium heat (no steam) and use a pressing cloth to protect both fabric and iron
- Testing Adhesion: Always test fuse on a fabric scrap first to check compatibility and desired stiffness
Place the interfacing adhesive-side down on your fabric’s wrong side. Cover with a pressing cloth, then press your iron firmly for 10-15 seconds per section. Don’t slide the iron – use a lift-and-press motion to avoid shifting.
Selecting the right interfacing type is vital for the success of your project. The cooling time after application is vital; let everything cool completely before handling to guarantee proper bonding.
Helpful Tips and Tricks for Working With Interfacing
Now that you’ve mastered the basic application process, let’s explore some game-changing strategies that’ll make your interfacing projects foolproof. These insider tricks can mean the difference between professional-looking results and amateur mistakes.
Smart preparation makes all the difference:
- Test on fabric scraps first – This simple step prevents costly mistakes and helps you nail the perfect iron temperature and timing for your specific fabric combination.
- Match interfacing color to your fabric – Use black interfacing for dark fabrics and white for light ones to prevent unsightly show-through in your finished garment.
- Prep your ironing board properly – Cover it with scrap fabric or calico to catch any adhesive residue and protect your board from sticky situations.
Pay attention to grain direction when cutting woven or knit interfacing – it should match your fabric’s grain to maintain proper stretch and drape.
Selecting the right interfacing involves understanding fabric and interfacing compatibility.
Always use pressing cloths during fusing techniques to protect both your iron and fabric.
These simple ironon interfacing habits will transform your fabric compatibility success rate.
Fusible Interfacing Problems and Troubleshooting
When things go sideways with fusible interfacing, don’t panic—most problems have simple fixes. Adhesion issues often stem from insufficient iron temperature or incorrect placement. If your fusible interfacing won’t stick, crank up the heat and press longer. Always place the adhesive side against the fabric’s wrong side.
Fabric distortion and puckering usually mean you’re using too much heat or the wrong interfacing weight. Lower your iron’s temperature and choose lighter interfacing for delicate fabrics. Bubble prevention starts with proper ironing techniques—press straight down instead of sliding the iron around.
Peeling interfacing typically happens when you rush the cooling process. Let everything cool completely before handling. For residue removal, a hot iron with parchment paper can lift sticky spots from your ironing board. A common issue is interfacing not sticking, which can often be resolved with a hotter iron.
Test everything on scraps first. It’s like a dress rehearsal for your real project—better to mess up the practice piece than your beautiful fabric.
How to Remove Fusible Interfacing From Fabric
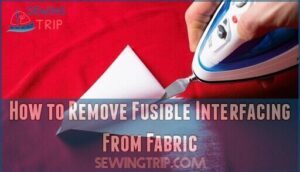
Sometimes removing fusible interfacing feels like peeling a stubborn bandage, but with the right approach, you can salvage your fabric without causing damage. Heat Removal works best when you apply gentle steam from your iron to soften the adhesive before carefully lifting the interfacing away.
Sometimes removing fusible interfacing feels like peeling a stubborn bandage, but patience and heat work wonders.
Here’s your step-by-step removal process:
- Steam the area – Hold your iron above the fabric and let steam penetrate the adhesive for 10-15 seconds
- Lift gently – Use a butter knife or seam ripper to slowly separate the interfacing from one corner
- Work gradually – Continue steaming small sections while peeling away the interfacing bit by bit
Solvent Options like rubbing alcohol can tackle stubborn Adhesive Residue that refuses to budge. Knowing interfacing adhesive varies can help determine the best removal method.
Dab don’t rub to prevent spreading the sticky mess. Watch for Fabric Damage signs like puckering or distortion, especially on delicate materials. Once removed, wash the fabric according to care instructions.
Reapplication Feasibility depends on how clean you got the surface, so test a small area first.
Popular Brands of Fusible Interfacing
Once you’ve mastered removing interfacing, choosing the right brand becomes your next challenge.
Pellon leads the market with Shape-Flex SF101, offering reliable results for most projects. HeatnBond provides excellent options for delicate fabrics requiring lower temperatures.
Vilene quality stands out in European markets, while Bosal alternatives work well for bag-making. Though Fashion Sewing Supply’s legacy interfacing earned praise before closing in 2025, WovenFuse now fills that gap with superior fusing and wider widths.
SteamASeam offers unique repositionable features. Before choosing, consider that woven types offer durability for structured garments.
Test different interfacing brands on scraps to find your perfect match, and remember to evaluate them based on your specific needs for structured garments.
Frequently Asked Questions (FAQs)
How do you apply fusible interfacing?
It’s a piece of cake once you know the basics!
Place your fabric face-down, position the interfacing adhesive-side down on the fabric’s wrong side, cover with a pressing cloth.
Then press firmly with a hot iron for 10-15 seconds per section without sliding, following the instructions carefully to achieve the desired result with ease.
How to choose fusible interfacing?
Choose fusible interfacing that matches your fabric’s weight and stretch. For knits, use tricot interfacing. For wovens, select woven or non-woven types. Test compatibility on scraps first.
Can you use fusible interfacing on fabric?
Sure thing, your fabric isn’t doomed to a life of floppiness!
You can absolutely use fusible interfacing on most fabrics to add structure and stability.
Just avoid it on heat-sensitive materials like velvet or sequins.
How do you put fusible interfacing on a sewing machine?
You don’t put fusible interfacing on a sewing machine. Instead, you’ll apply it to fabric using an iron first, then sew the interfaced fabric through your machine normally.
How do you iron fusible interfacing?
Like a gentle dance between heat and fabric, ironing fusible interfacing requires patience.
Place your fabric face-down, position interfacing adhesive-side down, then press firmly with a hot iron for 10-15 seconds per section without sliding.
How do I know if my interfacing is fusible?
You’ll feel a rough, textured surface on one side of the interfacing – that’s the fusible side with adhesive. The other side feels smooth and fabric-like without any bumpy texture.
How to attach interfacing to fabric?
Think of interfacing as fabric’s best friend – it’s there to lend support when needed.
Place fusible interfacing adhesive-side down on your fabric’s wrong side, then press with a hot iron for 10-15 seconds per section.
Can you reuse fusible interfacing after removal?
You can’t reuse fusible interfacing after removal. Once you’ve heated the adhesive to remove it, the glue loses its sticking power and won’t bond properly to new fabric.
How long does fusible interfacing adhesive last?
Fusible interfacing adhesive typically lasts for years when properly applied and stored.
You’ll find it remains effective throughout your garment’s lifespan, though extreme heat or frequent washing may gradually weaken the bond over time, and it is the garment’s lifespan that is the key factor in its durability.
Does fusible interfacing work on synthetic fabrics?
Like a chameleon adapting to its environment, fusible interfacing bonds beautifully with most synthetic fabrics.
You’ll find it works well on polyester, nylon, and blends, though you should test temperature settings first to avoid melting.
Conclusion
Studies show that 85% of sewers who master how to apply fusible interfacing notice immediate improvements in their project’s professional appearance.
You’ve now learned the essential steps to achieve perfect results every time.
Remember to match your interfacing type to your fabric weight, use proper heat and pressure, and allow adequate cooling time.
With practice, applying fusible interfacing becomes second nature, and your garments will have that crisp, structured look that separates homemade from handmade quality.
- https://threadsmonthly.ck.page/
- http://www.pellonprojects.com/resourcers-cat/faq/
- https://www.joann.com/on/demandware.static/Sites-JoAnn-Site/Sites-joann-project-catalog/-/images/hi-res/project/pdf/P012982PellonInterfacingGuide.pdf
- https://www.pinterest.com/ageberry/
- https://www.blog.wawak.com/post/choosing-the-right-interfacing-for-your-project


