This site is supported by our readers. We may earn a commission, at no cost to you, if you purchase through links.
 Knowing how to cut a gown before sewing sets the foundation for your entire project.
Start by washing and pressing your fabric, then lay it flat on a large surface. Pin your pattern pieces following the grainline arrows—this isn’t the time to eyeball it!
Use sharp fabric shears and cut in long, smooth strokes rather than choppy snips. Mark all notches, darts, and buttonholes with tailor’s chalk or washable markers.
Think of cutting as drawing your blueprint; one crooked line throws off the whole structure. Transfer every marking before removing pins—your future self will thank you when those puzzle pieces align perfectly during construction, making it a crucial part of the construction process.
Table Of Contents
Key Takeaways
- You’ll set yourself up for success by washing and pressing your fabric first, then laying it flat on a large surface and pinning pattern pieces along grainline arrows—this foundational step prevents costly mistakes later.
- Sharp fabric shears are non-negotiable for clean cuts, so use long, smooth strokes instead of choppy snips, and remember that one crooked line throws off your entire gown’s structure.
- Transfer all pattern markings before removing pins using tailor’s chalk or washable markers—these notches, darts, and buttonholes serve as your roadmap during construction.
- Take time to position pattern pieces strategically for efficient layout while maximizing fabric yardage and ensuring proper grain alignment, because rushing this step leads to wasted material and fitting disasters.
Select Fabric and Pattern
Choosing the right fabric and pattern usually makes or breaks your gown project – it’s truly the foundation of everything that follows.
Your fabric choice is the difference between a gown that glides and one that stumbles.
Start by selecting a pattern that matches your vision: the silhouette, neckline, and sleeve style you’re dreaming of. Consider pattern complexity carefully; simpler designs work best for beginners.
Your fabric selection is equally vital. Think about fabric drape – how it falls and moves. Silk creates elegant flow for formal occasions, while cotton offers structure for everyday wear.
Match seasonal fabrics to your event: lightweight materials for summer, richer textures for winter celebrations. Occasion appropriateness matters too – satin screams evening elegance, while cotton whispers casual charm.
Personal preferences shouldn’t be ignored either. Choose colors and textures that make you smile. Understanding the nuances of different gown materials can substantially impact the final result. Remember, gown cutting success depends on this initial decision.
Take time browsing fabric stores, feeling different materials between your fingers. Your perfect combination exists – you just need to find it through careful consideration of these essential factors.
Prepare The Pattern
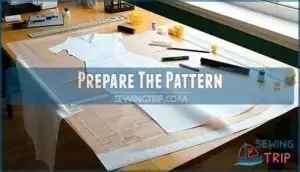
Now that you’ve got your perfect fabric and pattern in hand, it’s time to get that pattern ready for action. Think of this step as your dress rehearsal before the main event.
First, adjust pattern size to match your measurements perfectly. Don’t skip this – it’s like trying to fit into your high school jeans after Thanksgiving dinner. Mark any changes directly on the tissue paper with a pencil.
Next, trace pattern pieces onto sturdy paper using an ultra-fine marker. This protects your original pattern for future projects. Consider using specialized tracing supplies for this step.
Carefully trace grainline alignment arrows – these little heroes guarantee your gown hangs beautifully. Mark pattern details like notches, darts, and fold lines. These tiny symbols are your roadmap to success.
Mark and Cut Out Fabric
Now you’ll transform your beautiful fabric into gown pieces, and this step feels like unwrapping a gift – exciting but nerve-wracking since there’s no going back once you cut.
You’ll carefully position your pattern pieces on the fabric, pin them down securely, and make precise cuts that’ll become the foundation of your stunning gown.
This process is the foundation of creating your gown, and it requires attention to detail to ensure that your stunning gown turns out as envisioned.
Lay Out Fabric
Unfolding your fabric marks the moment when your gown vision becomes tangible reality. Lay the material completely flat on a clean, spacious surface—wrinkles are your enemy here. Check that grainlines run perfectly parallel to the selvage edge for proper Grain Alignment.
This step determines how your finished gown will drape and move. Place pattern pieces strategically for Efficient Layout, maximizing your Fabric Yardage while ensuring proper Pattern Placement.
Heavy-duty weights work better than pins for slippery satins and silks—they won’t shift unexpectedly. Consider using specialized cutting tools for best results.
Follow your fabric cutting guide religiously, keeping facings and major pieces aligned. Take extra time with this vital step. Rushing leads to crooked cuts and wasted material.
Your fabric layout tips include checking twice before cutting once. Remember, you can’t un-cut fabric, so precision here saves heartache later!
Pin and Cut Pieces
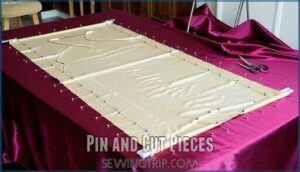
Mark those pattern pieces before slicing—this step separates amateur sewers from pros. Trace around each shape with your pencil so you know exactly where to follow your fabric scissors.
Precision in marking is the difference between a masterpiece and a costly mistake.
Pattern pinning requires precision. Use fabric weights alongside pins for better cutting accuracy. Position pieces strategically, checking grain alignment twice before cutting. Remember that seam allowances are your safety net—don’t skimp here.
Follow these gown cutting techniques for success:
- Pin corners first, then work inward for stability
- Cut curves slowly with short, deliberate snips
- Leave extra fabric around tricky areas like necklines
- Check grain alignment one final time before cutting
- Use sharp fabric scissors exclusively—dull blades create frayed edges
This fabric cutting guide emphasizes patience over speed. Cutting fabric efficiently means taking time upfront to avoid costly mistakes later. These fabric layout tips will transform your sewing experience from stressful to satisfying.
Transfer Pattern Markings
Your fabric pieces are cut, but they’re basically blank canvases without their road map. Pattern markings are like GPS coordinates for your gown – they tell you exactly where everything goes. Skip this step, and you’ll be sewing blind.
Start with notches importance – those little triangular cuts that match pieces together perfectly. Use marking tools like fabric chalk, washable pens, or tailor’s tacks for accurate tracing.
Transfer dart placement marks by poking pins through both fabric layers, then marking both sides. Don’t forget grainline precision – those arrows keep your gown hanging correctly.
For curved seams, clip small notches every few inches. Mark buttonhole positions, fold lines, and any design details from your pattern. Cutting corners here means wonky seams later.
These techniques might seem tedious, but they’re your insurance policy against fitting disasters. Your future self will thank you when everything aligns like magic.
Sew Darts
Darts shape your gown like magic, transforming flat fabric into curves that flatter.
Start at the wide seam end, stitching toward the pointed tip with short, precise stitches. Don’t backstitch at the dart’s point—instead, tie off threads by hand to prevent bulk.
For Curved Darts or Double Darts, maintain consistent Dart Length and check your Dart Placement against dressmaking patterns.
Press darts flat first, then toward the center using a tailor’s ham. These gown construction methods and pattern alteration techniques create that perfect fitted silhouette you’re after.
Insert Zipper
After perfecting your darts, it’s time to install the zipper—the gateway to your gorgeous gown! Choose between invisible zippers for a seamless look or centered zippers for drama.
Measure your zipper length carefully; it should extend from neckline to mid-back. Different zipper types require specific techniques, so match your method to your style.
Here’s your zipper installation roadmap:
- Use a zipper foot for precise stitching along zipper teeth
- Baste the seam closed before installing invisible zippers
- Press seam allowances open to create a flat foundation
- Pin zipper face-down against the right side of fabric
- Test the zipper by opening and closing before final stitching
Join Shoulders and Sides
With your zipper snugly in place, you’re ready to build the foundation of your gown.
Start by matching the front and back shoulder pieces, placing right sides together.
Pin carefully along the shoulder line, maintaining that essential 5/8-inch seam allowance.
This seam reinforcement step prevents stretching and keeps your neckline from gaping later.
Sew with steady hands, backstitching at both ends for durability.
Press these seams open using proper pressing techniques – lift and lower your iron rather than dragging it across the fabric.
The magic happens when you add understitching to the shoulder facings, creating crisp edges that won’t flip outward.
Next, tackle those side seams by matching notches perfectly.
This matching seams technique helps your gown hang beautifully.
Sew from armpit to hem, maintaining consistent seam allowances throughout.
Press open and admire how your flat fabric transforms into a three-dimensional garment.
These side seam finishes determine whether your creation looks homemade or couture-quality.
Finish Neckline
With your shoulders and sides perfectly joined, you’re ready to tackle the neckline – the crown jewel of your gown.
Think of facing application as creating an invisible support system that keeps everything looking polished.
Here’s your step-by-step roadmap to neckline perfection:
- Cut matching facings from your pattern pieces, ensuring they mirror your gown’s neckline shape exactly
- Stitch facings to the neckline with right sides together, maintaining consistent seam allowances
- Grade and clip seam allowances, cutting curves every half-inch to eliminate bulk and puckering
- Understitch close to the seam line – this prevents the facing from rolling outward and creates lasting neckline stabilization
- Flip and press the facing inward, using steam to set the crisp edge permanently
- Add topstitching around the neckline for decorative edging and professional finishing
Understitching benefits include better shape retention and a cleaner appearance.
Using a reverse pattern foot can also improve the precision of your stitching.
These topstitching details separate amateur work from professional-quality construction, giving your cutting and sewing efforts the polished finish they deserve.
Hem The Gown
Why does a perfect hem make or break your gown’s elegance? It’s the final touch that transforms homemade into haute couture.
Start by trying on your gown and marking the desired hem length with pins—you’ll want someone to help with this step. Different hemming techniques work better for various fabrics, so choose wisely.
| Fabric Type | Best Technique | Why It Works |
|---|---|---|
| Silk/Satin | Blind Hemming | Creates invisible finish |
| Cotton/Linen | Machine Hem | Durable and quick |
| Chiffon/Organza | Hand Rolling | Prevents fraying |
For decorative hems, consider adding lace or beading before sewing. Blind hemming keeps stitches hidden while maintaining a professional look.
Remember, fabric considerations matter—lightweight materials need gentler handling than heavy fabrics. Take your time with this step; rushing leads to uneven results that’ll haunt you every time you wear your masterpiece.
Add Final Touches
You’re almost there—like crossing the finish line after months of training.
These final touches transform your gown from homemade to haute couture. Take your time with each detail because rushing now wastes all your careful work.
Here are 5 essential finishing techniques:
- Pressing perfection – Steam every seam flat, setting creases that’ll last through countless wears
- Embellishment techniques – Add crystals, beading, or decorative stitching for that wow factor
- Lining options – Insert silk or cotton lining for comfort and professional drape
- Closure types – Perfect your zipper installation or add hook-and-eye closures for security
- Hemming variations – Choose blind hem, rolled hem, or faced hem based on your fabric weight
Your pattern-to-gown transformation is complete when every seam allowance lies flat and every detail sings.
Frequently Asked Questions (FAQs)
How to sew a dress?
Funny how cutting comes first, but sewing’s where magic happens!
Start by stitching darts from wide to narrow, then join shoulder seams.
Add facings, insert your zipper, and press everything for that polished finish.
How do you sew a dress on a sewing machine?
You’ll set up your machine, pin fabric pieces with right sides together, and stitch along marked seam lines.
Start with darts, then join shoulders, insert sleeves, and finish with side seams and hem.
How do you sew a wedding gown?
Like threading a needle with dreams, you’ll start by selecting your pattern and fabric carefully.
Pre-wash materials, trace patterns precisely, cut with sharp shears following grainlines.
Then construct using French seams for elegance.
How long does it take to sew a dress?
Sewing time depends on your skill level and dress complexity.
Simple dresses take 4-8 hours, while elaborate gowns need 20-40 hours.
You’ll work faster with experience, but don’t rush—quality matters more than speed.
How do you make a dress a good first time sew?
Choose simple patterns with minimal pieces, pre-wash your fabric, and start with forgiving materials like cotton.
Take your time measuring twice, cutting once.
Practice basic stitches first—you’ve got this, and mistakes teach valuable lessons!
How do you cut a fabric pattern?
Think of cutting fabric patterns like a puzzle—every piece must fit perfectly.
You’ll align pattern pieces with fabric grain, pin securely, then cut with sharp shears along marked lines, leaving proper seam allowances.
How to shorten a gown without sewing?
You can temporarily shorten a gown using fashion tape, safety pins from the inside, or a belt to cinch and blouse fabric.
These quick fixes work for one-time events without permanent alterations, using methods such as fashion tape.
How to reduce the length of a gown?
Ninety percent of gown alterations involve shortening.
You’ll measure twice, mark your desired length, then cut carefully with fabric scissors.
Add seam allowance for hemming, ensuring you’re cutting straight across the grain.
How to cut a dress pattern on the bias?
Align your pattern’s grainline at a 45-degree angle to the fabric’s selvage edge.
Pin carefully, then cut with sharp shears.
Bias-cut garments drape beautifully and flow naturally, creating that coveted fluid movement you’re after.
How to design a gown step by step?
Surprisingly, 50% of a gown’s success depends on fabric choice alone.
Start by selecting your pattern and fabric, then trace pieces onto sturdy paper, adding seam allowances before cutting carefully along grainlines.
Conclusion
Mastering how to cut a gown before sewing is like laying the cornerstone of a beautiful building—everything else depends on this pivotal first step.
You’ve learned the essential techniques, from fabric preparation to precise cutting methods.
Remember, patience beats speed every time when wielding those shears. Take your time with each cut, double-check your markings, and trust the process.
With these skills in your sewing toolkit, you’re ready to create stunning gowns that fit perfectly and look professionally crafted.


