This site is supported by our readers. We may earn a commission, at no cost to you, if you purchase through links.

That perfect pair of jeans you grabbed on sale can transform into something uniquely yours with just a few strategic cuts. Distressed denim isn’t reserved for high-end boutiques charging triple digits—you control the placement and intensity and the overall vibe when you make rips in your jeans yourself.
The process takes maybe twenty minutes and requires tools you already own: sharp scissors, sandpaper, maybe a pair of tweezers. What separates amateur slashes from professional-looking distressing comes down to understanding fabric grain, choosing your rip locations based on natural wear patterns, and knowing when to stop fraying.
Once you nail the technique, you’ll never look at an unmarked pair of jeans the same way.
Table Of Contents
Key Takeaways
- Successful denim distressing starts with choosing the right fabric—10-14 oz denim with 98% cotton holds up better than stretchy synthetics, and light to medium washes show off your custom rips without looking forced.
- The difference between amateur slashes and professional-looking distressing comes down to making small horizontal cuts first, pulling out white horizontal threads while leaving vertical blue ones intact, and using sandpaper or pumice to mimic natural wear patterns at stress points like knees and thighs.
- Your rips need protection to stay intentional—wash jeans inside-out on cold gentle cycles, air-dry flat instead of using heat, and reinforce larger tears with iron-on patches or hand-stitched bar tacks to prevent uncontrolled fraying.
- Planning your design with chalk guidelines based on where jeans naturally crease and fade transforms random destruction into deliberate craft, giving you complete control over placement, intensity, and the overall rebellious edge you’re after.
Choosing The Best Jeans for Ripping
Not every pair of jeans is meant to be ripped jeans—some fabrics fray beautifully, while others just fall apart. The secret to nailing that perfectly distressed look starts with choosing denim that can handle a little intentional destruction.
Before you grab your scissors, let’s walk through what makes a pair of jeans rip-ready, from fit and wash to the actual fabric itself.
If you’re planning to wash your jeans before distressing them, make sure you protect any hardware and delicate details to avoid unwanted damage in the machine.
Selecting The Right Fit and Style
The fit you choose—whether it’s a slim straight leg that hugs your calves or a relaxed boyfriend cut that gives you room to move—sets the foundation for how your rips will fall, fray, and ultimately tell your denim’s story.
The durability of those distressed details depends on choosing the right needle for your denim’s stretch and weight, so your carefully placed rips stay intact wash after wash.
Understanding the right relaxed fit style is vital for achieving the desired look. Your body type and fit preferences matter here, skinny jeans create sharp, vertical tears while wide-leg styles let distressing breathe across more fabric, giving you control over your DIY fashion projects.
Ideal Denim Thickness and Wash
Once you’ve locked in your fit, the weight of denim—measured in ounces per square yard—decides whether your rips will hold their edge or unravel into soft, feathered fringe. Heavier denim (14+ oz) resists distressing and gives you sharp, controlled tears, while lighter fabric softness (10-12 oz) frays beautifully on its own.
If you’re working without a zipper foot, lighter-weight denim (around 10-12 oz) is far more forgiving—check out these alternative techniques for installing zippers without specialty tools to get clean results even on distressed fabric.
Heavier denim resists distressing for sharp, controlled tears, while lighter fabric frays beautifully on its own
Light to medium wash effects show off your denim customization best, dark indigo can look forced after alteration.
Assessing Fabric Quality and Condition
Before you cut anything, run your fingers across the denim—worn spots with thinning threads will rip faster and look more authentic than stiff, brand-new fabric. To achieve an authentic look, consider the denim fabric quality when selecting your jeans.
Check for these signs of solid fabric durability:
- Tight weave density – Inspect the textile crafting closely; loose threads signal weak fiber strength
- Even cotton blends – 98% cotton holds up better than stretchy synthetics during denim customization techniques
- Visible wear patterns – Knee creases and thigh fades guide natural-looking placement
- Minimal pilling – Fuzzy surfaces mean the fabric’s already compromised
- Consistent denim thickness – Thin patches need gentle denim care and maintenance or they’ll blow out fast
Essential Tools and Materials Needed
Before you start slicing into your favorite pair of jeans, you’ll want to gather the right distressed denim gear. The tools you choose will shape how your rips turn out, from clean cuts to perfectly frayed edges.
Let’s break down what you actually need to create distressed denim that looks intentional, not accidental.
Scissors Vs. Utility Knives
Sharp, clean cuts separate intentional distressing from sloppy shredding, and your choice between scissors and a utility knife determines which side of that line you’ll land on.
Scissors give you edge control and blade safety for intricate cutting techniques, perfect if you’re new to distressing jeans.
Utility knives deliver fabric precision for your DIY rip project, but they demand steady hands—one slip can ruin the entire leg.
Tweezers, Sandpaper, and Pumice Stone
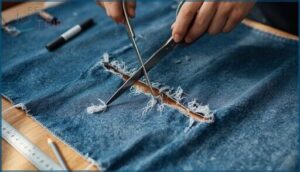
After you’ve cut, tweezers pull out horizontal weft threads one by one—that’s thread removal for fray control—while sandpaper roughs up high-wear zones like thighs and knees through fabric abrasion.
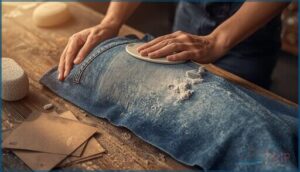
A pumice stone mimics stone washing when you scrub it over denim, softening stiff fabric and fading indigo color. These three distressing techniques transform raw cuts into lived-in ripped jeans that look authentically worn, not costume-shop fake.
Marking Tools and Protective Surfaces
With chalk or a fabric marker in hand, you map your vision directly onto the denim—precise guidelines that prevent hacking through both layers or wandering into territory you wanted intact.
Slip cutting mats or protective sheets inside each leg before your scissors, razor blade, or Dremel tool bite through—surface guards that stop your sandpaper or seam ripper from scarring the kitchen table beneath.
Planning Your Ripped Jeans Design
Before you make that first cut, you need a game plan. The difference between jeans that look intentionally distressed and jeans that just look ruined comes down to placement, precision, and a little forethought.
Here’s how to map out your design so you end up with something you’ll actually want to wear.
Identifying Rip Placement
The best rips don’t just happen—they’re mapped out like a designer sketching strategic details on a runway piece. When distressing jeans, knee placement creates that lived-in vibe, while thigh tears add rebellious edge.
Pocket distressing frames your silhouette, and hem rips ground the look. Study where your denim naturally creases—those rip locations tell you exactly where distressed denim should break for authentic, intentional jeans ripping.
Using Chalk or Markers for Guidelines
Before your scissors touch fabric, marking your design locks in precision cutting the way a tailor’s pen commits pattern to cloth.
Use fabric marking chalk for temporary guidelines on distressed denim—it brushes off cleanly after jeans ripping. For darker washes, white gel markers offer sharper precision drawing.
These guideline strategies in denim distressing keep your cuts intentional, transforming jeans customization techniques from guesswork into controlled craft.
Considering Natural Wear Patterns
Study where your jeans already fade and fray—knees, thighs, pockets—because authentic distressing follows the body’s natural friction points. Mimic these wear patterns when planning DIY rips, placing tears where fabric fraying would naturally occur. Denim aging reveals exactly where your movement stresses the weave, creating believable distressing elements.
- Knees show the most dramatic natural tears from constant bending
- Inner thighs develop subtle fading techniques from walking friction
- Pocket edges exhibit wear patterns from hands and keys
- Hem bottoms fray authentically from dragging and stepping
- Seat areas display gentle denim distressing from sitting pressure
Step-by-Step Guide to Making Rips
Now that you’ve mapped out your design, it’s time to break out the tools and get your hands dirty. The process itself is straightforward, but a few smart techniques will make the difference between rips that look intentional and ones that just look wrong.
Here’s how to create that perfectly distressed denim, step by step.
Creating Horizontal Cuts
Horizontal cuts form the backbone of every distressed denim piece—they’re what separate a carefully crafted rip from an accidental tear.
Position your scissors across the grain, not vertically, and make short horizontal slits where you marked. Keep cuts small at first—about half an inch works well. You can always expand later, but you can’t undo an overzealous slice.
This rip placement creates that authentic, worn-in vibe.
Fraying Edges for a Natural Look
Once you’ve made those horizontal slits, it’s time to coax out the white threads that give your jeans that lived-in, frayed character. Use tweezers to pinch and pull the horizontal white threads while leaving vertical blue ones intact—this creates natural distress and fabric wear.
- Grip each thread firmly near the cut edge
- Pull steadily outward to avoid breaking threads
- Work across the entire rip for even fraying
- Repeat until you achieve your desired denim aging effect
This technique controls rip effects while mimicking authentic distressed denim.
Using Sandpaper or Pumice for Distressing
If fraying alone doesn’t quite capture the weathered look you’re after, grab medium-grit sandpaper or a pumice stone to soften the denim and create those subtle worn-in shadows that make distressing feel authentic. Rub in circular motions over seams, pockets, and thigh areas where natural wear occurs—this fabric abrasion mimics years of use. Focus on raised surfaces first, then feather outward for graduated denim texturing that won’t look forced.
| Distressing Techniques | Tool Selection | Pumice Effects |
|---|---|---|
| Light surface wear | 120-grit sandpaper | Gentle fading |
| Medium distressing | 80-grit sandpaper | Visible texture |
| Heavy abrasion | 60-grit sandpaper | Deep weathering |
| Seam highlights | Pumice stone | Soft shadows |
| Edge softening | Fine steel wool | Vintage finish |
Layer your sanding methods—start coarse, finish fine—to build dimensional distressed denim that tells a story through denim customization techniques.
Customizing and Personalizing Rips
Once you’ve mastered the basics of ripping, it’s time to make those jeans truly yours. You can push past the standard distressed look and turn your denim into a one-of-a-kind statement piece.
Here’s how to add your own signature touches and take full control of the final design.
Adding Embellishments or Patches
Your distressed denim becomes a canvas the moment you start thinking beyond torn fabric—studs, patches, and rhinestones can transform simple rips into statement pieces that scream individuality. Layer iron-on patch designs over frayed edges, or use fabric painting to add bursts of color. Denim stickers and metal studs require no sewing techniques, making clothing customization accessible for every skill level in fashion DIY.
- Position patches strategically around rips to frame distressed areas and create visual interest
- Use E6000 adhesive for permanent embellishment tips when attaching studs or rhinestones to denim
- Mix textures like leather patches with metallic accents for bold garment modification contrast
- Experiment with denim alteration by layering multiple small patches instead of one large piece
- Iron patch designs from the inside to protect embellishments while ensuring secure adhesion
Incorporating Embroidery or Stitching
Thread and needle give you complete control over every design detail, turning raw rips into customized works of art that no store-bought pair can match. Choose thread colors that contrast sharply with your denim, then experiment with stitch patterns like running stitches or cross-hatches around frayed edges.
Sewing and embroidery techniques let you build custom designs that blend garment alteration and repair with pure fashion DIY rebellion—your jeans, your rules.
Achieving Different Distressing Effects
Distressing isn’t a one-size-fits-all technique—sandpaper whispers vintage wear, while a razor blade shouts punk-rock edge, and mastering both gives you the freedom to dial your denim’s rebellion up or down.
Experiment with rip patterns by combining scissors for clean horizontal cuts with sandpaper for edge wear, then layer fading effects using fabric fraying and varied distress techniques until your denim customization techniques reflect exactly how bold you want to be.
Caring for Your Ripped Jeans
You’ve put in the work to create your perfect ripped jeans, and now you want them to last. The key is treating those distressed areas with a little extra care so they don’t fall apart on you.
Here’s how to keep your custom denim looking sharp without losing that intentional, rebellious edge you worked hard to achieve.
Washing and Drying Tips
Treat your distressed denim like the statement piece it’s—fabric care separates runway-worthy rips from unraveling disasters. Cold water and gentle cycles preserve those intentional tears you worked so hard to craft, keeping your DIY fashion intact through countless wears.
- Turn jeans inside out before washing to shield frayed edges from drum friction and protect your denim protection investment
- Skip the dryer heat and air-dry flat—sustainable fashion practices that prevent shrinkage and fiber brittleness around ripped zones
- Use mild liquid detergent in cold water temperature settings, avoiding harsh chemicals that weaken distressed denim fashion details
Preventing Excessive Fraying
Rips that spiral out of control turn intentional edge into wardrobe malfunction—a few strategic stitches keep your rebellious aesthetic exactly where you want it.
Apply clear nail polish or fabric sealant around distressed edges for instant fray prevention and rip stability. Hand-stitch horizontal threads across wider tears using matching denim thread, creating invisible edge control that maintains your wear resistance without killing that raw, lived-in vibe you created.
Repairing or Reinforcing Ripped Areas
Even the most carefully crafted rips need backup—think of reinforcement as the invisible scaffolding that lets your denim destruction stay controlled, wearable, and exactly as wild as you intended.
Iron-on denim patches behind larger tears deliver instant rip stabilizing without visible fabric repair. For seam strengthening that’s built to last:
- Hand-stitch vertical bar tacks at rip endpoints using heavy-duty thread
- Apply interfacing strips for hidden denim reinforcement
- Weave darning stitches across thinning fabric before holes form
- Use fusible webbing for quick clothing repair that stays flexible
Top Tools for Making Rips in Jeans
The right tools make all the difference when you’re ripping jeans—they give you control over the cut, help you fray edges cleanly, and let you create the exact distressed look you’re after.
You don’t need a massive toolkit, but having a few specialized cutting tools can enhance your DIY project from amateur to intentional. Here are five reliable options that deliver clean cuts and precise distressing without shredding your denim beyond repair.
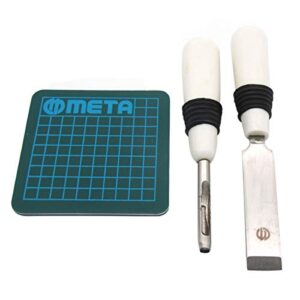
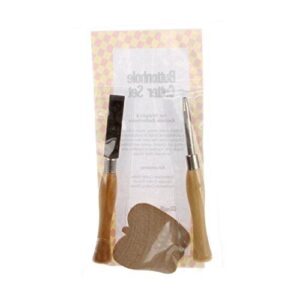
1. CKPSMS Buttonhole Cutter Set
The CKPSMS Buttonhole Cutter Set isn’t just for tailors—it’s your secret weapon for carving clean, controlled rips that look like they survived a decade of adventures, not ten minutes in your garage. This three-piece kit includes a keyhole cutter, straight cutter, and mat, giving you fabric precision that scissors can’t match.
The sharp metal blades slice through multiple denim layers with sewing accuracy, making buttonhole cutting feel seamless. Just remember cutter safety—those blades demand respect and careful blade maintenance. For anyone serious about jeans customization and DIY fashion projects, this tool transforms denim customization into pure clothing customization techniques magic.
| Best For | Sewers and DIY fashion enthusiasts who want clean, precise buttonhole cuts without the stress of using scissors on multiple fabric layers. |
|---|---|
| Primary Use | Cutting buttonholes |
| Material | Metal and plastic |
| Weight | 2.05 ounces |
| Blade Type | Sharp cutting blades |
| Fabric Compatibility | Multiple fabric types |
| Design Feature | Set with mat |
| Additional Features |
|
- Sharp metal blades cut through thick fabrics and multiple denim layers with precision
- Three-piece set gives you options for different cutting needs (keyhole, straight, plus mat)
- Reduces mistakes and makes buttonhole cutting way less stressful than traditional methods
- Cutting mat is smaller than some users would like
- Sharp blades require careful handling to avoid injuries
- Doesn’t include a storage pouch, so you’ll need to find your own way to keep the pieces organized
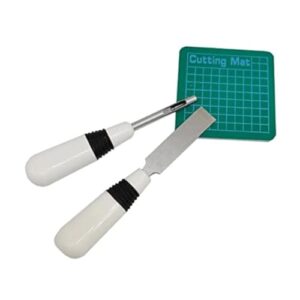
2. HoneySew Sewing Buttonhole Cutter Set
When you need surgical precision without the surgeon’s price tag, HoneySew’s Buttonhole Cutter Set delivers clean cuts that turn basic denim into street-ready style. This compact kit outperforms basic scissors and seam ripper combos, giving you fabric cutters built for serious clothing customization techniques.
The adjustable angle blade navigates thick denim like butter, perfect for DIY fashion projects where control matters. Just remember cutter maintenance—keep those blades sharp and protected. For DIY embellishments and buttonhole cutting that looks intentional, not accidental, this sewing tools set gives your ripped jeans that authentic, lived-in edge.
| Best For | DIYers and home sewers who want clean, professional-looking buttonholes on various fabrics without wrestling with dull scissors or flimsy tools. |
|---|---|
| Primary Use | Cutting buttonholes |
| Material | Plastic |
| Weight | 0.1 pounds |
| Blade Type | Sharp cutting blades |
| Fabric Compatibility | Various fabrics |
| Design Feature | Adjustable angle |
| Additional Features |
|
- Adjustable angle blade handles thick fabrics like denim with better control than standard scissors
- Compact three-piece set includes straight cutter, keyhole cutter, and mini mat for different buttonhole styles
- Affordable alternative to professional cutting tools while delivering clean, intentional-looking cuts
- Thick fabrics may still require significant force or hammering to cut through completely
- Quality inconsistency with some units arriving damaged, oxidized, or too blunt out of the box
- Mini cutting mat tends to break after limited use, reducing the set’s longevity
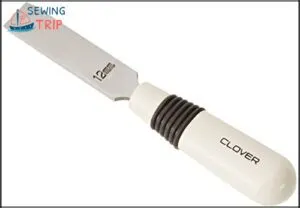
3. Clover Button Hole Cutter Tool
Sharp as rebellion itself, Clover’s Button Hole Cutter Tool brings 12mm chisel precision to your DIY guide arsenal. That steel blade slices through denim layers with clean, controlled cuts—no jagged seam ripper accidents here.
Position your fabric over a cutting mat or wood block, press down firmly, and watch buttonhole precision become your signature move. The rubber grip keeps your hand steady during chisel technique work, while the vinyl cover ensures cutter safety between sessions.
Light tool maintenance with silicone spray keeps those distressing elements cutting true, turning basic fabric handling into deliberate design.
| Best For | Sewers and DIY denim customizers who need clean, professional buttonhole cuts without risking torn stitches or fabric damage. |
|---|---|
| Primary Use | Opening buttonholes |
| Material | Steel |
| Weight | 0.704 ounces |
| Blade Type | Extremely sharp blade |
| Fabric Compatibility | Various fabric types |
| Design Feature | Ergonomic grip |
| Additional Features |
|
- Sharp 12mm chisel blade cuts through multiple denim layers cleanly in one press, saving time and preventing frayed edges
- Ergonomic rubber grip and large handle give you solid control during precision cuts, reducing hand fatigue on repetitive projects
- Includes safety cover for storage, keeping the blade protected and your workspace safer between uses
- Extremely sharp blade requires careful handling and isn’t ideal for households with kids or pets unless stored securely
- 12mm width may be too narrow for oversized or decorative buttonholes on some garment styles
- Needs occasional maintenance like silicone spray to keep the blade cutting smoothly over time
4. Euro Notions Buttonhole Cutter Set
Euro Notions takes that same chisel precision and adds a cutting board right into the package, giving you every tool you need to slice clean buttonholes without hunting through your craft drawer. The 8.5-inch blade delivers buttonhole precision sharper than scissors or a seam ripper could manage, while fabric protection comes built-in with that small cutting board—no scrambling for surfaces.
Though some users note dull blades or cracking boards, proper cutter safety and light tool maintenance keep your distressing elements sharp enough to rival any razor blade or Dremel tool when adding DIY embellishments.
| Best For | Sewers and crafters who want clean, professional buttonholes without the guesswork or risk of damaging their fabric with scissors. |
|---|---|
| Primary Use | Cutting buttonholes |
| Material | Not specified |
| Weight | 1.6 ounces |
| Blade Type | Sharp cutting blades |
| Fabric Compatibility | Various fabrics |
| Design Feature | Includes cutting board |
| Additional Features |
|
- Cuts straight and keyhole buttonholes with sharp, precise edges that protect your satin stitches
- Comes with a small cutting board so you have everything you need in one package
- Works double-duty as a circular cutter for other fabric projects and pattern adjustments
- Some users report the blades arrive dull and need sharpening right out of the box
- The included cutting board can crack if you’re not careful with pressure
- Pricier than basic seam rippers or scissors for what some consider a single-purpose tool
5. Leather Hole Punch Tool
For clean, round perforations that give your denim an industrial edge—think grommets, lacing detail, or hardware accents—a leather hole punch tool cuts through thick fabric with the kind of force scissors just can’t match.
Six hole size options (from 5/64″ to 3/16″) make DIY leather projects and denim customization possible, turning plain distressed jeans into statement pieces.
Keep your punch tool safety in mind—those sharp edges bite—and basic tool maintenance tips like wiping the blade clean extend its life through countless DIY fashion projects and leather crafting experiments.
| Best For | DIYers and crafters who want to add grommets, lacing, or hardware details to denim, leather, and thick fabrics without wrestling with scissors. |
|---|---|
| Primary Use | Punching holes |
| Material | Alloy steel |
| Weight | 0.31 kilograms |
| Blade Type | Circular knife-like edge |
| Fabric Compatibility | Leather, canvas, fabric |
| Design Feature | Self-opening revolving |
| Additional Features |
|
- Six hole sizes give you flexibility for different hardware and design ideas
- Sharp circular blade punches clean holes through tough materials like leather and heavy denim
- Affordable way to customize belts, straps, and jeans at home
- May struggle with really thick or dense materials
- Lining up the punch exactly where you want it can be tricky
- Sharp edges need careful handling to avoid accidents
Frequently Asked Questions (FAQs)
How should I launder my ripped jeans?
Don’t let your hard work go down the drain—literally. Hand washing or using gentle cycles keeps those frayed edges intact, while air-drying prevents fabric breakdown.
Skip bleach; it weakens denim fibers and compromises your custom distressing work.
What type of fabric is best for DIY ripped jeans?
Look for denim weight between 10–14 oz—it frays predictably without falling apart. Raw, indigo fabric with 1–3% elastane content gives you control, clean edges, and that authentic distressed finish you’re after.
Can I use bleach to distress the denim?
Want a sun-faded vintage vibe? You can use bleach for denim customization and distressed jeans effects, but chemical reactions weaken fabric—especially stretch blends—so dilute it carefully and watch for fabric damage during textile manipulation.
How can I make sure the rips look even?
Measure twice, cut once—mark matching spots on both legs with chalk, use a ruler to keep horizontal cuts straight, and step back frequently to check symmetry methods and fabric balance across your denim customization techniques.
Are there any safety considerations when making rips in jeans?
Yes—sharp tools like scissors, razor blades, and knives demand respect. Protect your hands with fabric underneath, keep fingers clear of blades, and work slowly.
Safety glasses shield against flying threads when cutting or sanding.
Can I rip jeans made from stretchy fabric?
You can rip stretch denim, but elastic fiber damage happens faster than in rigid cotton.
Fabric stretch limits mean rip propagation control requires smaller cuts and gentler distressing elements to prevent uncontrolled fiber breakage patterns during wear.
How do I prevent rips from getting bigger?
Ironic that you want bigger holes—until they’re out of control. Stop rip growth with iron-on patches inside, stitch around edges, wash inside-out on delicate, and air-dry your distressed jeans.
Whats the difference between rips and distressing?
Rips expose skin through full holes—bold rebellious openings that define ripped jeans.
Distressing creates worn textures through fading, fraying, and whiskers without cutting through fabric completely, giving distressed jeans their vintage vibe.
Should I wash jeans before or after ripping?
Rip timing depends on your denim type: wash raw jeans first to prevent shrinkage from misaligning holes.
But rip pre-washed pairs before washing—that agitation creates authentic fray control and enhances fabric durability through natural distressing.
Can I rip jeans near pockets or seams?
You can absolutely create pocket seam rips, but approach with caution—these high-stress zones need denim reinforcement and fray prevention.
Weakening fabric near seams accelerates wear, so distress lightly and consider adding subtle stitching for longevity.
Conclusion
Your scissors already knew what they were made for—now your jeans do too. Learning how to make rips in jeans puts design control back where it belongs: in your hands, not some factory’s.
The distressing you create tonight carries more intention than anything mass-produced ever could. Wash them, wear them hard, and watch those frayed edges tell your story. Those $40 jeans just became irreplaceable, and you made that happen in under half an hour.
- https://www.mottandbow.com/blogs/diy/how-to-make-ripped-jeans
- https://www.oreateai.com/blog/how-to-rip-jeans/fed0d874219604bfebda48c91fce2f5f
- https://www.tataneu.com/pages/fashion/apparel-accessories/how-to-wash-ripped-jeans-without-damaging-them
- https://onlinelibrary.wiley.com/doi/10.1111/cote.70043?af=R
- https://www.vogue.com/article/how-to-distress-jeans


