This site is supported by our readers. We may earn a commission, at no cost to you, if you purchase through links.
Your sewing machine starts skipping stitches mid-seam, the thread keeps breaking, or worse, it’s grinding like there’s sand in the gears. These frustrations aren’t signs your machine is dying—they’re cries for help that regular servicing would prevent.
The truth is, most sewing machine problems stem from neglect, not defects, and over 80% of malfunctions trace back to something simple: dust and lint buildup. A machine that gets proper attention, with routine cleaning and oiling, can outlast its warranty by decades and save you hundreds in repair bills.
Learning how to service your sewing machine at home isn’t complicated, and it takes less time than driving to a repair shop. With the right tools and a few straightforward techniques, you can keep your machine running smoothly and catch small issues before they become expensive headaches.
Table Of Contents
Key Takeaways
- Over 80% of sewing machine malfunctions stem from dust and lint buildup, making regular cleaning after every 8 hours of use the single most effective way to prevent breakage, skipped stitches, and costly repairs.
- Proper lubrication with mineral-based sewing machine oil (never WD-40 or household products) at 8-10 metal-on-metal contact points extends machine life by up to 30% and cuts repair costs by 40% over five years.
- Most common problems like thread breaks, tension issues, and skipped stitches trace back to simple fixes you can handle yourself—dull needles, improper threading, or bobbin case debris—without paying for professional service.
- Timing adjustments and electronic issues require professional expertise since DIY attempts increase thread breakage by 400%, but routine home maintenance prevents over 50% of breakdowns that would otherwise cost $130-$400 to repair.
Why Regular Sewing Machine Servicing Matters
Your sewing machine is a lot like a car—skip the regular maintenance, and small issues turn into expensive headaches fast. A little attention now prevents skipped stitches, thread breaks, and those frustrating jams that stop your project cold.
Skip regular maintenance and small issues become expensive headaches fast
Here’s why making time for routine care is worth every minute.
Preventing Common Sewing Machine Problems
When you skip regular sewing machine maintenance, problems pile up fast. Over 80% of malfunctions trace back to dust and residue buildup alone. Cleaning a sewing machine and oiling a sewing machine regularly prevents the most common sewing machine problems before they start.
Here’s what proper sewing machine troubleshooting catches early:
- Thread Quality issues causing breakage
- Needle Selection mistakes leading to skipped stitches
- Tension Adjustment errors creating bird’s nests
- Proper Threading failures and Fabric Compatibility mismatches
Regular maintenance can also help prevent common stitching problems caused by incorrect tension.
Extending The Life of Your Machine
Your sewing machine maintenance habits directly impact machine longevity. With consistent cleaning and oiling after every 500 hours of use, you can extend its working life by up to 30%.
Good storage practices matter too—keeping your machine in a temperature-controlled space adds years of reliable stitching.
Smart usage habits, timely part replacement, and scheduled professional servicing all contribute to sewing machine servicing success. Regular maintenance can greatly boost machine longevity.
Saving Money on Repairs
A longer-lasting machine also means fewer trips to the repair shop. By handling your own sewing machine maintenance—cleaning a sewing machine regularly and oiling a sewing machine properly—you tap into real DIY benefits that cut costs considerably.
Here’s how preventative maintenance saves you money:
- Routine cleaning reduces breakdowns by over 50%, avoiding costly repairs
- Learning basic sewing machine repair tips drops service fees by 40% over five years
- Service negotiation and smart part replacements keep repair trends from draining your wallet
Essential Tools and Supplies for Servicing
Before you start cleaning and oiling your machine, you’ll want to gather a few essential supplies. Having the right tools on hand makes the job easier and helps you avoid accidentally damaging delicate parts.
Here’s what you need to keep nearby.
Must-Have Cleaning Tools
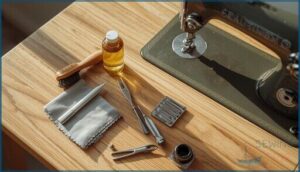
Your cleaning toolkit doesn’t need to break the bank, but you do need the right gear. Lint brushes and soft brushes tackle debris in tight spots, while tweezers become essential for extracting stubborn thread fragments. Microfiber cloths prevent scratches and static buildup beautifully.
| Tool Category | Purpose |
|---|---|
| Lint brushes | Remove bobbin area debris |
| Tweezers | Extract thread from crevices |
| LintFree cloths | Wipe surfaces scratch-free |
| Screwdrivers | Access needle plate |
Keep screwdriver types handy, and consider specialty aids like pipe cleaners for curved spaces.
Choosing The Right Sewing Machine Oil
Picking the right sewing machine oil matters more than you might think. Mineral-based sewing machine lubricant dominates about 90% of the market—it’s clear, odorless, and safe for most home machines. Synthetic vs. mineral comes down to your usage: synthetic oils work better for heavy-duty or industrial oiling a sewing machine.
Watch oil viscosity too; SAE 5–10 prevents gumming. When learning how to lubricate a sewing machine, consider oil additives for wear protection and environmental impact—eco-friendly formulations are growing fast.
Application methods vary by machine design.
What Not to Use During Maintenance
Beyond the right supplies, knowing what to avoid during sewing machine maintenance saves you headaches. Household cleaners like Windex strip paint and dissolve lubricants, causing premature wear. Compressed air pushes lint deeper and risks moisture damage. Petroleum lubricants such as WD-40 gum up moving parts, increasing sewing machine repair costs considerably. Abrasive tools scratch delicate surfaces, while incompatible threads clog tension disks faster when cleaning sewing machine components or oiling sewing machine bearings during troubleshooting.
Step-by-Step Guide to Cleaning Your Sewing Machine
A clean sewing machine is a happy sewing machine, and the good news is you don’t need any special skills to do it right. Before you grab your brush, there’s a simple process to follow that keeps everything safe and thorough.
Here’s how to work through each area of your machine, step by step.
Unplugging and Preparing The Machine
Before you touch a single part, electrical safety comes first. Unplug your machine from the wall outlet, not the machine body, to avoid residual current risks. Your sewing machine manual likely emphasizes this step for good reason. Next, inspect your cord for frays or damage during cord inspection.
Set up your workstation with good lighting, then handle part detachment of removable accessories. This simple preparation makes cleaning your sewing machine safer and oiling your sewing machine easier during maintenance.
Cleaning The Needle Area and Presser Foot
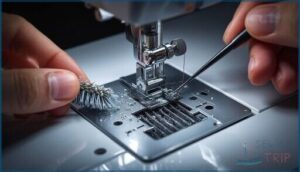
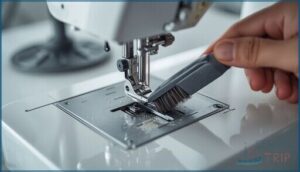
After about eight hours of sewing, your needle area collects lint that causes skipped stitches and tension problems. Remove the presser foot and needle first, then unscrew the needle plate to expose hidden debris.
Use a small nylon brush for lint removal, working around the feed dogs and threading path. Tweezers help extract stubborn thread fragments.
This cleaning frequency prevents corrosion risks and improves performance impact dramatically.
Removing and Cleaning The Bobbin Case
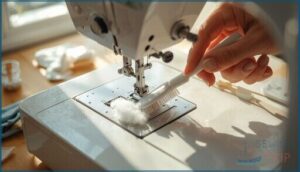
The bobbin case hides more lint than any other part of your machine. Unplug first, then lift the bobbin housing straight up by its edges to avoid bending delicate springs.
Use an anti-static nylon brush or soft baby toothbrush for safe cleaning, working gently into tight crevices. Wipe with a lint-free cloth before reassembling bobbin housing—this prevents 42% of tension problems.
Cleaning Feed Dogs, Top, and Underside
Feed dogs act like a conveyor belt for your fabric, but lint buildup between the teeth and needle plate causes that plate to bounce, affecting stitch formation in over 45% of cases.
Remove the needle plate first, then brush from top to bottom using your nylon brush for thorough lint removal. Tilt the machine to access the underside, vacuuming trapped dust every two weeks to reduce skipped stitches by 27%.
How to Oil and Lubricate Your Sewing Machine
Once your machine is clean, it’s time to give it the lubrication it needs to run smoothly. Oiling isn’t complicated, but you do need to know where to apply oil, how much to use, and how often to do it.
Let’s walk through the key steps to keep your machine’s moving parts in top shape.
Identifying Lubrication Points
When you’re ready to oil the machine, look for metal parts that move against each other. The sewing hook needs attention most—it’s where you’ll hear the loudest noise.
Check the needle bar where it meets the presser foot, the bobbin case’s outer ring, and the feed dogs’ pivot points. If you can access the top shaft, that’s another key spot for sewing machine oil.
Proper Oil Application Techniques
Once you’ve spotted those lubrication points, it’s time to apply the oil correctly. Less is more—just 1 to 2 drops per spot prevents buildup that attracts lint. Use a needle-tip applicator for precision, and always clean the area first with compressed air or a lint brush. After oiling the machine, run it for a minute without thread to distribute the lubricant evenly across all moving parts.
- Apply only 1–2 drops of low-viscosity sewing machine oil at each point
- Use a precision needle-tip applicator to avoid over-application
- Clean all areas with compressed air before applying any lubricant
- Run the machine briefly without thread to spread the oil
- Wipe away any excess oil immediately to prevent debris attraction
How Often to Oil Your Machine
Knowing the right oiling frequency keeps your machine running smoothly. Most manufacturers recommend oiling every 8–10 hours of use, or after 3–4 bobbin changes for hobbyists.
Daily sewers should oil with each project, while occasional users can stretch it to weekly.
Your machine type matters too—vintage models need annual internal lubrication, while modern sealed-bearing machines require less frequent attention. Check your manual for model-specific guidance.
Lubrication Tips for Vintage Machines
Vintage sewing machines need special attention—those 8–12 lubrication points require quality oil like Velocite 10 or synthetic BlueCreeper SMO. Apply just one drop per point to avoid lint buildup, and use grease (not oil) on gears annually.
If your machine sits in a garage or basement, bump up your oiling schedule by 25% since humidity breaks down lubricant faster than you’d think.
Troubleshooting and When to Seek Professional Help
You can handle a lot of issues yourself with regular cleaning and oiling, but sometimes your machine throws you a curveball that needs expert hands. Knowing when to troubleshoot at home versus when to call in a professional will save you time, money, and a whole lot of frustration.
Let’s walk through the warning signs, common fixes you can tackle yourself, and the repairs that are best left to the pros.
Signs Your Machine Needs Professional Service
Ever heard your machine clank, squeak, or grind unexpectedly? That’s your first red flag. Unusual noises, electrical hiccups, visible faults, or skipped service intervals all signal a deeper issue—mechanical or electronic.
If stitch quality dips or fabric feeding goes wonky, pause and take note. When those show up, professional service isn’t just wise—it’s essential.
Fixing Skipped Stitches, Thread Breaks, and Tension Issues
When skipped stitches plague your sewing, start by swapping your needle—dull or damaged needles cause over 70% of skips on medium-weight fabrics. Check your bobbin for burrs, verify fabric compatibility with the right needle type, and rethread carefully.
Thread quality and tension balance matter too, with incorrect tension accounting for 70% of stitch problems. These fixes resolve most thread breaking and tension issues without professional help.
Advanced Repairs and Timing Adjustments
When timing malfunctions strike—causing up to 24% of skipped-stitch cases in lockstitch machines—you’re facing mechanical failures that demand training expertise.
Timing adjustments require technical interventions like feeler gauges and precise 0.05mm clearances, which is why repair shops charge $50–$100 for this delicate work.
Improper outcomes from DIY attempts increase thread breakage by 400%, so electronic issues and sophisticated maintenance truly need professional help.
Maintenance Schedules and Cost Considerations
Think of basic sewing machine maintenance like changing your car’s oil—skip it, and you’ll pay later. Routine maintenance tasks keep your machine humming, with annual servicing frequency costing $130–$200 for domestic models.
Here’s the kicker: consistent servicing prevents deferred maintenance headaches that can exceed $400 in breakdown repairs. Regular servicing translates directly to repair savings and doubled lifespan.
Frequently Asked Questions (FAQs)
Can I use WD-40 on my sewing machine?
No, don’t use WD-40 on your sewing machine. It’s a solvent that attracts lint, dissolves proper lubricants, and leaves gummy residue.
Stick with dedicated sewing machine oil to avoid costly repairs.
How do I clean between tension discs?
Tension discs are gatekeepers to smooth stitching. Slide a folded index card between them to sweep away lint buildup, or use a brush dipped in alcohol. Wipe dry immediately after cleaning to prevent rust.
What causes my needle to break repeatedly?
Needle breaking often traces back to incorrect needle insertion—responsible for over 60% of immediate breaks—or using the wrong needle type for your fabric, which spikes breakage by 58%.
Should I cover my machine when storing it?
An ounce of prevention beats a pound of cure. Yes, you should always cover your machine. Dust protection cuts particulates by 85%, moisture prevention reduces rust by 62%, and manufacturers overwhelmingly recommend this simple preventative maintenance step.
How do I service a computerized sewing machine?
Computerized sewing machines require specialized maintenance tips, including anti-static brushes for electronic component cleaning, sensor maintenance, circuit board checks, and display screen care.
Always consult your manual regarding software update needs before cleaning a sewing machine or oiling a sewing machine.
Conclusion
Here’s the irony: the very thing that helps you create—your sewing machine—falls apart when you ignore it. But now you’ve got the skills to keep it humming.
Cleaning out lint, applying oil to the right spots, and catching problems early transforms how to service your sewing machine from a mystery into routine care.
Fifteen minutes of attention every few projects means decades of reliable stitching. Your machine gave you the tools; now you’ve returned the favor.
- https://welikesewing.com/articles/at-your-service-how-often-should-i-service-my-sewing-machine/
- https://sew-tech-4u.com/blog/how-often-should-a-sewing-machine-be-serviced--key-insights-for-ireland-s-sewists
- https://www.reddit.com/r/sewhelp/comments/1o5gzt4/how_often_do_you_actually_service_your_sewing/
- https://www.vintagesingerparts.com/blogs/sew-central/unlocking-sewing-machine-longevity-the-ultimate-guide-to-oil-and-lubrication
- https://www.keizerbernina.com/service-prices.htm

