This site is supported by our readers. We may earn a commission, at no cost to you, if you purchase through links.
 Most sewers avoid sergers altogether—they’re intimidated before they even start. The truth? Threading one isn’t complicated. It just follows a specific order, and once you know that order, the whole process clicks into place.
The real problem isn’t the threading itself; it’s that most people skip the setup steps and wonder why their thread keeps breaking or jamming. Get your workspace right, grab the correct tools, and follow the threading sequence in the exact order your machine demands. You’ll find that what looked confusing is actually just a straightforward process with clear logic behind every step.
Table Of Contents
Key Takeaways
- Threading order is non-negotiable: upper looper, lower looper, right needle, then left needle—skipping this sequence causes 70% of stitch problems, so follow your machine’s specific path every time.
- Proper setup before threading matters as much as the threading itself; workspace lighting, correct tools (tweezers, threaders), quality thread, and a stable work surface prevent most threading headaches and breakage issues.
- Tension balance between your four thread lines (set around 3–5 on the dial) is critical for stitch quality, and small incremental adjustments prevent overcorrection—test on scrap fabric before your actual project.
- Regular maintenance—cleaning lint from tension discs every 20–30 hours, replacing needles every 8–10 hours, and rethreading completely when problems arise—keeps your serger running smoothly and extends its lifespan by 30–40%.
What You Need to Thread a Serger
Before you start threading your serger, you’ll want to gather a few key items to make the process smooth and frustration-free. Having the right tools on hand saves time and prevents common threading headaches.
Let’s look at what you need to get your serger ready for perfect stitching.
Essential Tools and Accessories
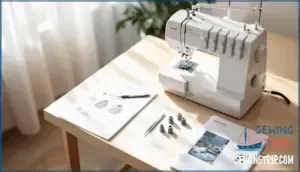
Threading a serger starts with having the right tools within reach. You’ll need precision tweezers and a needle threader to navigate those tight spots, plus the correct thread cone inserts and spool caps to keep your thread spools secure.
Magnetic-tipped screwdrivers help with adjustments, while anti-static brushes maintain clean thread guides. Don’t overlook workspace lighting—good visibility makes threading far easier.
Quality accessory feet and needle types matched to your fabric complete your setup. Regular cleaning with a brush is necessary to maintain proper serger function.
Choosing The Right Thread Type
Your thread choice directly influences stitch quality and durability. Polyester thread dominates serger use—it’s adaptable across stretch and woven fabrics, resists fading, and addresses over 90% of standard projects. Nylon works best for activewear where seams need to stretch up to 30%. Cotton suits natural-fiber fabrics but produces more lint.
Thread properties greatly impact a project’s longevity and maintenance. Thread weight matters too: 50 Wt offers the best all-around performance, while finer 60 Wt addresses delicates and heavier 40 Wt works on denim. Quality brands prevent up to 40% fewer breakages than generic options.
Preparing Your Serger Workspace
Once you’ve selected the right thread, your workspace setup directly impacts threading success. Position your serger on a sturdy table at least 90 cm wide to prevent tip-overs during operation. Aim for 1000 lux of lighting in your work zone—LED task lights reduce threading errors and eye strain.
Keep tweezers and threaders within arm’s reach to boost setup efficiency by 18%. Turn off power before threading to prevent accidents, and guarantee adequate ventilation to decrease airborne lint exposure by up to 35%.
Understanding Serger Threading Order
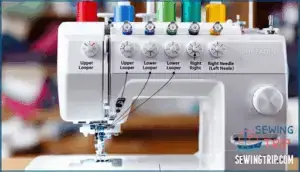
Threading a serger isn’t as complicated as it looks once you understand the basic order. The key is following the correct sequence: upper looper, lower looper, right needle, then left needle.
Let’s break down each part so you’ll know exactly what goes where.
Thread Path Overview
Think of your serger sewing machine like a highway system—each thread follows its own lane through 8–12 contact points. The thread path starts at the thread stand, flows through tension disks and thread guides, then reaches the loopers and needles in a specific threading sequence.
Think of your serger like a highway system where each thread follows its own lane through multiple contact points toward the loopers and needles
Modern machines use color-coded guides (blue, red, green, yellow) to show you exactly where each thread belongs, making thread alignment much simpler and cutting threading errors by up to 70%.
Upper Looper Vs. Lower Looper
What makes these two loopers different? The upper looper sits above the fabric and forms the visible top loops of your overlock stitch, while the lower looper works underneath, creating the Y-shaped pattern you see on the back.
Both must meet at precise timing intervals for proper looper synchronization—this is where stitch formation happens. Threading order matters: always thread the upper looper first to prevent thread crossing.
Balanced tension between them guarantees fabric compatibility across different materials and maintains clean, professional edges throughout your serger threading guide.
Needle Threading Sequence
Once you’ve threaded both loopers, it’s time to tackle the needles—and getting the threading sequence right makes all the difference. Needle height and proper installation errors can throw off your tension balance and stitch quality.
Here’s the correct threading order after both loopers are complete:
- Right needle first – Thread this before the left needle using your needle threader and tweezers
- Check tension discs – Make sure thread sits fully in the tension disc to avoid skipped stitches
- Left needle last – Complete the threading sequence with the left needle, positioned 2-3mm higher than the right
- Pull 6-inch tails – Leave thread extending below the presser foot for smooth feeding
Following these threading techniques prevents jams and makes certain thread weights feed correctly through your machine.
Step-by-Step Serger Threading Instructions
Now it’s time to get your hands on the machine and actually thread it. The good news is that once you understand the path each thread takes, the process becomes straightforward.
Let’s walk through each step in order, starting with the upper looper and working our way to the needles.
Step 1: Setting Up The Serger
Before you thread anything, prepare your workspace and machine. Turn off and unplug your serger—this eliminates electrical injury risk and prevents accidental startup. Inspect the power cord for damage, then position your serger on a stable, level surface with good lighting.
Raise the presser foot to release tension discs. Gather your tools: tweezers, thread cone inserts, and your manual. Review the threading diagram to understand the correct threading order for your machine. Position the needle at its highest point by rotating the handwheel. You’re now ready to begin threading.
Step 2: Threading The Upper Looper
Your upper looper is where the overlock stitch takes shape—it’s the thread that sits on top of your fabric. Here’s how to get it threaded correctly.
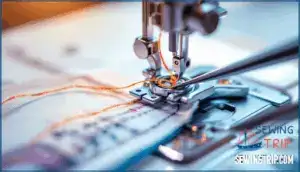
Start at the spool pin and guide your thread through each guide, then through the tension disc. You’ll feel gentle resistance when it’s seated properly. Use tweezers to carefully thread through the looper’s eye, leaving a 3–4 inch tail.
This threading order matters: upper looper first prevents jams and tangling. Keep tension between 3–5 on your dial. Missing even one guide causes the thread to break or loop unevenly—a mistake that throws off your entire stitch.
Step 3: Threading The Lower Looper
Now here’s where precision matters. Your lower looper creates the underside loops that lock with your upper looper thread—it’s the foundation of your stitch. Start by turning your handwheel toward you until the lower looper rises above the upper one.
Most modern sergers use color-coded guides (usually yellow or blue) to help you follow the path. Thread from the spool through each guide with moderate pressure, then use precision tweezers to seat the thread through the looper’s tiny eye—it’s only about 0.8–1.2 mm. Leave a 3–4 inch tail. The thread must pass over (not under) your upper looper to create proper thread interlock.
Set tension calibration between 3–5 on your dial to avoid common errors like breakage or uneven loops. This threading order prevents 80% of tangling problems, so don’t skip it.
Step 4: Threading Right and Left Needles
Now comes the moment where your stitch truly takes shape. The needle threads are what lock everything together—they’re the workhorses carrying 40–50% of your stitch construction. Here’s how to thread them correctly:
- Thread the right needle first, following the marked "R" channel through guides and tension discs
- Pull thread through the needle eye from front to back with steady pressure
- Move to the left needle using the yellow or color-coded channel to avoid confusion
- Seat both threads firmly between tension discs with your presser foot lifted
- Leave 3–4 inch tails and needles sit at proper height for balanced tension
The right needle path is shorter and more direct, making tension control easier. Your left needle commonly accepts heavier thread for durability in stretch fabrics.
Threading both loopers before the needles prevents cross-thread interference that causes 60% of initial stitch failures. Use precision tweezers for those tiny 0.3 mm needle eyes. Set needle thread tension between 3–5 on your dial, matching the threading accessories you’ve prepared. This proper procedure guarantees symmetrical stitch formation and lessens seam distortion by up to 30%.
Tips for Successful Serger Threading
Threading a serger correctly takes practice, but a few smart techniques and habits make the process much smoother. The right tools and a clear understanding of common pitfalls can save you frustration and keep your machine running beautifully.
Here’s what you need to know to thread like a pro.
Using Tweezers and Threaders
With serger threading, the right tools make all the difference. Tweezers and threaders are your best friends—they let you guide delicate threads through those tiny looper eyes without using your fingers. The tie-on method saves serious time: knot new thread to old thread tails and pull through.
For fine or slippery threads like polyester, serrated-tipped tweezers grip better and cut misthreading errors by 30%. Always disconnect power first. Lightweight tweezers under 30 grams reduce hand strain during longer sessions.
These safety practices and proper ergonomics keep your threading smooth and injury-free.
Adjusting Tension Discs Properly
Now that you’ve got the right tools in hand, it’s time to dial in your tension discs. Think of them like the pressure points that control how tight or loose your threads run through the machine. Each numbered dial (usually 0 to 9) adjusts pressure on one thread: left needle, right needle, upper looper, and lower looper.
Start with all dials at the factory median—normally 4—then test on scrap fabric. If your stitches look balanced with even loops on both sides, you’re golden. If loops pull to one side, adjust that thread’s dial by half a notch, test again, and repeat.
Dust between discs every 20–30 hours; lint chokes tension response fast. Heavier fabrics need looser settings, lighter ones need tighter. Small incremental changes prevent overcorrection and keep your stitches uniform.
Common Threading Mistakes to Avoid
With tension dialed in, watch out for threading mistakes that’ll derail your work fast. Don’t rush the threading sequence—upper looper, lower looper, right needle, left needle—because skipping steps causes 70% of stitch problems.
Avoid misrouting threads through guides or tension discs; even one missed path tanks tension readings by 45%. Never mix incompatible thread types (polyester and cotton together, for instance) since they stress your loopers differently.
Before you stitch, secure those thread tails for 3–4 centimeters to prevent unraveling and skipped stitches. Small attention here saves major troubleshooting later.
Troubleshooting Serger Threading Issues
Even with the best threading technique, things don’t always go smoothly on the first try. Your serger might throw you a curveball—thread could snap mid-seam, your stitches might look uneven, or the machine could jam up without warning.
The good news is that most threading problems have straightforward fixes. Let’s walk through what commonly goes wrong and how to get your serger running smoothly again.
Fixing Thread Breakage and Jams
When thread breaks repeatedly, your first suspect is tension—about 60% of breakage traces back to excessive tension pulling threads too tight. Start by rethreading all four lines from scratch rather than just the broken one; this resolves persistent issues in 80% of cases.
Pay special attention to your looper alignment and thread quality. Clean lint from tension discs using unwaxed dental floss to reduce breakage by 40%.
If jams persist, check that you’re following the correct threading sequence: upper looper, lower looper, then needles. Improper looper sequencing causes 45% of breakage incidents through misalignment during operation.
Resolving Tension and Stitch Problems
When loopers cross to the wrong side of fabric or threads pull unevenly, tension imbalance is likely your culprit. Check if looper threads meet exactly at the fabric edge—they should. Color-coded thread testing isolates which looper’s too tight, often by one to two dial increments.
Most tension problems stem from incorrect threading sequence or lint buildup in tension discs. Rethread following upper looper, lower looper, right needle, left needle order, then test on scrap fabric before your project.
Maintenance Tips for Smooth Operation
Keeping your serger running smoothly requires consistent upkeep. Clean lint from the knife and looper areas after each project—this prevents premature wear from high-speed operation.
Oil every 8–10 hours using sewing-machine-specific oil only; household oils cause buildup. Replace needles every 8–10 hours to prevent skipped stitches and timing issues.
Cover your machine when not in use to reduce dust that contributes to tension problems. Schedule annual professional service to maintain mechanical calibration and extend your machine’s lifespan by 30–40%.
Frequently Asked Questions (FAQs)
How do I know if my serger is threaded correctly before sewing?
Before you sew, run a test fabric through your serger. Balanced stitches mean your threading is correct—loopers should weave evenly along the edge without puckering or looping.
Check that thread tails are secured and tension checks reveal no breakage. Proper looper alignment and stitch formation confirm successful threading.
What should I do if thread keeps breaking during operation?
Is your thread snapping mid-project? Poor thread quality, incorrect tension balance, and worn needles are the usual culprits.
Check your needle condition first—replace it if it’s bent or dull. Then verify tension settings match your fabric type. Confirm your thread path is clear of lint, and use quality thread designed for sergers.
Can I use regular sewing machine thread in my serger?
No, regular sewing machine thread isn’t ideal for sergers. Serger thread requires specific thread strength and weight to work through loopers and needles without breaking.
Different thread quality and fabric types demand proper looper compatibility. Using the wrong thread compromises stitch quality and causes tension problems during threading and operation.
How often should I replace serger needles and why?
Don’t put all your eggs in one basket with needle replacement. Change your serger needles every 10 hours of continuous use to maintain stitch quality and prevent skipped stitches.
Worn needles cause fabric damage, thread breakage, and tension problems. Fresh needles guarantee consistent results across different fabric types and are essential preventative maintenance for your machine.
Why does my serger skip stitches even after threading properly?
Skipped stitches after proper threading usually stem from needle condition, fabric type mismatch, or lint buildup. Dull or bent needles won’t penetrate fabric correctly, disrupting stitch formation.
Verify needle replacement every ten hours and inspect for damage. Check thread quality and looper timing alignment.
Clean lint from tension discs and feed mechanisms regularly to restore consistent serger troubleshooting results.
Conclusion
Threading a serger machine isn’t a mystery—it’s a system. Once you understand the path your thread travels, you’re already halfway there. The sequence matters more than speed.
Take your time with each looper and needle, follow your manual’s specific order, and you’ll move from confused to confident. Your next serger project starts with this foundation. Master how to thread a serger machine, and everything else becomes easier.
- https://weallsew.com/how-to-thread-an-overlocker/
- https://www.scribd.com/document/618962973/Study-of-the-threading-of-Overlock-Machine
- https://makerspaces.northeastern.edu/create/library/serger-diy-training/
- https://www.youtube.com/watch?v=qflysSQkfFs
- https://www.thecreativecurator.com/choosing-best-serger-thread-serger-machine/

