This site is supported by our readers. We may earn a commission, at no cost to you, if you purchase through links.
Your sewing machine won’t tell you when it’s starving for oil. It will just start skipping stitches or grinding like it’s chewing gravel. Most sewists never oil their machines until something goes wrong.
By then, friction has already worn down metal parts that should glide smoothly for decades. A properly oiled machine runs quieter and stitches more evenly. It also lasts years longer than one left to fend for itself.
The process takes less than ten minutes once you know which parts need attention. You’ll learn to identify the key oiling points and choose the right lubricant. More importantly, you’ll understand why regular maintenance beats expensive repairs every time.
Table Of Contents
Key Takeaways
- Most sewists never oil their machines until problems appear, but by then friction has already damaged metal parts that should last decades with proper maintenance.
- You need clear mineral-based sewing machine oil applied in 1-2 drops at specific metal-on-metal points every 8-10 hours of use, never WD-40 or household oils that cause buildup.
- Clean lint from the bobbin case and feed dogs before oiling because debris traps lubricant in the wrong places and causes skipped stitches.
- Over-oiling attracts lint and stains fabric while under-oiling creates grinding sounds and sluggish movement, so wipe away excess after application.
Preparing Your Sewing Machine for Oiling
Before you pick up that oil bottle, you need to set the stage. A few simple steps now will protect your machine and make the whole process smoother.
Let’s walk through what you need to do first.
Safety Precautions and Unplugging
Before you start machine lubrication, unplug your sewing machine from the wall. This simple step eliminates shock hazards and fire prevention risks tied to energized circuits. Women account for over 83% of sewing machine injuries. Unplugging benefits you by cutting electrical safety threats during sewing machine maintenance. Don’t skip this—it’s your first line of defense against maintenance risks.
Regularly practicing energy saving tips can also reduce overall household risks.
Gathering Essential Materials
Now you need the right tools. Grab clear sewing machine oil—about 4 to 8 ounces does the job. Add a fine-tipped applicator to control each drop.
Your Sewing Kit should include at least one lint brush for bobbin debris. Toss in two or three lint-free Cleaning Cloths to wipe excess oil. Compressed air helps reach tight spots.
Keep these supplies together for fast machine lubrication every time. Regular machine care routines are essential for maintaining your sewing machine’s performance.
Consulting The Machine Manual
Your manual instructions hold every detail you need. Flip to the maintenance schedules and oil guidelines specific to your model. Look for UserWarnings about safety precautions—some machines run on factory grease and never need user oiling. Check diagrams that show exactly where machine lubrication belongs.
Missing your booklet? Contact the manufacturer with your serial number to download a fresh sewing machine upkeep guide.
Removing Thread, Bobbin, and Accessories
Once you’ve reviewed the manual, power off and pull the plug. Cut your upper thread at the spool and guide it out toward the needle. This thread removal prevents contamination during oiling.
Remove the needle and presser foot next. Lift out the bobbin case and bobbin. Unscrew the needle plate to expose the hook race.
Detach any extension table or accessory to clear your workspace for hook cleaning and thorough sewing machine maintenance.
Cleaning The Machine Before Oiling
A clean machine is the foundation for effective oiling. Dust and lint act like tiny roadblocks that trap oil in all the wrong places. Before you apply a single drop, you need to clear away the debris hiding in your machine’s moving parts.
Brushing Away Lint and Dust
Before you reach for oil, you need a clean machine. Lint accumulation clogs moving parts and causes skipped stitches.
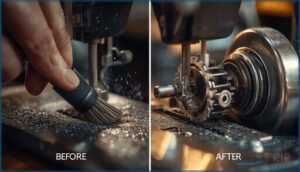
Use your soft cleaning brush every 2-3 bobbin changes. Remove the needle plate first. Brush outward from the bobbin case and feed dogs. Short gentle strokes work best.
This lint removal prevents jamming and keeps your machine running smoothly.
Using Compressed Air Safely
Many technicians warn against compressed air for sewing machine care. It drives lint deeper into internal areas where you can’t reach it. If your manual allows compressed air, follow strict safety precautions:
- Keep nozzle pressure under 30 psi to prevent injury
- Hold the canister 4+ inches away from openings
- Direct air parallel to surfaces, never straight into mechanisms
- Wear eye protection against flying debris
A nylon brush remains the safer lint removal method.
Cleaning Under The Stitch Plate
Lint piles up fastest where fabric meets metal. Unscrew your needle plate after every 8 to 10 hours of stitching. Use a small nylon brush to sweep debris from the feed dog and throat plate cavity.
Cotton thread sheds heavily in the bobbin area, so check this zone after 3 to 5 bobbins. Remove compacted lint before applying sewing machine oil to any moving parts.
Wiping Bobbin Hook and Feed Dog
Your needle works inches from where lint turns into concrete. Pull out the bobbin case and you’ll find clumps wedged around the hook race and feed dog teeth.
Use a stiff brush or tweezers for Lint Removal and Hook Maintenance. Wipe the bobbin hook with a dry microfiber cloth to capture fine dust.
This Bobbin Care step protects stitch quality and improves Sewing Efficiency before you apply any machine oiling.
Choosing The Right Sewing Machine Oil
The oil you choose makes all the difference in your machine’s performance. Not all lubricants are safe for sewing machines. Let’s look at what works and what to avoid.
Types of Sewing Machine Oil
Your machine needs the right oil viscosity to run smoothly. Most sewing machine oils are light mineral-based machine lubricants with kinematic viscosities around 32 centistokes at 40°C. You’ll find synthetic oils with specialized lubricant additives for high-speed performance. Some brands now offer eco-friendly biodegradable options.
Always choose dedicated sewing machine oil—never household substitutes—for proper machine lubrication and lasting sewing machine maintenance.
Synthetic Vs. Mineral Oil
Should you reach for synthetic or mineral oil for your machine lubrication needs? Synthetic oils deliver enhanced Oil Longevity and Synthetic Benefits with viscosity indexes above 120. They resist oxidation far longer than mineral types.
Mineral sewing machine oil costs less and works well for home machines. Synthetic options excel in high-speed industrial settings.
Both Lubricant Types support proper sewing machine maintenance when you follow your oiling guide correctly.
Eco-Friendly and Biodegradable Options
Biodegradable oils made from vegetable-based renewable resources now dominate eco-friendly lubricants. These green manufacturing products capture roughly 88% of the bio-lubricant market.
Sustainable materials like high-oleic canola or soybean oil offer excellent machine lubrication with higher flash points around 610°F. They biodegrade within 28 days in standard tests.
Your oiling guide can include these eco-friendly options for responsible sewing machine maintenance using proper oil application techniques.
Oils to Avoid (WD-40, Household Oils)
While eco-friendly options work well, some products spell disaster for your machine. WD-40 removes protective oil films instead of lubricating. It leaves parts dry and prone to damage.
Never use these oils:
- WD-40 – strips away existing lubrication and evaporates quickly
- 3-in-1 oil – becomes sticky and gum-like under heat
- Automotive oils – contain additives that cause varnish buildup
- Cooking oils – oxidize rapidly and turn rancid
Oil contamination from these lubricant alternatives leads to seized parts and costly repairs.
Step-by-Step Oiling Process
Now that your machine is clean and you’ve chosen the right oil, it’s time to put everything into action.
The actual oiling process requires precision and care to protect your machine’s performance. Let’s walk through each step so you can oil your sewing machine safely and effectively.
Identifying Oiling Points
Your manual holds the map to every lubrication point. Open to the oiling guide and locate diagrams that mark each spot with oil symbols.
Most machines feature 3–10 points depending on age and design. Common areas include the bobbin hook race, needle bar bushings, and feed dog linkages.
Metal-on-metal joints need attention while plastic parts don’t.
Applying Oil to Moving Parts
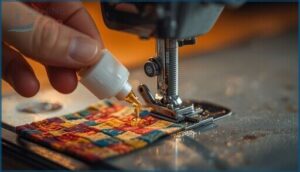
Once you’ve mapped your lubrication points, apply one or two drops of sewing machine oil to each. Start with the bobbin hook race. Target friction reduction at metal joints.
Turn your handwheel slowly so moving parts glide through the fresh lubricant. This simple drop application ensures machine longevity.
Follow this precise oiling guide:
- Apply 1–2 drops to the bobbin case
- Add a single drop into the hook race
- Lubricate the needle bar bearing
- Oil the feed dog linkage
- Turn the handwheel to distribute oil evenly
Proper machine lubrication keeps everything running smooth.
Wiping Away Excess Oil
Precision matters after oil application techniques meet sewing machine maintenance reality. Use a clean lint-free cloth to wipe all accessible metal surfaces until only a thin sheen remains.
This oil removal tip prevents excess oil dangers like sticky lint buildup and fabric stains. Rotate your handwheel several times. Check for fresh beads of oil. Remove any oil residue you spot for proper machine oiling results.
Avoiding Oil on Fabric-Contact Areas
Keep sewing machine oil away from needle maintenance zones and presser foot care areas that touch fabric directly. Never oil tension discs or the needle shaft. Focus your oil application techniques only on the needle bar housing and internal pivot points.
After lubrication, place scrap fabric under your presser foot to catch any drips. Run test stitches on remnants before sewing your project. This fabric protection ensures stitch quality stays clean.
Maintenance Tips and Troubleshooting
Oiling your machine is just the beginning. Proper maintenance extends its life and prevents frustrating breakdowns.
Let’s cover how often to oil, what warning signs to watch for, and how to solve common problems that pop up along the way.
Oiling Frequency Based on Usage
Your machine’s appetite for oil depends on how hard you work it. Light home users can oil every three to four months. Heavy users need machine lubrication every eight to ten hours of sewing. Industrial machines demand daily attention.
Dusty environments and thick fabrics shorten oil intervals. Follow your manual’s lubrication schedules. Regular maintenance based on usage patterns prevents machine wear and keeps your sewing hours productive.
Signs Your Machine Needs Oiling
Your machine speaks to you through noise levels and sluggish movement. Listen for grinding sounds or unusual squeaks during stitching. Watch for stitch quality problems like skipped stitches or thread breaks. Feel for heat issues around the needle bar.
Friction signs include stiff handwheel turning and reduced stitching speed. These symptoms tell you it’s time for sewing machine oil and proper machine lubrication to restore smooth performance.
Regular Cleaning and Inspection
Your maintenance schedule should fit your sewing rhythm. Daily users need thorough lint removal weekly. Casual sewers clean monthly.
Always inspect the bobbin hook and feed dogs after each project. Use your lint brush and cleaning tools around these high-risk areas. Check for compacted debris between feed dog teeth.
Schedule professional servicing annually for average use. Every 300 to 500 hours demands fresh sewing machine oil application.
Troubleshooting Common Issues
Even after oiling, problems can surface. Watch for these red flags that signal deeper trouble:
- Thread Tension loops or bird nesting often mean incorrect threading in tension discs
- Noise Issues like grinding or knocking suggest worn bearings or misalignment
- Oil Leaks and Fabric Staining indicate over-lubrication or seal failure
- Machine Overheating with vibration requires professional sewing machine repair within 2–3 years
Frequently Asked Questions (FAQs)
How to oil a sewing machine?
Ever wondered why a well-oiled machine runs smoother? Proper sewing machine lubrication begins with unplugging your equipment.
Apply one to two drops of low-viscosity oil on moving metal parts. Wipe away excess carefully.
What is a suitable oil for a sewing machine?
Choose clear mineral oil designed for sewing machines. Synthetic options like Tri-Flow offer enhanced stability. Avoid WD-40 and household oils. Proper viscosity prevents buildup while biodegradable alternatives support eco-friendly maintenance.
How often should you oil your sewing machine?
Your sewing machine maintenance depends on usage levels and fabric types. Oil after every 8–10 hours of active sewing for domestic models.
Daily use and high sewing speed require more frequent machine lubrication.
Can you use too much oil when oiling a sewing machine?
One drop too many and you’ve opened the floodgates to disaster. Yes, you can absolutely over-oil your machine.
Excess oil attracts lint, stains fabric, and creates sticky buildup that slows performance.
How much oil do you use on a sewing machine?
You’ll need just one or two drops at each oiling point. Most home machines require fewer than ten drops total per session.
This minimal oil application prevents staining and maintains ideal machine lubrication performance.
Why should you use sewing machine oil?
Proper machine lubrication reduces friction and wear on moving parts. It extends your machine’s lifespan.
Regular oil application prevents rust and corrosion. It also improves stitch quality and keeps operation smooth and quiet.
Can I oil a computerized sewing machine?
Most computerized machines don’t need user oiling. Over 80% specify “no oiling” around electronics.
Check your manual—only designated hook areas may require 1-2 drops.
Incorrect lubrication voids warranties and damages sensors.
What happens if I over-oil my machine?
Like adding too much water to a recipe, excess lubrication creates messy problems. Oil contamination ruins fabric.
Machine wear accelerates from debris buildup.
Maintenance costs climb as you clean pooling lubricant from delicate components regularly.
How do I dispose of used sewing oil?
Take used sewing machine oil to a household hazardous waste facility or oil recycling center. Never pour it down drains or into trash. Contact your local waste authority for proper disposal locations.
Does warranty cover oil-related machine damage?
Most warranties won’t cover machine failure from user neglect or wrong sewing machine oil.
Repair costs fall on you when improper machine lubrication causes damage—even if warranty claims initially seem valid.
Conclusion
A neglected sewing machine loses up to 40% efficiency within its first year. That’s stitches skipped and seams bungled because friction ate through precision parts.
Your oiling a sewing machine guide keeps metal gliding smoothly instead of grinding to dust. Ten minutes of maintenance now beats hours of repair later.
Oil the moving parts. Wipe away excess. Run a test seam. Your machine will reward you with decades of quiet reliable stitching instead of expensive breakdowns.
- https://www.dainessewing.com/blog/best-practices-for-oiling-lubricating-your-sewing-machines
- https://www.vintagesingerparts.com/blogs/sew-central/unlocking-sewing-machine-longevity-the-ultimate-guide-to-oil-and-lubrication
- https://www.franklinsgroup.com/how-often-should-i-clean-and-oil-my-sewing-machine/
- https://www.hooptalent.com/vi/blogs/news/how-to-oil-your-embroidery-machine-a-complete-maintenance-guide
- https://www.mobil.com/en-cn/industrial/pds/ap-xx-mobil-velocite-sm-series


