This site is supported by our readers. We may earn a commission, at no cost to you, if you purchase through links.
Match your needle size to your fabric weight, and you’ll avoid most headaches. Adjust tension settings when threads look loose or puckered.
Clean your machine regularly to prevent lint buildup that causes feeding issues. Wrong thread type? That’s another common troublemaker.
Use quality thread that matches your project needs. Most stitching disasters stem from these simple oversights, not machine malfunctions.
Master these fundamentals, and you’ll discover techniques that transform frustrating sewing sessions into smooth, professional results.
Table Of Contents
Key Takeaways
- Check your needle first – You’ll solve most stitch problems by matching needle size to fabric weight and replacing needles every two projects, since bent or dull needles cause thread breaks and skipped stitches.
- Master tension settings – You can fix loose loops and puckered fabric by adjusting upper thread tension between 3-4 and testing on scraps, remembering that balanced stitches lock perfectly in the fabric’s center.
- Clean your machine regularly – You’ll prevent feeding issues and thread breakage by removing lint from feed dogs and bobbin areas after every project, plus oiling moving parts monthly.
- Use quality thread and proper threading – You can eliminate most thread problems by choosing high-quality thread that matches your project needs and rethreading completely whenever you change tension settings.
Common Sewing Issues
You’ll encounter four main sewing problems that can turn any project into a frustrating experience: thread breakage, skipped stitches, tension issues, and needle damage.
These issues share common causes like incorrect threading, worn needles, and improper machine settings that you can fix with basic troubleshooting steps.
Thread Breakage and Fraying
Thread breakage and fraying plague even experienced sewers. Poor thread quality with weak fibers snaps under pressure, while incorrect thread tension creates excessive stress.
Lint buildup in your machine’s threading path catches fibers, causing breaks. Check your needle size matches thread weight—mismatched pairs increase friction.
Replace low-quality thread immediately and clean threading guides regularly for breakage prevention. To minimize thread issues, understanding thread weight basics is essential for superior sewing performance and to avoid common mistakes like thread breakage due to incorrect thread tension.
Skipped Stitches and Uneven Feeding
Skipped stitches and uneven feeding plague even experienced sewers, turning smooth projects into frustrating battles. When your machine starts acting up, these feed dog issues and stitch skipping problems need immediate attention through proper tension adjustment and fabric guidance checks.
To resolve these issues, understanding common sewing problems is essential for effective troubleshooting.
- Check your needle – A bent or dull needle causes stitch skipping faster than you’d expect
- Inspect feed dogs – Lint buildup underneath creates uneven fabric movement and thread pathing disasters
- Verify thread pathing – Incorrect threading through tension discs leads to uneven tension and persistent sewing machine troubleshooting headaches
Incorrect Tension Settings
Wrong thread tension creates a cascade of sewing headaches.
Your upper thread tension knob controls stitch quality—too tight causes fabric puckering, too loose creates messy loops underneath.
Start with tension settings between 3-4, then test on scraps.
Make small tension adjustments until stitches lock perfectly in fabric’s center, remembering to rethread completely before changing any tension settings for accurate results, and aiming for a setting that allows stitches to lock perfectly in fabric’s center.
Needle Damage and Breakage
Damaged needles wreak havoc on your stitching projects.
Needle inspection reveals bent tips, dull points, or burrs that cause thread snagging and fabric damage.
Replace needles every two projects to prevent breakage causes like stress fractures.
Check needle alignment after installation—misaligned needles create cutting action on thread.
When needles break mid-seam, stop immediately and examine the machine for bent needle remnants.
Troubleshooting Basics
When your sewing machine acts up, start with the basics before assuming you need expensive repairs.
Check your threading, clean out lint buildup, and verify your tension settings—these three steps solve most common stitch problems you’ll encounter.
They are fundamental to resolving issues and should be considered basics before seeking further assistance.
Regular Machine Cleaning and Maintenance
Your sewing machine craves attention like a faithful companion. Start with lint removal from the bobbin area and feed dogs using tweezers. Schedule oiling frequency every 8-10 hours of use with machine-specific oil.
Your sewing machine is your creative partner—treat it with the care it deserves and it’ll reward you with flawless stitches.
Replace needles after two projects to maintain precision. Clean tension discs monthly and the bobbin case weekly.
A clean environment also boosts operator morale, as workspace organization matters.
Consistent sewing machine maintenance prevents costly repairs and guarantees flawless stitching performance.
Proper Threading and Tension Adjustment
Most threading problems stem from skipping steps in the Threading Order.
Start by lifting your presser foot, then follow the Thread Path from spool to needle, ensuring proper Tension Balance.
Wind your Bobbin Winding evenly and insert correctly.
After rethreading both upper thread and bobbin thread, run Test Stitching on scrap fabric to check thread tension before starting your project.
Identifying and Resolving Basic Issues
When your machine acts up, start with an Initial Inspection. Check if it’s plugged in—Power Issues are surprisingly common.
Listen for unusual Machine Sounds that signal trouble. Most sewing machine problems stem from User Error rather than mechanical failure.
Before panicking about thread breakage or skipping stitches, try these Simple Fixes: rethread completely, check stitch tension settings, and verify that your needle isn’t bent.
Stitch Quality and Tension
Perfect stitches depend on proper tension settings and correct stitch adjustments that work together to create balanced seams.
You’ll master these fundamental controls by understanding how upper thread tension, bobbin tension, and stitch length affect your final results.
Adjusting Stitch Length and Width
Your machine’s stitch length dial controls everything from delicate hems to bold topstitching.
Adjust from 0 (shortest) to 5 (longest) based on your fabric considerations and project needs.
Stitch width determines zigzag spread and decorative stitching effects.
Longer stitches work great for basting, while shorter ones strengthen seams.
Master these machine settings, and you’ll control every stitch with confidence.
Regular cleaning helps prevent inconsistent stitch lengths to ensure consistent and high-quality results.
Upper Thread Tension Adjustment
Perfect stitches start with proper tension wheel settings.
Turn your dial gradually between 2-5 while testing on scrap fabric.
Check the thread path for obstructions that cause uneven flow.
Clean tension discs regularly to prevent buildup.
Balanced stitch formation means no fabric underside loops or loose stitches appearing.
Higher numbers increase upper thread tension, preventing thread breakage through careful adjustment, ensuring balanced stitch formation.
Bobbin Thread Tension Adjustment
Unlike upper thread tension that’s easily adjusted, bobbin tension requires a delicate touch with the bobbin case screw. Most factory bobbin settings work perfectly, but thread weight balance issues demand precision adjustments.
- Test current tension – Pull bobbin thread through case; it should flow smoothly with slight resistance
- Use tension gauge – Measure consistent pressure for accurate bobbin thread control
- Turn screw clockwise – Increases tension gradually; counterclockwise decreases it
- Ensure consistent bobbin winding – Uneven winding creates variable tension throughout seaming
- Reset to factory settings – When sewing stitch issues persist, return to original bobbin tension specifications
Needle and Thread Compatibility
Matching your needle size to your thread thickness prevents most stitching problems you’ll encounter.
When you use the wrong combination, you’ll get skipped stitches, thread breakage, and frayed seams that ruin your project, which can be avoided by using the right combination of needle and thread.
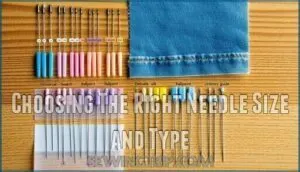
Choosing The Right Needle Size and Type
Your needle selection directly impacts stitch quality and fabric integrity.
Match needle size to fabric weight—size 60 for delicate silk, size 80 for cotton, size 90 for denim.
Universal needle types work for most projects, while ballpoint needles prevent snags on knits.
Check the needle point for sharpness and inspect the eye size for proper thread compatibility.
Refer to a complete needle guide for specific fabrics.
Replace needles every 8-10 hours of sewing to maintain optimal performance.
Selecting Suitable Thread Types and Qualities
Your choice of thread makes or breaks your project. Thread Fiber Types range from cotton for quilting to polyester for stretch fabrics. Thread Weight Matters – lighter numbers mean thicker thread. High-quality thread prevents breakage and maintains Thread Colorfastness through washes.
Different projects may also require different needles, so it’s essential to take into account needle size and fabric when selecting your materials.
- Cotton thread works best for natural fabrics and quilting projects
- Polyester thread handles stretch fabrics and frequent washing cycles
- Specialty Thread Uses include metallic for decoration and invisible for hems
Preventing Thread Fraying and Breakage
When thread quality drops, so does your sewing success.
Choose high-quality thread that won’t shed fibers or snap under pressure.
Check needle condition regularly—dull needles shred thread like sandpaper.
Maintain proper tension balance to prevent excessive stress on fibers.
Keep your thread path smooth and clean, ensuring no rough edges catch delicate strands.
Regular machine maintenance prevents most thread breakage issues, which is crucial for sewing success and using proper tension.
Ensuring Proper Needle and Thread Alignment
Proper needle positioning starts with correct insertion—flat side faces back, pushed fully into the clamp.
Check needle alignment by lowering it slowly; it should center perfectly through the needle plate hole.
Match needle size to thread type and fabric weight. Quality needles stay straight longer, preventing thread tension issues.
Replace bent needles immediately to maintain consistent stitch formation and ensure that the needles stay straight, which is crucial for preventing thread tension issues.
Advanced Sewing Solutions
When you’ve mastered basic needle and threading techniques but still face complex fabric feeding issues or uneven stitches, you need specialized solutions that go beyond standard adjustments.
These advanced troubleshooting methods address presser foot pressure settings, specialized accessories, and professional-grade techniques that transform problematic projects into perfectly executed seams.
Resolving Fabric Feeding and Movement Issues
Fabric-feeding nightmares disappear when you master these fundamentals.
Check your drop-feed setting isn’t accidentally engaged, then inspect feed dogs for lint buildup requiring thorough cleaning.
Adjust presser foot pressure based on fabric types—lighter for delicates, firmer for heavy materials.
Consider fabric stabilization techniques for slippery textiles.
Walking foot attachment eliminates fabric feed inconsistency, ensuring smooth operation across challenging projects.
Using Specialized Feet and Accessories
Specialized presser foot accessories transform your machine into a problem-solving powerhouse.
Each foot tackles specific sewing machine problems with precision, eliminating common stitch problems before they start.
Master these tools and you’ll handle any fabric challenge with confidence.
- Walking Foot – Prevents fabric layers from shifting during quilting and thick material sewing
- Zipper Foot – Allows close stitching alongside zippers and piping for professional results
- Buttonhole Foot – Creates consistent, precise buttonholes with built-in measuring guides
- Blind Hem Foot – Produces invisible hems on curtains, pants, and skirts effortlessly
- Gathering Foot – Automatically gathers fabric while sewing, saving time on ruffles and pleats
For specialized sewing needs, consider exploring walking foot options.
Adjusting Presser Foot Pressure and Settings
Your presser foot pressure controls how firmly fabric feeds through your machine. Too much pressure crushes delicate materials, while too little causes skipped stitches.
Adjust the dial gradually—test on scraps first. Proper pressure guarantees consistent feeding and stitch quality.
| Fabric Type | Pressure Setting | Common Issues |
|---|---|---|
| Lightweight/Silk | Low (1-2) | Puckering, stretching |
| Medium Cotton | Medium (3-4) | General sewing standard |
| Heavy Denim | High (5-6) | Poor fabric feeding |
| Stretch Knits | Low-Medium (2-3) | Fabric distortion |
Mastering Advanced Sewing Techniques and Stitches
Once you’ve mastered presser foot adjustments, advanced sewing techniques reveal your creative potential.
Complex garment construction demands precision in specialty stitches and decorative techniques. Pattern alterations require understanding how different sewing stitch types interact with fabric behavior.
Master these advanced approaches:
- Specialty Stitches – Perfect buttonholes and blind hems through controlled stitch tension
- Decorative Techniques – Execute embroidery and appliqué with consistent thread tension
- Pattern Alterations – Modify designs while maintaining structural integrity
- Garment Construction – Layer multiple sewing techniques for professional results
- Quilting Methods – Combine hand and machine stitches for complex stitch problems
Frequently Asked Questions (FAQs)
How Often Should I Clean and Maintain My Sewing Machine?
Like a well-oiled machine, your sewing companion needs regular TLC.
Clean it after every project, focusing on lint removal from the bobbin area.
Oil moving parts monthly or every 8-10 hours of use, which can be considered as part of the regular TLC.
How Do I Know if the Feed Dogs Are Worn Out?
Check if fabric doesn’t move smoothly forward or backward during sewing.
Look for visible wear patterns, rough edges, or height differences on the metal teeth.
Uneven fabric feeding indicates it’s time to replace worn feed dogs, as this is a clear sign of necessary maintenance to ensure smooth fabric feeding.
Why does my bobbin thread keep tangling underneath?
Tangled threads beneath your fabric spell trouble for any sewing project.
You’re likely dealing with incorrect upper threading, improper bobbin insertion, or tension imbalances.
Rethread completely and check your bobbin case positioning first.
How do I fix uneven seam allowances consistently?
Use your presser foot edge as a guide, marking fabric with removable tape, or invest in a seam guide attachment.
Keep fabric aligned consistently and don’t rush—steady hands create perfect seams.
What causes my fabric to bunch while quilting?
Ninety percent of quilting bunching stems from incorrect tension settings.
Your fabric’s bunching up because you’re fighting unbalanced thread tension, inadequate presser foot pressure, or feed dog buildup that’s preventing smooth fabric movement through your machine.
Why wont my buttonhole stitch work properly anymore?
Your buttonhole function likely needs calibration or your needle’s dulled.
Try rethreading completely, installing a fresh needle, and testing stitch length settings.
If electronic controls aren’t responding, you’ll need professional repair.
How do I prevent thread nests at seam starts?
Start with your needle down in the fabric before lowering the presser foot.
Hold both thread tails behind the needle for the first few stitches, then release to prevent tangled thread nests.
Conclusion
Mastering these solutions transforms your sewing machine from a temperamental beast into an obedient partner. When your sewing stitch problems solved become second nature, you’ll tackle any project with confidence.
Remember: most issues stem from simple oversights, not complex malfunctions. Check your needle first, adjust tension second, and clean regularly.
These fundamentals prevent 90% of common problems. You’ve got the knowledge—now apply these fixes systematically. Perfect stitches aren’t magic; they’re the result of proper technique and consistent maintenance habits.
- https://www.tlr-journal.com/wp-content/uploads/2023/09/TLR_2023_071_MOIN.pdf
- https://www.cliffsnotes.com/study-notes/21918889
- https://academic.oup.com/jcde/article/12/4/140/8100483
- https://www.grafiati.com/en/literature-selections/stitches-sewing/journal/
- https://www.slideshare.net/slideshow/sweing-problem-and-remedies/22077376

