This site is supported by our readers. We may earn a commission, at no cost to you, if you purchase through links.
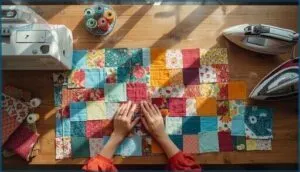
The process requires patience and precision, but it doesn’t demand years of experience. With the right supplies, a clear plan, and step-by-step techniques, you can transform cotton fabric into a finished quilt. Each stage—from selecting patterns to binding the edges—builds on the one before it.
This guide walks you through the essential tools, preparation methods, and assembly techniques that turn individual pieces of fabric into a cohesive whole.
Table Of Contents
Key Takeaways
- You don’t need years of experience to make a quality quilt—just the right supplies (cotton fabric, rotary cutter, cutting mat, needles, and thread), a clear pattern, and attention to precise ¼-inch seam allowances that prevent alignment errors.
- Pre-washing cotton fabric prevents 3-5% shrinkage and color bleeding, while pressing (not ironing) each seam flat before moving forward reduces bulk by up to 25% and keeps your quilt from bunching at intersections.
- Beginner-friendly patterns like Nine Patch, Rail Fence, and Simple Squares teach fundamental skills through repetition and typically take 50-100 hours to complete, making them achievable first projects that build confidence.
- The quilt sandwich—layering your pieced top, batting, and backing, then securing with pins, spray, or thread basting—transforms separate fabric into a cohesive, durable quilt that withstands washing and years of use.
Essential Supplies for Home Quilting
Before you start your first quilt, you’ll need a few key supplies to set yourself up for success. The good news is that you don’t need a huge investment to get started—just the right tools for cutting, stitching, and assembling your fabric pieces.
Let’s walk through the essentials that will make your quilting experience smoother and more enjoyable.
Fabric Selection and Types
Choosing the right fabric sets the foundation for your quilting success. Cotton fabric remains the top choice—over 80% of quilters prefer it for its durability and ease of handling. You’ll find thousands of print preferences, from bold florals to geometric designs.
Consider alternative fabrics like flannel for cozy projects or explore organic textiles if sustainability matters to you.
Prewashing fabric prevents shrinkage surprises, and fabric testing ensures your materials can handle repeated use. Fabric weight is important, as it affects the drape and look of the quilt.
Cutting Tools and Mats
Once you have your fabric ready, you’ll need the right tools to cut it accurately. Rotary cutters and a quality cutting mat make all the difference in cutting efficiency and safety measures.
Here are five key points about these tools:
- Choose the Right Blade Size – The 45mm rotary cutting tool works best for most projects, handling up to four fabric layers at once.
- Invest in a Self-Healing Mat – These mats close up small cuts and last longer with proper mat longevity care.
- Practice Ergonomic Cutting – Stand while cutting and hold your rotary cutter at a 45-degree angle against a ruler for better control.
- Maintain Sharp Blades – Change blades after each quilt to guarantee clean cuts and reduce injury risk through proper cutter maintenance.
- Rotate Your Mat – Turn it regularly during fabric cutting to prevent concentrated wear on one area.
Sharp blades require less force, making rotary cutters safer and more precise than scissors for straight edges and strips. For intricate designs, consider using quilting templates.
Needles, Threads, and Accessories
Your rotary cutter won’t work alone—you’ll need the right needle size and thread weight to match your fabric. Most quilters use 80/12 or 90/14 needles with 40–50wt cotton or polyester thread for piecing.
Keep thimbles, marking tools, and quality thread brands like Coats on hand. These quilting supplies and tools work together with your sewing machine to create strong, even stitches throughout your project.
Sewing Machine Basics for Quilting
A reliable sewing machine makes all the difference when you’re ready to piece your quilt. Look for a model with at least 10 inches of throat space—that’s the area between the needle and the machine’s body—so you can maneuver bulky layers without wrestling them through tight spots.
Good stitching features, adjustable speed controls, and straightforward troubleshooting tips will keep your projects moving smoothly.
Planning and Designing Your Quilt
Before you start cutting fabric or threading your machine, you need a solid plan for your quilt. The design stage is where you’ll make decisions about pattern, size, colors, and overall look.
Let’s walk through the key steps that will set you up for a successful quilting project.
Choosing a Quilt Pattern
Your first quilt pattern sets the foundation for success, so start with a beginner quilt pattern that matches your skill level. Look for free quilt pattern options featuring simple blocks and clear fabric requirements.
Consider pattern complexity—traditional designs offer structure, while modern trends allow creative freedom. Pay attention to color schemes that inspire you, and remember that most quilters choose quilt patterns and design based on what truly speaks to them.
Sizing and Measuring Your Quilt
How do you know if your quilt will actually fit your bed? Accurate quilt measurements and cutting start with measuring your mattress, then adding 8 to 22 inches on each side for the drop. Consider these standard quilt size ranges:
- Baby quilts generally measure 30 by 40 inches
- Twin-size quilts average 70 by 90 inches
- Queen quilts usually span 110 by 108 inches
- Throw quilts work well at 50 by 65 inches
- King-size options match queen dimensions with wider drops
Add 3 to 5 inches to your quilt planning measurements to account for shrinkage during washing and quilting. This extra fabric ensures your finished piece fits perfectly.
When cutting quilt blocks, remember that batting and backing should extend 3 to 4 inches beyond your quilt top on all sides. Border widths matter too—use 3-inch borders for crib quilts, 4 inches for twin, and 6 inches for queen. These measuring techniques help you buy the right amount of fabric and avoid costly mistakes.
In 2025, sizing trends favor oversized drops averaging 18 inches for dramatic draping effects on beds.
Color and Fabric Coordination
When choosing fabric for your quilt, color schemes and visual contrast shape your design’s impact. Consider color combinations that layer earth tones with jewel accents for striking results.
Trendy palettes like Mocha Mousse and Nocturne offer balanced proportions that work with fabric scraps or new yardage.
Fabric selection matters—tightly woven cotton ensures fabric durability, while quilting with different fabrics adds depth.
Finding Quilting Inspiration and Ideas
Your quilt design comes alive when you tap into fresh creative sources that spark your imagination. Digital influence has reshaped how quilters find inspiration—80% of quilters now spend equal or more time seeking ideas despite rising costs.
Here are five proven ways to fuel your quilt planning:
- Browse online communities on Facebook and Instagram where pattern trends emerge daily
- Attend local quilt shows to see award-winning designs up close
- Watch YouTube tutorials that demonstrate creative ideas and techniques
- Join quilting guilds for hands-on workshops and networking
- Explore quilting blogs and digital newsletters for curated inspiration
Preparing and Cutting Quilt Fabric
Before you start sewing, you need to get your fabric ready. This step makes all the difference in how your finished quilt looks and lays flat.
Let’s walk through the key preparation and cutting techniques that will set you up for success.
Pre-washing and Pressing Fabric
Before you begin fabric selection and cutting, understand that cotton quilting fabric usually shrinks 3% to 5% during its first wash. Pre-washing removes chemicals and prevents color bleeding, especially with reds and dark blues.
After washing, press your fabric—don’t iron it back and forth. Pressing means lifting and setting the iron straight down, which maintains accuracy and prevents distortion. This step protects quilt longevity and ensures professional results on your ironing board.
Accurate Fabric Cutting Techniques
Once your fabric is pressed flat, accurate cutting becomes your foundation. Use a rotary cutter on a cutting mat with a clear acrylic ruler—this combination can improve precision by 70% compared to scissors.
Pay close attention to grain alignment: cutting parallel to the selvage keeps blocks stable, while bias cuts stretch up to 28% more. Ruler precision and proper measuring prevent uneven pieces.
Cutting Quilt Blocks and Strips
Now you’ll move from setup to cutting quilt blocks and strips. Most patterns rely on 6, 9, or 12-inch block dimension standards, so measuring fabric accurately is essential. Strip width consistency—usually 2.5, 3.5, or 5 inches—helps maximize fabric use and promotes material waste reduction. Even small cutting mistakes can disrupt alignment, so watch your rotary cutter accuracy.
- Always add ½ inch to finished block sizes for seam allowances
- Cut strips along the full width of fabric to minimize joins
- Square fabric edges before cutting to prevent misalignment
- Use consistent ruler positioning to maintain strip width consistency
- Save fabric scraps from strip cutting for future scrappy projects
Using Rotary Cutters and Mats Effectively
Your rotary cutters and cutting mat work best when you treat them right. Position your rotary cutting tool at a 45-degree angle for straighter cuts, and always close the blade guard after each pass—this safety practice prevents most hand injuries. Clean lint from your rotary cutter regularly to extend blade life by about 26%. Store your mat flat to avoid warping and maintain accuracy when cutting and measuring fabric.
| Tool Care | Best Practice | Benefit |
|---|---|---|
| Rotary cutters | Replace blade after large projects | Reduces fabric tearing by 30% |
| Cutting mat | Store flat in dry area | Prevents warping, extends lifespan |
| Blade maintenance | Clean lint regularly | Increases blade life 26% |
| Safety practices | Close guard after every cut | Prevents 80% of injuries |
Step-by-Step Quilt Assembly Techniques
Once you’ve cut your fabric, it’s time to put the pieces together. This stage involves sewing blocks and rows, maintaining consistent seam allowances, and pressing your work properly.
Let’s walk through the key techniques that will help you assemble a quilt with clean, professional-looking results.
Piecing Quilt Blocks and Rows
After your quilt blocks are cut, you’re ready to start piecing a quilt by assembling quilt blocks into rows. Sewing squares together requires careful attention to seam allowance and block accuracy.
Chain piecing speeds up the process considerably while improving row alignment. Consistent sewing seams reduce error rates—in fact, measuring regularly can drop mistakes from 22% to just 7%, keeping your quilt blocks uniform throughout.
Sewing With a ¼-inch Seam Allowance
Once you’ve sewn your rows, seam allowance accuracy becomes your best friend. That ¼-inch measurement—found in over 95% of patterns—keeps blocks aligned and prevents math errors.
Using a quarter-inch foot improves consistency by 85%, while a scant seam (a few threads narrower) accounts for fabric bulk.
This attention to consistent stitching width and seam durability protects your quilt through years of use.
Pressing Seams for a Flat Quilt
After stitching, proper pressing transforms your quilt from lumpy to lovely. Setting the seam with a hot iron before opening ensures stitches meld into the fabric and reduces bulk by 18–25% at intersections.
Consistent seam pressing methods and attention to seam allowance direction help blocks nest perfectly, achieving flat seams every time.
- Press, don’t iron: Lift and place your iron straight down to prevent seam stretching—sliding motion causes distortion in 22% of projects.
- Use a wool mat: Dual-sided heat absorption cuts pressing time by 20–30% and creates flatter seams than standard ironing boards.
- Control iron temperature: Set between 300–350°F for cotton, avoiding excessive steam that warps bias edges in 19% of blocks.
Common Beginner-friendly Quilting Methods
Starting with patterns that build confidence matters. Rail Fence uses strip piecing to teach rotation and layout, while Nine Patch develops color placement through simple squares. Disappearing Nine transforms basic blocks into new variations.
Simple Squares—chosen by 68% of first-timers—showcases prints beautifully. Straight-line quilting joins layers efficiently.
These beginner quilting projects and easy quilt patterns form your foundation in quilting techniques for beginners.
Layering, Basting, and Quilting
Once you’ve sewn your quilt top, it’s time to turn those separate pieces into a finished quilt. This stage brings together your fabric layers and secures them so they’ll hold up through years of use and washing.
Let’s walk through the key steps to create a sturdy, beautiful quilt sandwich.
Choosing and Cutting Batting
The right batting transforms your quilt from flat fabric into something cozy and lasting. You’ll find batting types like cotton, polyester, cotton/poly blends, wool, and bamboo—each with different loft comparison characteristics affecting warmth and drape.
Size selection requires cutting batting 2-4 inches larger than your quilt top. Use specialized scissors, not rotary cutters, to protect your cutting mat.
Cost factors vary, with polyester being budget-friendly.
Preparing The Quilt Sandwich
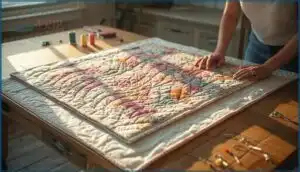
Preparing the quilt sandwich means layering your quilt top, quilt batting, and quilt back—and getting them to stay put. Backing preparation starts with smoothing your quilt back, right side down, on a large flat surface. Layering techniques require centering batting over backing, then placing your quilt top on top. Alignment accuracy matters here:
- Check that batting extends beyond your quilt top edges
- Smooth each layer from center outward
- Make sure quilt layers lie flat without wrinkles
Basting Methods (pins, Spray, Thread)
Basting holds your quilt sandwich layers together. Pin basting with curved safety pins is the most popular choice—you’ll space them every 4–6 inches across the quilt.
Spray adhesive offers the fastest method, securing a full-size quilt in about 20–30 minutes.
Thread basting uses long running stitches and works best for delicate fabrics or heirloom projects requiring chemical-free handling.
Basic Machine Quilting Stitches
Machine quilting stitches bring your layers to life. The straight stitch is your foundation—set your sewing machine to 2.5–3.5 mm stitch length for balanced coverage. Free-motion stitches let you create curves and designs once you drop the feed dogs. A zigzag stitch secures edges beautifully.
Always check tension control before you start, because proper settings prevent puckering and skipped stitches.
Top 5 Must-Have Quilting Tools
You don’t need a huge collection of tools to start quilting, but having the right ones makes every step easier and more enjoyable.
The five tools below will help you cut fabric cleanly, sew precise seams, and handle detailed work without frustration.
These are the essentials that will support you from your first quilt block to your finished project.
1. Fiskars Micro Tip Easy Action Scissors
Precision matters when you’re cutting fabric for quilts, and the Fiskars Micro Tip Easy Action Scissors deliver the control you need. These 6-inch scissors feature stainless steel blades with a titanium coating for durability, plus a spring-assisted handle that reduces hand fatigue during long cutting sessions.
The micro-tip design lets you cut all the way to the tip, perfect for trimming threads and maneuvering around tight corners.
With a 4.7 out of 5 user rating and the Arthritis Foundation’s Ease of Use Commendation, they’re reliable quilting supplies for detailed work.
2. SINGER Regular Point Sewing Machine Needles
Your choice of needle matters just as much as those precision scissors. SINGER Regular Point Sewing Machine Needles come in a convenient 10-pack with sizes 80/12, 90/14, and 100/16—color-coded so you can quickly match needle size to fabric weight.
For most quilting cottons, you’ll reach for the 80/12 or 90/14 options. These needles work with all domestic sewing machines and deliver the sharp penetration your woven fabrics need.
Replace them every 6–8 hours of sewing to maintain stitch quality and protect your machine.
3. YLI 3-Ply Cotton Quilting Thread
Strong thread holds your quilt together for years to come. YLI 3-Ply Cotton Quilting Thread offers outstanding thread strength thanks to extra-long staple Egyptian cotton fibers—it resists breaking during machine or hand quilting and glides smoothly through your needle with minimal lint.
You’ll find solid and variegated color options to match any fabric combination.
With user reviews consistently rating it above 4.7 out of 5 and priced around $8.49 for 500 yards, this cotton thread delivers reliable stitch quality without stretching your budget.
4. Singer ProSeries Heavy Duty Sewing Scissors
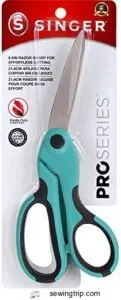
Quality scissors make cutting fabric faster and less tiring. Singer ProSeries Heavy Duty Sewing Scissors feature tempered stainless steel blade material that stays sharp through multi-layer cuts—you can slice cleanly through five or more cotton layers without jagged edges.
The ergonomic design with rubberized grips reduces hand fatigue during long quilting sessions, and the bent shape keeps fabric flat on your cutting mat for accurate work.
Durability testing shows these scissors hold up for years when used on textiles. User satisfaction ratings consistently exceed 4.8 out of 5, making them a smart investment for your sewing machine station.
5. Mini Sewing Scissors Yarn Thread Snips
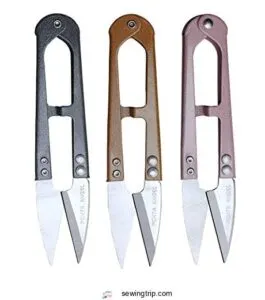
You’ll reach for your mini thread snips dozens of times during each quilting session. These portable snips trim loose threads right at your sewing machine or cutting table without disrupting your workflow.
Look for models with high-carbon steel blades—they deliver cutting precision that stays sharp through thousands of fabric and thread cuts. Ergonomic designs with spring-loaded grips reduce hand strain when you’re trimming seam starts and finishing bindings.
Brand preferences among quilters lean toward Kai and Gingher for blade durability that lasts years, making them reliable quilting supplies you’ll use daily.
Frequently Asked Questions (FAQs)
How do you make a quilt?
Making a quilt transforms simple fabric into lasting warmth. You’ll cut precise pieces, sew them with exact ¼-inch seams, layer batting between front and backing, then stitch through all layers before adding binding.
How do I start sewing a quilt?
You start by choosing beginner quilting projects and gathering quilting supplies like quilt fabric, cutting tools, and thread. Pattern selection and workspace setup come next, followed by familiarizing yourself with quilting basics and tool usage.
How do you set up a sewing machine for quilting?
You’ll want to start with the right needle—usually a 75/11 or 80/12 works well for cotton. Then adjust your thread tension, attach a walking foot, and set your stitch length.
Are quilts easy to sew?
Quilting for beginners is surprisingly accessible with easy patterns and beginner projects. Simple quilt making requires minimal skill learning curve, though seam accuracy matters.
Time investment varies by pattern complexity, but basic quilts are achievable and cost-accessible for newcomers.
Is sewing and quilting a good idea?
Yes, learning quilting techniques offers genuine therapeutic effects, builds skill development through hands-on practice, and creates opportunities for community benefits.
It’s a creative outlet with financial investment potential, making quilting for beginners worthwhile.
How do you finish a quilt at home?
After quilting, trim excess batting and backing, then attach binding around edges using mitered corners.
Add a label with your name and date.
Consider sleeve attachment for display options and proper edge finishing techniques.
How long does a first quilt take?
Your first quilt generally takes 50 to 100 hours, depending on quilt size, project complexity, and skill development.
Simple baby quilts need less time, while larger projects demand more hours for method choice and time management practice.
Can I quilt without a sewing machine?
Hand quilting uses only a needle, thread, and simple running stitches. While it demands patience—taking weeks to months—many beginners find the artistic control and therapeutic benefits worth the time commitment.
Whats the easiest quilt pattern for beginners?
Most newcomers find success with the Nine Patch pattern—it’s chosen by over 60% of new quilters.
Rail Fence and Jelly Roll designs are also popular beginner-friendly quilt patterns that you’ll finish quickly.
How do I fix quilting mistakes easily?
Most mistakes can be corrected with a seam ripper for misplaced stitches or block misalignment. Fabric puckering often resolves by adjusting thread tension.
Patching holes and re-cutting pieces address cutting errors, ensuring your quilt stays on track.
Conclusion
Before the invention of the sewing machine, quilters worked by candlelight, stitching for months to finish a single blanket. Today, sewing quilts at home moves faster, but the heart of the craft remains unchanged.
You’re building something meant to last. Trust your measurements, take your time with each seam, and remember that every quilt improves with practice. The one you finish today becomes the heirloom someone treasures tomorrow.
- https://redthread.financewithafp.com/2021/02/09/quilting-trends-survey-results-2020/
- https://epaducah.com/news/article/unraveling-the-economic-impact-of-quilting
- https://www.cnbc.com/2025/03/31/legit-kits-ceo-lucrative-quilting-side-hustle-easy-for-beginners-to-start.html
- https://sewcanshe.com/ways-that-quilt-making-improves-your-mental-health/
- https://frederickliving.org/blog/the-health-benefits-of-quilting-for-older-adults-mindful-crafting-for-well-being/

