This site is supported by our readers. We may earn a commission, at no cost to you, if you purchase through links.
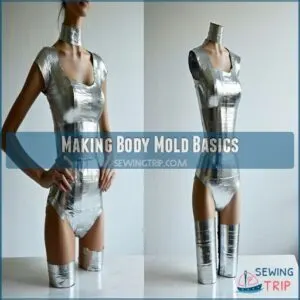
Wear the t-shirt, have your helper wrap you in overlapping strips of duct tape until you’re covered from neck to hips, then carefully cut up the back to remove it.
Stuff the form with polyester fiberfill, seal the cut, and mount it on a stand.
Voilà—your twin is ready for fittings! The real magic happens when you start pinning patterns to your exact dimensions, saying goodbye to those awkward fitting sessions in front of the mirror.
Table Of Contents
Key Takeaways
- You’ll need basic materials like duct tape, an old t-shirt, scissors, and a helper to create your body mold, which serves as a personalized dress form for more accurate fittings.
- When creating your mold, wrap your torso with overlapping strips of duct tape, mark center points, carefully cut it off, then stuff it with polyester fiberfill for stability.
- Don’t skip the refinement stage—using techniques like plaster of Paris for imperfections, adding proper neck and shoulder support, and applying decoupage will give your form a smooth, durable finish.
- Your custom body mold will save you hours of fitting frustration by capturing your exact dimensions, allowing you to pin patterns directly to it, visualize designs before cutting fabric, and create garments that fit your unique shape perfectly.
Making Body Mold Basics
You’ll need simple materials like duct tape, a t-shirt, and polyester stuffing to create your perfect body double for sewing projects.
Your custom dress form will save you countless fitting headaches and help you make clothes that actually fit your unique shape, not some standardized mannequin that looks nothing like you, providing a more personalized approach to fashion.
Necessary Materials for Construction
Every successful body mold starts with gathering the right materials.
You’ll need 2-3 rolls of quality duct tape (the good stuff, not dollar store variety), a sturdy lamp stand for support, plaster-impregnated gauze for durability, decoupage paper, and Mod Podge glue for finishing touches.
These basics guarantee your DIY dress form will stand the test of time while accurately reflecting your unique measurements.
Consider the various sizes available for your project to ensure you have the necessary supplies for a successful DIY experience.
Safety Equipment and Precautions
Now that you’ve gathered your materials, let’s talk safety – because nobody wants a DIY disaster.
When working with plaster bandages and sharp tooling, protect yourself with rubber gloves and a mask for ventilation. Material hazards like plaster allergies are no joke!
Wear closed shoes, tie back long hair, and keep a clean workspace. Remember that sewing machines need maintenance to prevent malfunctions.
Apply Vaseline liberally to prevent plaster adhesion, and have medical scissors handy for safely cutting your body mold.
Choosing The Right Stand and Base
Your dress form’s stability is just as important as the form itself.
Look for a stand with a foot pedal for easy height adjustment and a heavy base that won’t tip during work.
Choose one with smooth-rolling wheels for effortless turning.
IV stands make inexpensive yet stable options.
For non-standard body types, consider custom or adjustable dress forms to guarantee accurate fitting when sewing.
Many options for dress form stands are available online, offering a range of choices for a stable dress form stand.
Creating Custom Body Mold
With your assistant at the ready, let’s begin creating your custom body mold. First, wrap your torso with clingfilm or wear a thin t-shirt as your base layer. Start applying duct tape strips horizontally under your chest, gradually working upward.
Create an ‘X’ pattern across your chest and back for structure, then add vertical strips for stability. For unique body shapes, follow your natural curves when applying tape – don’t pull too tight!
Mark your center front, back, and waistline with a Sharpie before carefully cutting the mold off. The casting process refinement happens when you’ve removed your DIY dress form.
Join the edges securely with more tape, stuff firmly with polyester filling for body mold durability, and seal openings with cardboard. Your sewing body double should maintain its shape well, making storage solutions simple – just place it on your stand!
To guarantee a perfect fit, consider how a custom dress form can capture your unique body asymmetries. This will help you create a custom body mold that accurately represents your body shape, ensuring that your sewing projects turn out well. With a DIY dress form, you can achieve professional-looking results and make sewing easier and more enjoyable.
Smoothing and Refining Mold
You’ll need to smooth out those lumps and bumps on your dress form before it’s ready for action, just like you wouldn’t want to pin fabric to a bumpy potato.
Now let’s fix those imperfections with some simple techniques that’ll transform your rough mold into a perfectly smooth sewing buddy that’ll make fitting garments a breeze.
Using Plaster of Paris for Imperfections
After creating your body mold, you’ll likely notice some bumps and rough spots inside.
Mix plaster of Paris with water until it’s smooth like pancake batter. Using a kidney tool, apply this mixture to internal imperfections, working carefully around curves.
One can also use plaster bandage tape and expanding foam molds for a durable form.
Let everything dry for at least 48 hours before handling – patience during drying time guarantees your body casting maintains its shape for perfect sewing projects, ensuring a great outcome with minimal effort.
Adding Neck and Shoulder Support
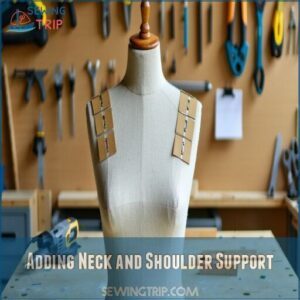
After smoothing your dress form’s surface, it’s time to give it proper structure. Your body mold needs strong neck and shoulder support to stand tall and maintain its shape.
To create a reliable support system for your homemade dress form:
- Cut chipboard support pieces to match your shoulder slope
- Insert wooden dowel reinforcement through the center
- Secure attachment points with strong adhesive
- Check angle considerations for natural posture
- Apply extra reinforcement for support longevity
Your custom mannequin will thank you for the strong neck and shoulder support that allows it to stand tall and maintain its shape.
Decoupage for a Smooth Finish
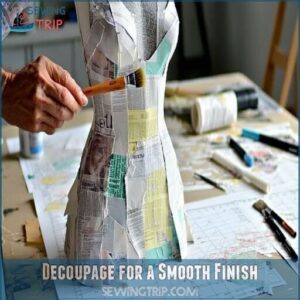
Your dress form’s smooth finish starts with decoupage—a technique that transforms rough surfaces into professional-looking mannequins.
Apply small pieces of paper and Mod Podge in 3-4 layers to create a durable surface.
For best results, consider specific decoupage adhesives.
| Step | Material | Technique | Time |
|---|---|---|---|
| 1 | Tissue Paper | Surface Preparation | 30 min |
| 2 | Mod Podge (Matte) | First Layer Application | 2 hours |
| 3 | Printer Paper | Layering Techniques | 1 hour |
| 4 | Clear Sealing Options | Final Coat | 1 hour |
Using Body Mold for Sewing
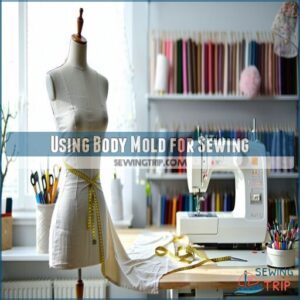
You’ll save hours of fitting frustration when you use your custom body mold as your personal fitting assistant.
Your handmade dress form captures every curve and angle of your unique shape, making it easier to create clothes that fit like they were made just for you (which they actually are).
Benefits of Custom Body Mold for Fitting
Many sewists find that a custom body mold transforms their fitting process completely.
Your personalized dress form guarantees garments fit perfectly the first time, without endless adjustments.
- Finally seeing your unique curves represented accurately feels incredibly validating
- That moment when a muslin fits without a single pin is pure magic
- Watching difficult fabrics drape beautifully on your exact shape is deeply satisfying
- Saving hours of frustration makes you fall in love with sewing all over again, which can be truly satisfying
Adjusting Mold for Changes in Body Shape
A custom body mold does wonders for your sewing, but bodies aren’t static – they change! When your shape shifts, you’ll need to update your dress form too.
| Change Type | Solution | Difficulty |
|---|---|---|
| Weight Fluctuation | Temporary Padding | Easy |
| Minor Adjustments | 3D Fixture Patches | Moderate |
| Posture Changes | Targeted Modifications | Moderate |
| Major Changes | New Mold Creation | Challenging |
For small changes, add padding where needed. You can’t remove less than 0.010 inches of material effectively, so build up rather than cut back, which is a temporary solution to make the necessary adjustments, and it’s considered easy to implement.
Tips for Efficient Sewing With a Body Mold
Now that your body mold can handle minor changes, let’s maximize its efficiency in your sewing process.
Your custom dress form isn’t just for show—it’s your silent fitting partner!
When working with your body mold, try these proven techniques:
- Pin pattern pieces directly to visualize design elements before cutting fabric
- Drape fabric directly on the form to test how it falls naturally
- Take photos from multiple angles to assess fit objections you might miss in a mirror
To further improve workflow, consider how prewound thread bobbins can save significant time.
Frequently Asked Questions (FAQs)
How to make a mannequin of your own body?
You’ll need duct tape, a t-shirt, and a helper.
Wrap your body in tape, mark key lines, cut it off, seal openings, and stuff it for a perfect DIY mannequin that mimics your shape, using this process to create a perfect DIY mannequin.
What can I use instead of a sewing mannequin?
When push comes to shove, you can use a duct tape dress form, padded hanger, dress form pillow, customized foam torso, or even stuff an old t-shirt with filling to replace a sewing mannequin.
This approach allows for flexibility and creativity in finding alternatives to a traditional sewing mannequin.
How to make a dummy out of clothes?
Wrap an old t-shirt on a friend, layer with duct tape strips, mark center points.
Cut off carefully, tape edges, stuff with polyester filling.
Mount on a stand for your DIY dress form.
What fabric is used for dress forms?
You’ll typically use cotton canvas or muslin for dress forms, with some professionals preferring linen.
These fabrics can be pinned easily and offer enough stability to maintain your form’s shape over time, which makes cotton canvas a practical choice.
How long does the body molding process usually take?
The complete molding process takes about 1-2 hours for application and initial setting.
But you’ll need to let your plaster cast dry thoroughly for at least 48 hours, preferably a full week.
Are there any safety precautions to take when making a body mold?
You’ll need a breathing mask, good ventilation, and safety glasses when working with plaster or chemicals. Don’t work alone, and have scissors nearby to cut yourself free if needed.
How much padding should I use for the body mold?
You’ll need about 5kg of polyester cushion stuffing for your dress form. Fill it firmly with no lumps, ensuring it won’t collapse. Old pillows work too if you’re pinching pennies!
Is it possible to reuse the body mold after the initial process?
Yes, you can definitely reuse your body mold.
The plaster or fiberglass forms are durable and remain effective despite minor weight fluctuations.
They’ll serve as your fitting companion for years with proper care.
How long does a body mold last?
Your custom body mold will last 5-10 years with proper care, depending on the materials used and storage conditions.
You’ll get the most mileage when kept in a dry, temperature-controlled environment away from direct sunlight.
Can body molds be resized later?
Traditional body molds can’t typically be resized, but you can modify them slightly by sanding down areas or adding padding.
For significant body changes, you’ll need to create a new mold from scratch.
Conclusion
Picture yourself confidently sewing garments that fit perfectly every time!
Now that you know how to make a body mold for sewing, you’re equipped with a valuable tool that’ll transform your sewing experience.
Your custom dress form will save you countless hours of fitting adjustments and help you create professional-looking clothes that actually fit your unique shape.
It’s a game-changer for any sewist—whether you’re a beginner or seasoned pro, and with this skill, you’ll be happy sewing!
- http://couturestories.blogspot.co.il/p/dressform.html
- https://wefunder.com/make?utm_source=make&utm_medium=makezine&utm_campaign=wefunder&utm_content=cta_widget
- https://discord.gg/mpBkj2hhJ4?utm_source=makezine&utm_medium=article&utm_campaign=discord&utm_content=launch
- https://www.facebook.com/sharer.php?u=%3C%=%20url%20%%3E
- https://www.pinterest.com/pin/create/button/?url=%3C%=%20url%20%%3E&description=%3C%=%20title%20%%3E&media=%3C%=%20image%20%%3E

