This site is supported by our readers. We may earn a commission, at no cost to you, if you purchase through links.
Your machine made a strange popping sound on the last seam. The thread keeps breaking. You notice small snags in the fabric that weren’t there before. These aren’t random gremlins in your sewing machine. They’re warning signs that your needle has reached the end of its useful life.
A dull or damaged needle does more than ruin your current project. It can strike metal components inside the machine and cause expensive damage over time.
The good news is that learning how to replace needle on sewing machine takes less than five minutes. This simple maintenance task protects your equipment and keeps every stitch clean and precise.
Table Of Contents
- Key Takeaways
- Why You Should Replace Sewing Machine Needles
- Essential Preparation Before Needle Replacement
- Step-by-Step Guide to Removing The Old Needle
- Inspecting and Selecting a New Sewing Needle
- How to Properly Install a New Needle
- Troubleshooting Needle Replacement Issues
- Maintenance Tips for Sewing Machine Needles
- Frequently Asked Questions (FAQs)
- Conclusion
Key Takeaways
- A dull or damaged needle causes thread breaks, skipped stitches, and fabric snags, and can strike internal metal components to create expensive machine damage in 87% of cases.
- You should replace your sewing machine needle every 6-8 hours of sewing time, or at the start of each new project, to maintain stitch quality and prevent costly repairs.
- The replacement process takes under five minutes: unplug the machine, raise the needle to its highest position, loosen the clamp screw counterclockwise, remove the old needle, insert the new needle with the flat side facing back, and tighten securely without over-tightening.
- Match your needle size to your fabric weight (60/8-70/10 for lightweight fabrics, 80/12-90/14 for medium weight, 100/16+ for heavy materials like denim) and choose between universal needles for everyday sewing or specialty needles for specific fabric types.
Why You Should Replace Sewing Machine Needles
Your sewing machine needle does more work than you might think. A worn or damaged needle won’t just give you bad stitches—it can actually harm your machine over time.
Here’s what happens when you wait too long to swap it out.
Impact on Stitch Quality
When needle sharpness fades, your stitch quality takes the hit. A dull or damaged needle causes skipped stitches and thread breaking every time you sew. Fabric compatibility matters too. The wrong needle creates uneven tension and poor stitch consistency.
Regular needle replacement prevents these defect prevention headaches. You’ll see the difference immediately. Fresh needles deliver clean, uniform stitches that make your projects look professional. For peak performance, consider needle replacement frequency every six to eight hours of sewing.
Preventing Machine Damage
A bent or damaged needle strikes metal parts inside your machine. This causes 87% of machine damage cases. The needle plate develops burrs. The presser foot cracks. Your timing mechanism shifts out of alignment. Needle strikes can be prevented by properly inserting the sewing machine needle.
Regular inspection and appropriate needles prevent these costly repairs. Proper needle installation stops 70% of these problems. Machine maintenance includes needle replacement every eight to sixteen hours of sewing time.
Proper needle installation and regular replacement every 8-16 hours prevent 70% of costly sewing machine repairs
Common Signs Your Needle Needs Changing
You’ll know it’s time for a fresh needle when skipped stitches show up out of nowhere. Thread breaking happens more often than usual. Your fabric develops snags or small tears you didn’t expect. Listen for strange popping sounds or clunking noises while you sew.
A bent needle or dull needle creates all these problems. Visual inspection catches 25% of defects before they wreck your project.
Essential Preparation Before Needle Replacement
Before you swap out that needle, a little prep work goes a long way. Taking a few simple safety steps protects both you and your machine from unnecessary wear or accidents.
Here’s what you need to do first.
Turning Off and Unplugging The Machine
Before you begin your sewing machine repair, always turn off the power switch and unplug the machine from the power outlet. This simple step protects you from electrical safety hazards like shocks and prevents damage from power surges.
It’s essential for sewing machine maintenance and damage prevention. Many machines have auto shut-off features, but unplugging ensures complete surge protection and energy conservation during extended breaks.
Positioning The Presser Foot and Fabric
After unplugging, raise the presser foot to access the needle area. Foot height helps provide proper clearance for safe needle changes.
Place a scrap of fabric or paper under the presser foot, then lower it to secure the material. This prevents the needle from dropping into the throat plate hole during removal.
Proper fabric alignment and pressure adjustment protect needle position and help guarantee needle safety across different fabric types and weights.
Gathering Necessary Tools
You’ll need a small screwdriver to loosen the needle clamp screw. Most machines use a flat-head type.
Keep several needle replacement options nearby. Match the needle variety to your fabric.
Good lighting options help you see clearly during the swap. Storage solutions like magnetic holders prevent needle loss.
Basic safety equipment like tweezers protects your fingers from sharp points.
Step-by-Step Guide to Removing The Old Needle
Removing the old needle is easier than you think. You just need to follow a few simple steps in the right order.
Here’s how to get that worn-out needle out safely and set yourself up for a smooth replacement.
Raising The Needle to The Highest Position
Before you touch the needle, you must raise it to its highest position using the handwheel. Turn the handwheel toward you slowly until the needle stops rising. This simple step protects machine timing and prevents needle breakage during the needle replacement process.
Here’s why raising the needle matters:
- Engages the thread take-up lever completely
- Allows safe fabric removal without damage
- Lets automatic cutters function properly
- Improves seam accuracy when starting new stitches
- Protects components during needle replacement
Loosening The Needle Clamp Screw
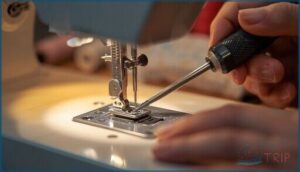
After raising the needle, you must loosen the needle clamp screw to release it. Find the small screw holding the needle in place. Turn it counterclockwise gently with a screwdriver. Stop when the needle moves freely.
Over-tightening damages the needle bar. Under-tightening causes needles to fall out during sewing.
| Action | Correct Technique | What to Avoid |
|---|---|---|
| Turn screw | Counterclockwise rotation | Excessive force or pliers |
| Tightness | Loosen just enough | Complete removal |
| Grip | Hold needle while loosening | Letting needle drop |
| Tool choice | Small screwdriver | Wrong-sized tools |
Safely Removing and Disposing of The Needle
After loosening the screw, hold the sewing machine needle firmly and slide it straight down from the clamp. Don’t let it drop.
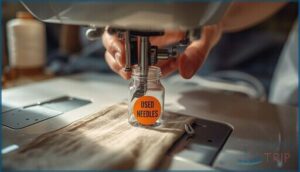
Needlestick prevention starts with container selection—place used needles in a rigid, screw-top plastic bottle labeled “used needles.” Check for local disposal programs that handle sharps safely.
Proper needle disposal protects waste workers and reduces environmental impact. Public education about replacing sewing machine needles includes this critical safety step.
Inspecting and Selecting a New Sewing Needle
You’ve removed the old needle, so now it’s time to pick the right replacement. A quick inspection helps you avoid installing a faulty needle that could cause problems down the line.
Let’s walk through how to check your new needle and choose the best one for your project.
Checking for Damage or Bends
Visual Inspection is your first line of defense against needle problems. Hold your new needle against a light source to check for needle bends or burrs on the tip. Place it flat on a smooth surface—bent needles won’t sit evenly. Look closely for dull edges or tiny metal flakes. These small checks catch 87% of needle damage before it ruins your project.
Matching Needle Size to Fabric
A damaged needle is only half the battle—picking the right needle size makes or breaks your sewing performance. Wrong sizing causes fabric damage, thread breakage, and skipped stitches.
Match needle gauge to fabric thickness: sizes 60/8 through 70/10 work for silks and sheers, 80/12 to 90/14 handle cottons and linens, while denim needs 100/16 or larger. Follow a needle size guide based on fabric weight.
Choosing Universal Vs. Specialty Needles
Beyond size, you need to pick between universal and specialty sewing machine needle types. Universal sewing needles handle 60-70% of everyday fabrics like cotton and polyester blends. They’re your reliable workhorse for most sewing techniques.
Specialty needles—ballpoint for knits, denim for heavy fabrics, leather for tough materials—offer better fabric compatibility and stitch quality when your project demands it.
How to Properly Install a New Needle
Installing the new needle is where everything comes together. You’ll need to pay close attention to how the needle fits into the clamp and make sure it’s locked in tight.
Getting these steps right means your machine will stitch smoothly without any hiccups.
Aligning The Needle Correctly
Before needle insertion, check that your sewing machine needle sits correctly. The flat side of the needle shank should face the back on most machines. This alignment verification prevents misalignment consequences like broken threads or skipped stitches.
Needle position controls vary by model. Use adjustment tools from your manual if needed. Regular checks help the needle clamp holds the needle straight and centered.
Inserting and Securing The Needle
Once alignment looks good, push the needle shank all the way up into the needle clamp until it stops. Hold it steady with one hand. Now tighten the needle screw clockwise using a screwdriver. Watch your screw tightness—snug is right, but over-tightening risks $100+ repairs.
- Clearance plates help stabilize wobbly needles during insertion
- Proper needle orientation prevents thread breakage mid-project
- Needle depth affects stitch formation inside the hook
- Secure needle installation protects your machine from damage
Ensuring Proper Needle Position
After needle installation, verify your machine’s needle position aligns with its specs. Check that the needle clamp holds firmly and the needle sits centered under the presser foot. This affects stitch symmetry and fabric handling directly.
| Position Check | What to Look For | Why It Matters |
|---|---|---|
| Needle alignment | Flat side faces correct direction | Prevents tension balance issues |
| Centered placement | Even distance from foot edges | Maintains stitch quality |
| Machine compatibility | Needle fits your model | Avoids skipped stitches |
Proper needle insertion protects your investment and ensures smooth sewing.
Troubleshooting Needle Replacement Issues
Even after you’ve installed a new needle, things don’t always go as planned. Sometimes you’ll notice skipped stitches or hear strange sounds that tell you something’s off.
Let’s walk through the most common problems and how to fix them so you can get back to sewing without frustration.
Skipped Stitches or Thread Breakage
When skipped stitches or thread breakage disrupts your sewing, the culprit is often a dull or bent needle. Improper threading and thread tension problems also cause these frustrating sewing problems. Here’s what to check:
- Replace your needle after every 8 hours of sewing to maintain needle quality
- Re-thread your machine carefully through all guides and tension discs
- Adjust upper and bobbin thread tension to manufacturer settings
- Clean lint from tension discs and bobbin cases regularly
- Match needle size to your fabric for proper fabric compatibility
Needle Installation Mistakes
A loose clamp or incorrect alignment during needle installation can spell trouble fast. If you don’t raise the needle to the highest position, you risk bent needles and skipped stitches. Clamp undertightening leads to needle issues, while using the wrong needle or poor needle insertion causes thread breakage.
Always check needle height and orientation before tightening the screw in your sewing machine.
Recognizing and Fixing Bent or Dull Needles
A popping sound at slow speed signals a dull needle—time to swap it immediately. Bent needles cause skipped stitches and thread pulls along your seamline. Run your fingertip gently over the point. Any roughness means replacement.
Fabric damage signs include snags or visible holes. Needle sharpness tests show if a blunt tip needs fixing. Dull needle sounds and needle breaks don’t lie. Replace it now.
Maintenance Tips for Sewing Machine Needles
Taking care of your needles means taking care of your machine. A few simple habits can save you from frustrating stitching problems and keep everything running smoothly.
Let’s look at when to change needles, how to maintain your machine, and the best ways to store your supplies.
Recommended Needle Replacement Frequency
You should change your sewing machine needle every 6 to 8 sewing hours. Fabric type affects needle lifespan; heavy fabrics wear needles faster than light ones. Project complexity matters too.
Replace your needle at the start of each new project for best results. Frequent sewers need monthly changes even with light use.
Regular needle maintenance prevents costly machine repairs and keeps stitch quality high.
Cleaning and Oiling The Machine
Lint accumulation happens fast in your machine’s bobbin case and feed dogs. Clean these areas weekly if you sew daily or monthly for lighter use. Use a lint brush and soft cloth for machine cleaning.
Apply a few drops of sewing machine oil to the bobbin area and needle bar every 10-12 sewing hours. Over-oiling attracts dust.
Schedule professional servicing yearly for essential sewing machine maintenance.
Proper Needle Storage and Handling
Store needles in sealed containers with labels for needle types and needle sizes. This prevents rust and keeps replacement needles organized. A pill bottle or needle storage book works well.
Safe disposal matters too. Place used sewing machine needles in a sharps container or sealed bottle before discarding. Keep needles away from kids and pets to reduce incident risk by up to 90%.
Frequently Asked Questions (FAQs)
How to replace a needle on a sewing machine singer?
Turn off and unplug your Singer sewing machine. Raise the needle using the handwheel. Loosen the screw with a screwdriver.
Remove the old needle. Insert the new needle with its flat side facing back.
How do you remove a broken sewing machine needle?
When a needle breaks, it’s like threading the eye of a storm. Unplug your machine first. Use magnet tool usage or tweezers for needle fragment retrieval.
Access the bobbin case if needed, preventing further damage to internal parts.
How is a needle fixed in a sewing machine?
Your sewing machine needle is secured inside the needle clamp using a small needle screw. The needle clamp grips the needle’s shank firmly when you tighten the screw clockwise during the needle installation process.
How do I know if my sewing machine needs a new needle?
You’ll notice auditory cues like popping sounds and visual signs such as bent tips. Watch for fabric damage, uneven stitches, and poor stitch quality.
Usage frequency matters—replace your sewing machine needle every 6-8 hours of identifying needle problems.
How do you change a sewing machine needle?
Start by unplugging your machine for safety.
Loosen the needle clamp screw counterclockwise. Pull the old needle straight down.
Insert the new needle—flat side back—pushing upward completely. Tighten the screw snugly to secure proper needle installation.
How do I remove an old sewing machine needle?
Turn the handwheel toward you to raise the needle fully.
Loosen the needle clamp screw counterclockwise with a screwdriver. Hold the needle by its shank. Pull it down gently from the needle clamp and dispose safely.
When should I change my sewing machine needle?
Replace your needle every 6 to 8 usage hours or after each heavy project.
Check for fabric damage, uneven stitches, or thread breaks. Needle inspection ensures improving stitch quality and prevents issues with fabric type.
What happens if you don’t change your sewing machine needle?
A dull sewing machine needle causes fabric damage, thread breakage, and uneven stitches. You’ll face machine malfunction risks and declining stitch quality.
Operator safety decreases when needles break unexpectedly during sewing.
Can I reuse a sewing machine needle?
You might be tempted to keep using that sewing machine needle, but needle reuse risks outweigh any savings.
Stitch quality decline and machine damage prevention matter more than squeezing extra projects from worn needles.
How do I dispose of old sewing machine needles?
Place old sewing machine needles in a puncture-proof sharps container like a plastic bottle. Seal and label it clearly.
Check local disposal regulations or use community drop-off programs to prevent needlestick injuries and environmental contamination.
Conclusion
An ounce of prevention is worth a pound of cure. That wisdom holds true every time you learn how to replace needle on sewing machine. This five-minute task protects your fabric from snags and shields expensive machine parts from damage.
Keep spare needles in your workspace. Change them often. Check for bends or burrs before each major project. Your machine will reward careful maintenance with years of clean stitches and reliable performance.

