This site is supported by our readers. We may earn a commission, at no cost to you, if you purchase through links.
Grab scissors, a rat-tail comb, and a mirror (or two). Gently locate the thread holding the extensions and snip carefully—don’t rush, and definitely don’t cut your own hair (we’ve all had that panic moment).
Work section by section, unraveling the thread and removing the wefts. Once the extensions are out, undo your braids gently and detangle with a wide-tooth comb.
Finish with a good wash and deep condition to pamper your natural hair. Ready for the next style adventure?
Table Of Contents
Key Takeaways
- Gather sharp scissors, a seam ripper, sectioning clips, and a wide-tooth comb to safely remove the sew-in without damaging your natural hair.
- Work row by row, carefully cutting threads while avoiding your hair, and detangle gently as you go to prevent matting.
- Use oil like coconut oil to loosen threads and make removal easier, reducing tension on your scalp.
- After removal, wash with clarifying shampoo, deep condition, and detangle to restore your hair’s health.
How to Prepare
Before diving into DIY hair removal, you’ll want to set yourself up for success with proper preparation steps.
Start by washing your hair thoroughly to remove any product buildup that could complicate the sew in removal process.
Gather your essential tools: sharp scissors, tweezers, wide-tooth comb, and sectioning clips.
Conduct a quick hair assessment to identify different sew in types and extension choices you’re working with – this helps you understand what you’re dealing with.
Stock up on detangling products and deep conditioners for post-removal care.
These pre removal tips guarantee you’re ready to tackle removing sew in hair safely and effectively.
Understanding the importance of fabric pre treatment can also be beneficial in other textile projects.
How to Remove Your Weave
Now that you’ve got everything ready, it’s time to tackle the actual removal process – and trust me, it’s way less scary than you think!
You’ll start by working from the back of your head, carefully cutting the threads that hold each weft in place while being super gentle with your natural hair.
This process requires attention to detail and care to avoid damaging your hair, making it a delicate task that needs to be done correctly.
Tools Needed
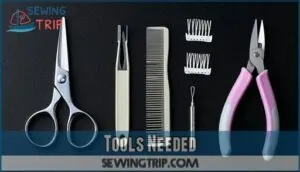
Before tackling your sew in removal, gather these essential tools: sharp scissors for cutting threads, a seam ripper to safely separate stitches, sturdy hair clips for sectioning, tweezers for grabbing stubborn thread bits, and pliers to handle any tricky closures.
These hair extension removal tools transform what could be a frustrating experience into a smooth DIY sew in removal process that puts you in complete control.
To guarantee a successful removal, it’s vital to understand the proper use of hair extension tools for a safe and efficient process.
Step-by-Step Process
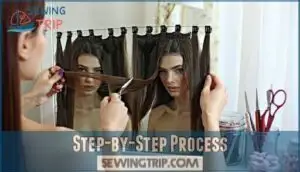
Ready to tackle your DIY sew in removal? Start by sectioning your hair with clips, then locate the thread holding each weft.
Use scissors to carefully cut threads while protecting your natural hair – never rush this step. For a successful removal, consider using a good sew in remover.
Here’s your game plan for safe extension cutting:
- Hold your natural hair firmly above each ring before cutting
- Work from bottom to top, removing one weft at a time
- Gently detangle as you go to prevent matting
Post-Care
Your hair’s finally free, but it needs some serious TLC after being locked down for weeks.
Start with a clarifying shampoo to remove buildup, then follow with deep conditioning for moisture care and hair nourishment. Using a deep conditioning treatment can help restore hair health.
Finally free, your hair deserves love—nourish it with deep conditioning and watch it bounce back stronger than ever!
| Treatment Type | Product | Duration |
|---|---|---|
| Scalp Treatment | Coconut oil massage | 15-20 minutes |
| Hair Repair | Deep conditioning mask | 30-60 minutes |
| Damage Control | Protein treatment | 20 minutes |
| Moisture Care | Leave-in conditioner | Daily application |
Schedule that trim within the week—your ends will thank you later!
Tips for Reusing Extensions
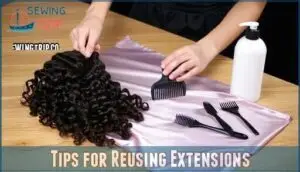
After proper post-care, you’ll want to maximize your investment by reusing those extensions. Smart hair recycling starts with gentle detangling using a wide-tooth comb, working from ends to roots in small sections. Don’t rush this process – patience prevents unnecessary breakage.
For curly extensions, restyle by braiding or twisting damp hair, then let it air dry completely before your next DIY sew in removal and reapplication. Wash extensions thoroughly with clarifying shampoo to eliminate product buildup that could affect your next install.
Extension storage matters tremendously. Keep hair loosely braided or twisted, wrapped in satin to prevent matting. Discard any tracks that’re frayed, broken, or shedding excessively – they’re not worth the hassle.
With proper extension care and weft cleaning, quality human hair can be reused 2-3 times, making your hair extension reuse both economical and sustainable. To learn more about the best practices for reusing hair, consider reading about hair extension reuse techniques.
- Detangle gently with wide-tooth comb from ends upward
- Wash with clarifying shampoo to remove buildup completely
- Air dry curly extensions in braids for shape retention
- Store in satin wraps to prevent tangling overnight
- Inspect for damage before deciding on hair reuse
- Take time during prep to avoid unnecessary breakage
- Quality human hair withstands 2-3 reapplication cycles
Why People Care About Removing Sew-in Extensions by Themselves
Removing sew-in extensions yourself isn’t just about saving money—it’s about reclaiming your time and embracing hair freedom. DIY sew-in removal lets you skip the salon wait and control your schedule. Plus, it’s a huge confidence boost knowing you can handle your own hair extension removal like a pro.
Reclaim your time, save money, and master the art of sew-in removal—your hair, your rules, your freedom.
Who doesn’t love a little personal empowerment?
Here’s why it’s worth it:
| Benefit | Why It Matters | Example |
|---|---|---|
| Cost Savings | Keeps extra cash in your pocket | Skip the $100+ stylist fee |
| Self Care | Turns removal into a relaxing, meditative moment | Unwind while focusing on your hair |
| DIY Benefits | Builds skills and independence | Master taking out sew-ins confidently |
Taking out sew-in hair extensions yourself is like a small act of rebellion against unnecessary expenses. It’s your hair, your rules, and your time.
Just go slow, stay patient, and enjoy the process—it’s all part of owning your hair journey.
Hair Factory – How to Easily Remove Sew-in Extensions With High-Quality Extensions
In the context of sew in removal, using high-quality tools makes all the difference. Think of it as having the right ingredients for a perfect recipe—it sets you up for success. Hair Factory extensions are designed for easy removal without compromising your hair health.
Here’s how to make the process smooth:
- Gather Tools: Use sharp scissors, a seam ripper, and a pin tail comb for precision.
- Focus on Sections: Work row by row, cutting threads carefully to avoid your natural hair.
- Hydrate and Nourish: Apply coconut oil to soften threads and protect your scalp.
- Post-Care: Wash with a clarifying shampoo and deep condition for proper hair maintenance.
Taking out sew in extensions doesn’t have to be stressful—just take it slow!
Frequently Asked Questions (FAQs)
How do I remove a sew in?
Did you know improper sew-in removal can cause hair damage?
Start by sectioning hair with clips, then carefully cut threads using sharp scissors or a seam ripper.
Gently detangle, wash, and condition for healthy recovery, which is crucial for healthy hair after the removal process.
How do you take out a sew in weave?
Start by sectioning your hair with clips, then carefully cut the threads using a seam ripper or small scissors.
Gently pull out the wefts, detangling as you go.
Patience prevents damage—your hair will thank you!
How long should a sew in be removed?
Imagine wearing the same outfit for two months—itchy, right?
Sew-ins should be removed every 6-8 weeks to prevent hair damage, tangling, and scalp irritation.
Don’t wait too long; your hair deserves breathing room!
How long does a sew in weave last?
A sew-in weave typically lasts 6-8 weeks with proper care.
Stretching it longer risks tangling and hair damage.
Treat your natural hair underneath with love, and don’t skip regular maintenance to keep everything healthy!
Can you wear a sew in weave for a long time?
You might think keeping a sew-in weave longer saves time, but it risks tangling, breakage, or scalp issues.
Stick to 6-8 weeks max, giving your natural hair a breather to stay healthy.
How do you remove a hair weave?
To remove a hair weave, carefully cut the threads with small scissors or a seam ripper, section by section.
Use tweezers for thread remnants, detangle gently, and nourish your hair with deep conditioning afterward.
Can I take my sew in out myself?
Carefully cut threads with sharp scissors or a seam ripper, sectioning hair with clips.
Detangle gently as you go. Patience is key—rushing risks damage.
If unsure, don’t hesitate to seek professional help!
How do you remove sew in extensions yourself?
Start by sectioning your hair with clips, then locate the threads holding the extensions.
Use a seam ripper or scissors to cut threads carefully, avoiding your natural hair.
Gently detangle and remove wefts row by row, this process requires carefully handling to avoid damaging your hair.
How long does it take to take out sew in?
Imagine untangling Christmas lights—that’s sew-in removal!
It typically takes 1-2 hours, depending on thread tightness and your experience.
Work row by row, stay patient, and you’ll free your hair without stress.
How to loosen sew in extensions at home?
Gently massage coconut oil or a similar oil-based product onto the threads and scalp to loosen them.
This softens the stitches, making it easier to snip threads and slide out extensions without tugging.
Conclusion
Snipping, sliding, and smoothing—taking out a sew-in by yourself doesn’t have to be stressful.
With patience and the right tools, you can safely remove your extensions while protecting your natural hair.
Remember to work slowly, double-check for threads, and avoid cutting too close to your scalp.
Once your sew-in is out, treat your hair to some TLC with a deep condition.
Ready for your next hair journey? You’ve got this, and your hair will thank you for the care!

