This site is supported by our readers. We may earn a commission, at no cost to you, if you purchase through links.
 To sew a zipper successfully, you’ll need a zipper foot attachment for your machine and some patience.
Start by pinning the zipper face-down along your fabric’s seam line. Baste the seam closed first, then press it open.
Position the zipper centered over the seam and pin it in place. Using your zipper foot, stitch along both sides of the zipper tape, keeping your stitching line straight and even.
Remove the basting stitches carefully with a seam ripper. Test the zipper by sliding it up and down to verify smooth operation. The key is taking your time and practicing proper positioning techniques for professional results.
Table Of Contents
- Key Takeaways
- Why Sew a Zipper?
- Types of Zippers
- Key Parts of a Zipper
- Required Supplies
- Simple Zipper Installation
- Other Zipper Installation Methods
- Tips for Sewing Zippers by Hand
- Common Zipper Sewing Mistakes and How to Avoid Them
- Troubleshooting Zipper Installation Issues
- Advanced Zipper Techniques and Projects
- Frequently Asked Questions (FAQs)
- Conclusion
Key Takeaways
- Use a zipper foot attachment and practice proper positioning techniques – this essential tool lets you stitch close to zipper teeth without catching them, giving you professional results every time.
- Choose the right zipper type for your project – separating zippers for jackets, invisible zippers for dresses, and metal zippers for heavy-duty items like jeans ensure your closure matches your fabric’s needs.
- Master the basic installation method by basting your seam first, positioning the zipper face-down along the seam line, and stitching both sides evenly – this foundation technique works for most zipper projects.
- Prevent common mistakes by pre-shrinking your zipper, using interfacing on lightweight fabrics, and maintaining consistent tension while sewing – these steps eliminate puckering and wavy seams that scream amateur work.
Why Sew a Zipper?
When you learn to sew a zipper, you’re gaining project versatility that transforms basic sewing into professional craftsmanship.
Master zipper installation and unlock endless creative possibilities for jackets, bags, and professional-quality garments.
Zipper installation opens doors to jackets, bags, pillows, and countless creations requiring functional closure. This essential skill development saves money on repairs and alterations while enhancing your design aesthetics.
Instead of avoiding patterns with zippers, you’ll embrace them confidently. Mastering zipper repair means extending garment life and reducing waste.
These fundamental sewing techniques elevate your work from amateur to polished, giving you complete control over how to sew zipper applications successfully. Many sewists start by learning zipper installation techniques, which is a key step in achieving professional craftsmanship and gaining complete control.
Types of Zippers
Understanding zipper types isn’t rocket science, but choosing the right one makes all the difference in your project’s success. You’ll encounter four main categories that each serve distinct purposes.
Separating zippers split completely apart, making them perfect for jackets and coats. These open-end applications require the zipper to function like a hinge, allowing garments to open fully.
Coil zippers feature nylon teeth wound around the zipper tape. Their coil zipper uses include lightweight garments, bags, and cushions. They’re budget-friendly and flexible, though less durable than metal options.
Metal zippers offer superior metal teeth durability for heavy-duty projects. Choose these for jeans, work clothes, or items requiring frequent use. They withstand washing and wear better than plastic alternatives.
Invisible zippers completely disappear into seams when installed correctly. The invisible zipper pros include a clean, professional finish ideal for dresses and formal wear. They require special techniques but create seamless results.
Consider your zipper size guide carefully—heavier fabrics need larger teeth numbers for proper support. For heavier-duty applications, consider a zipper with molded plastic teeth.
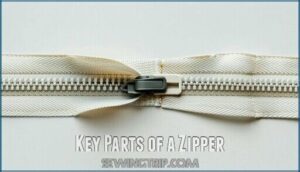
Key Parts of a Zipper
Now that you know the different zipper styles, let’s break down what makes each one tick.
Every zipper has five main parts that work together like a well-oiled machine.
Here’s what you’ll find on every zipper:
- Zipper Teeth – The interlocking pieces that create the closure
- Zipper Slider (or zipper pull) – The part you grab to open and close
- Zipper Tape – The fabric strips that hold everything together
- Top Stop – Prevents the slider from sliding off the top
- Bottom Stop – Keeps the zipper closed at the bottom end
Understanding these components helps you choose the right zipper for your project and sew it properly.
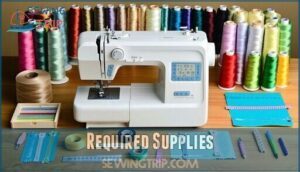
Required Supplies
Now that you understand zipper anatomy, let’s gather your supplies. Having the right tools makes the difference between a smooth installation and a frustrating afternoon.
Your sewing machine is your workhorse, but you’ll need a zipper foot to stitch close to those teeth. Zipper foot types include standard and invisible options – choose based on your project needs. Thread color matching prevents visible stitching mistakes, so pick thread that blends with your fabric.
You’ll need measuring tools like a ruler or tape measure for accurate placement. Marking implement options include fabric chalk, water-soluble pens, or washable markers – test on scraps first. Don’t forget pins to hold everything in place while you work. For delicate or stretchy fabrics, fabric interfacing needs consideration to prevent puckering. A seam ripper saves the day when mistakes happen. Finally, choose your zipper – pick one slightly longer than your opening for easier handling. These basics set you up for zipper success.
Now that you understand zipper anatomy, let’s gather your supplies. Having the right tools makes the difference between a smooth installation and a frustrating afternoon.
Your sewing machine is your workhorse, but you’ll need a zipper foot to stitch close to those teeth. Zipper foot types include standard and invisible options – choose based on your project needs. Thread color matching prevents visible stitching mistakes, so pick thread that blends with your fabric.
You’ll need measuring tools like a ruler or tape measure for accurate placement. Marking implement options include fabric chalk, water-soluble pens, or washable markers – test on scraps first. Don’t forget pins to hold everything in place while you work. For delicate or stretchy fabrics, fabric interfacing needs consideration to prevent puckering. A seam ripper saves the day when mistakes happen. Finally, choose your zipper – pick one slightly longer than your opening for easier handling. These basics set you up for zipper success. For precise cuts, consider using rotary cutters alongside your scissors.
Simple Zipper Installation
Installing a simple zipper is easier than you think when you follow the right steps.
You’ll learn to attach your zipper foot, position the zipper correctly, and sew straight lines that create a professional finish every time.
This process allows for a professional finish that enhances the overall quality of your work, making it look polished and well-made.
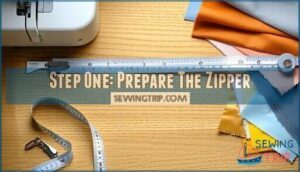
Step One: Prepare The Zipper
First, measure your zipper length against the opening to guarantee a perfect fit.
Pre-shrinking zippers prevents future fabric puckering, especially with natural materials.
Check your zipper foot attachment—it’s essential for precise stitching. A proper zipper foot makes things easier.
Add interfacing to lightweight fabrics for extra support. Position the zipper slider halfway down the zipper tape to avoid hitting the zipper stop while sewing, ensuring a smooth and precise stitching process with the right zipper foot attachment.
Step Two: Sewing With Seam Allowance
Switch to your zipper foot after basting your fabric pieces together.
This specialized foot lets you stitch closer to the zipper teeth without catching them. Set your sewing machine to a straight stitch and maintain consistent seam allowance width throughout.
Start sewing 5/8 inch from the fabric edge, keeping your fabric edge alignment perfect. Backstitch at both ends for security.
The zipper foot gives you better control than a regular foot when working near those metal or plastic teeth.
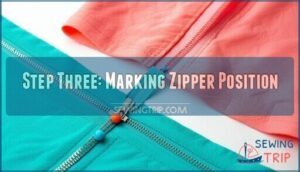
Step Three: Marking Zipper Position
You’re ready to master zipper placement with precise marking techniques.
Position your zipper face-down on the fabric’s right side, aligning the teeth with your seam line.
This accurate marking step determines your project’s professional finish.
- Mark the zipper stop position with a fabric-safe pen or chalk
- Align zipper teeth perfectly parallel to your fabric edge
- Secure the zipper pull approximately one inch above the bottom stop
- Pin every two inches along the tape, staying within seam allowances
Measuring precisely guarantees your sewing machine can stitch smoothly without catching the zipper pull.
Take time with fabric alignment now—it prevents frustrating adjustments later, ensuring a smooth sewing process and a precise finish.
Step Four: Sewing With Zig-Zag Stitch
Switch your sewing machine to zig-zag mode for stronger zipper attachment.
Set stitch width to 2-3mm and length to 1-2mm for best results.
Adjust tension settings based on your fabric types – lighter fabrics need less tension.
This stitch pattern provides flexibility and prevents thread breakage when the zipper moves.
Consider various machine settings for ideal performance.
The zig-zag benefits include durability and professional-looking seams that won’t snap under pressure.
Step Five: Topstitching for a Polished Look
Topstitching transforms your zipper installation from amateur to professional. Position your sewing machine needle 1/4 to 3/8 inch from the zipper seam. This topstitch distance creates clean, even lines that scream quality craftsmanship.
Choose thread that matches your fabric or creates intentional contrast for visual pop.
- Thread Choice: Match fabric color or use contrasting thread for decorative effect
- Stitch Length: Set machine to 2.5-3mm for balanced, professional appearance
- Fabric Stability: Keep fabric taut while stitching to prevent puckering
- Cornering Techniques: Pivot with needle down at zipper stops for sharp turns
- Sewing Tips: Test stitch length on fabric scraps before final topstitching
Step Six: Finishing Touches
After your topstitching is complete, you’ll want to add the final flourishes that separate amateur work from professional results.
Press any fabric warping with your iron on low heat, then secure loose threads with hand sewing techniques.
Consider thread embellishments or interfacing support for delicate fabrics.
Explore options for decorative thread accents to elevate your design.
These small details transform your zipper from functional to flawless with the use of thread embellishments.
Other Zipper Installation Methods
You’ve learned the basic zipper method, but there are three other ways to install zippers that work better for different projects.
These methods include lapped zippers for a professional finish, invisible zippers that hide completely in seams, and exposed zippers that show the zipper as part of the design.
Lapped Zipper
Lapped zippers create professional-looking seams with teeth hidden beneath a fabric flap.
This classic technique works perfectly for mid-weight fabrics like cotton and linen.
Using your sewing machine with a zipper foot, you’ll baste the seam closed first, then carefully stitch one side before folding the fabric to create the concealing lap.
The result adds sophisticated design aesthetics to any garment.
Alternatively, for a cleaner look, consider using an invisible zipper.
Invisible Zipper
Invisible zippers disappear completely into your seams, creating clean lines perfect for dresses and formal garments.
You’ll need special invisible zipper feet for your sewing machine since regular zipper foot won’t work here.
Press the zipper teeth flat first, then align with your fabric’s seam allowance. This zipper tutorial shows how fabric choice matters – lightweight materials work best.
Match your zipper length to the opening, and you’ll sew a zipper that’s practically magic.
Exposed Zipper
Unlike invisible zippers that hide completely, exposed zippers make the zipper teeth a bold design feature.
This zipper sewing technique transforms functional hardware into decorative elements through creative color use and zipper teeth options.
Here’s your step-by-step exposed zipper tutorial:
- Reinforce the opening with fusible interfacing to prevent stretching
- Position zipper teeth directly over the seam opening, securing with basting tape
- Stitch outer edges of zipper tape using your zipper foot for precision
- Add decorative topstitching with contrasting thread for enhanced exposed zipper aesthetics
This sewing tutorial turns ordinary closures into stunning focal points through thoughtful zipper hardware choices and functional design.
Tips for Sewing Zippers by Hand
Hand sewing a zipper gives you complete control over every stitch. Start by choosing the right needle – use a sturdy one for heavy fabrics and a thinner needle for lightweight materials.
Hand sewing zippers puts the power of precision directly in your hands.
Thread choice matters too; silk or polyester thread slides smoothly through fabric without snagging.
Master these essential hand stitch types for professional results:
- Use a prick stitch for strength – make tiny front stitches with longer back stitches
- Control tension by keeping stitches consistent and avoiding pulling too tight
- Secure zipper ends by knotting threads carefully without creating puckering
Common Zipper Sewing Mistakes and How to Avoid Them
Even experienced sewers make zipper mistakes, but you can skip the learning curve by avoiding these common pitfalls.
Wavy Zippers happen when you stretch fabric while sewing.
Keep your hands relaxed and let the machine do the work.
Zipper Bulging occurs when you choose the wrong zipper weight for your fabric.
Match heavy zippers with thick materials and lightweight ones with delicate fabrics.
Uneven Stitching results from rushing or using the wrong foot attachment.
Pre-shrinking Zippers prevents future puckering in washable garments.
Soak metal and plastic zippers in hot water before installation.
When you sew a zipper, test it frequently to catch problems early.
Remember to verify fabric fraying tendency to guarantee a clean finish.
Replace bent or damaged zippers immediately rather than fighting with faulty hardware.
These sewing tips will save you hours of zipper troubleshooting later.
Remember, zipper replacement is easier than fixing a poorly installed one.
Troubleshooting Zipper Installation Issues
When zipper problems arise, don’t panic. Check for fabric bunching by running your fingers along the seam. Uneven stitching often causes wavy zipper fix issues—press seams flat and re-pin carefully.
Stuck zipper pull usually means fabric caught in teeth. Zipper foot issues create alignment problems, so adjust your machine’s needle position.
If the zipper won’t close smoothly, remove basting stitches and realign fabric edges. For zipper replacement needs, mark original stitch lines first.
These sewing troubleshooting steps solve most zipper problems and challenges you’ll encounter.
Advanced Zipper Techniques and Projects
You’ve mastered basic zipper installation, but now it’s time to tackle advanced projects that’ll showcase your skills.
Create welt zipper pockets for professional-looking jackets or try pieced pockets that add visual interest to bags.
Pattern hacking lets you add zipper pockets to existing sewing patterns, while recessed zippers create sleek, modern finishes.
Master complex curves by clipping seam allowances every centimeter and easing fabric gradually, and add zipper embellishments like decorative tabs or contrasting topstitching for unique touches.
Practice invisible zipper techniques on curved seams, and experiment with welt zipper pocket construction for custom garments that rival store-bought quality.
Frequently Asked Questions (FAQs)
What sewing machines work best for installing zippers?
Picture your trusty sewing machine humming smoothly as you tackle that tricky zipper.
Most standard machines handle zippers beautifully—you’ll need a zipper foot attachment and adjustable needle position for perfect results every time.
How do I sew an invisible zipper?
Position your invisible zipper face-down on the right side of your fabric, aligning edges perfectly.
Use an invisible zipper foot to stitch close to the coil teeth, keeping stitches straight and even throughout.
What’s the best way to shorten a zipper?
Like trimming a hedge to perfect size, you’ll cut the zipper tape below your desired length.
Then create a new stopper by hand-stitching dense zigzag stitches across the teeth to prevent the pull from sliding off.
How can I fix a jammed zipper?
Try these quick fixes for your jammed zipper: rub a bar of soap, candle wax, or graphite pencil along the teeth.
Gently work the pull back and forth while applying pressure to loosen the stuck mechanism.
How do you shorten a zipper safely?
Cut the zipper tape below your desired length, leaving extra fabric.
Create a new bottom stop by hand-stitching several tight zigzag stitches across the teeth.
This prevents the slider from falling off completely.
Can you replace a broken zipper pull?
Yes, you can replace a broken zipper pull.
Remove the old pull by sliding it off the track’s end or cutting it away.
Slide a new matching pull onto the zipper teeth, ensuring proper size compatibility.
What thread weight works best for zippers?
You’ll want to use medium-weight thread, typically 40-50 weight polyester or cotton.
This provides enough strength without being too bulky.
Avoid heavyweight threads that can jam your machine or create uneven stitches.
How do you prevent zipper fabric puckering?
Tired of wavy zipper seams?
Use interfacing along the seam for extra support, especially with stretchy fabrics.
Keep tension even while stitching, and press seam allowances open before installing your zipper.
Should zippers be pre-washed before sewing?
Pre-washing zippers depends on your fabric choice. You’ll want to pre-shrink zippers in hot water before sewing into natural, stretchy fabrics to prevent puckering later. Check the zipper packaging first.
Conclusion
Mastering the art to sew a zipper transforms you from a nervous beginner into a confident creator.
Like building blocks stacking perfectly together, each technique you’ve learned creates a solid foundation for future projects.
Remember, every expert seamstress once fumbled with their first zipper foot.
Practice makes perfect, so don’t get discouraged by initial wobbles.
With patience and these proven methods, you’ll soon sew a zipper with the precision of a professional tailor every single time.
- https://weallsew.com/zipper-tips-and-techniques/
- https://sewingworkshop.com/new-blog/how-to-sew-a-zipper
- https://www.masterclass.com/articles/how-to-sew-a-zipper
- https://fabricandflowers.co.uk/6-tips-how-to-sew-zippers-easily-and-quickly/
- https://www.threadsmagazine.com/collection/9-zipper-installation-techniques

