This site is supported by our readers. We may earn a commission, at no cost to you, if you purchase through links.
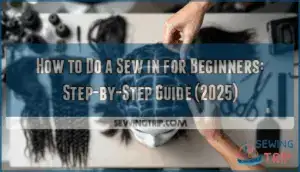 Your first sew-in doesn’t have to look like a tangled disaster. Most beginners panic at the sight of wefts, needles, and thread—convinced they’ll end up with lumpy tracks and a sore scalp.
Here’s the truth: sew-ins are one of the most forgiving protective styles you can learn. The braided foundation hides small mistakes, and with the right technique, you can install professional-looking extensions from your own bathroom.
Whether you’re tired of dropping $200 at the salon every six weeks or you simply want control over your hairstyle, mastering this skill opens up endless styling possibilities. Learning how to do a sew in for beginners starts with understanding the basic steps, gathering the right tools, and taking your time with each weft.
Table Of Contents
Key Takeaways
- Sew-ins are a forgiving protective style where hair extensions are stitched onto cornrowed natural hair, lasting 6-8 weeks and allowing your hair to grow while experimenting with length, volume, and color without permanent commitment.
- Success starts with proper prep—wash and deep condition your natural hair, create medium-tension cornrows as your foundation, and gather essential tools like a curved needle, weaving thread, and quality human hair extensions that match your texture.
- Install extensions by sewing wefts onto cornrows from the nape upward, stitching every ¼ inch for security, then blend by matching textures with heat tools and strategic layering to hide any visible tracks.
- Maintain your sew-in by moisturizing your scalp 2-3 times weekly, washing every 1-2 weeks with sulfate-free products, sleeping with a satin wrap, and removing it after 6-8 weeks to prevent matting and scalp damage.
What is a Sew in and How Does It Work?
If you’ve been thinking about leveling up your hair game, a sew in might be exactly what you’re looking for. This popular technique can transform your look by adding length, volume, or both—and once you know the basics, it’s easier than you might think.
Let’s break down what a sew in actually is, how it works, and whether it’s the right choice for you.
Definition and Benefits of Sew in Extensions
A sew-in is a protective styling method where hair extensions are literally stitched onto tightly braided cornrows, giving you instant length, volume, and adaptability without putting stress on your natural hair. This protective hairstyle shields your strands from daily manipulation while you rock gorgeous, full-bodied looks. The beauty of sew-ins lies in their flexibility and longevity.
Benefits of sew-in extensions include:
- Transform your look overnight – go from shoulder-length to waist-length hair in one appointment
- Give your natural hair a break – minimal heat styling and care means healthier growth
- Stretch your dollar further – proper maintenance keeps your sew-in looking fresh for 6-8 weeks
- Experiment without commitment – try colors, textures, and lengths you’ve always dreamed about
Types of Hair Extensions Used for Sew Ins
When you’re shopping for extensions, you’ll find several types of wefts on the market—and knowing the differences can save you time, money, and a whole lot of frustration. Machine wefts are durable and budget-friendly, perfect for beginners learning to sew. Hand-tied wefts lie flatter against your scalp, creating a more natural look.
You’ll also encounter Remy human hair and virgin human hair options in various extension lengths, texture options, and color matching possibilities—each offering different levels of hair quality to fit your style and budget.
Human Hair Vs. Synthetic Hair Extensions
One big choice you’ll face: human hair extensions or synthetic hair extensions. Human hair offers styling flexibility—you can curl, flat-iron, and color it just like your natural hair. Synthetic options cost less upfront but lack heat tolerance and have a shorter hair lifespan.
Human hair also wins on texture difference, blending seamlessly with your natural strands, though the environmental impact and cost comparison favor synthetics initially. Product images on the website aim to display items accurately.
Who Should Consider a Sew In?
Now that you’ve picked your extensions, let’s figure out if a sew in is actually right for you. Sew ins work best if you want a protective style that promotes hair growth while adding length or volume.
They’re ideal for various hair textures—especially if your natural hair can maintain a braid securely.
Consider your lifestyle factors, commitment level, and budget concerns, too, since maintenance requires time and touch-ups every 4-6 weeks.
Essential Tools and Products for a Sew In
Before you start sewing in those extensions, you’ll need to gather the right tools and products. Having everything ready beforehand makes the process smoother and helps you avoid mid-project scrambles.
Let’s break down what belongs in your sew-in toolkit.
Must-Have Hair Extension Tools
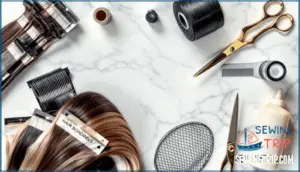
Before you even think about installing your first sew-in, you’ll need to gather a handful of essential tools—and trust me, having the right supplies on hand makes all the difference between a smooth installation and a frustrating mess. Here’s what you’ll need:
- Curved needle: Perfect for sewing wefts onto cornrows without poking your scalp
- Weaving thread (braid thread): Strong, durable thread that holds extensions securely in place
- Extension scissors: Sharp shears for cutting wefts and trimming thread cleanly
- Weaving clamps: Helpful for holding hair extensions steady while you work
Recommended Hair and Product Types
Choosing the right hair extensions and products is like picking the perfect foundation for your dream home—it sets the stage for everything that comes after. Here’s what works best for sew-ins:
| Factor | Best Choice |
|---|---|
| Hair Type | Human hair extensions for natural movement |
| Hair Texture | Match your natural texture (straight, wavy, curly) |
| Extension Length | Start with 12-18 inches for beginners |
| Weft Types | Machine wefts for durability, hand-tied for comfort |
Color matching is key—bring a sample of your natural hair when shopping. Look for hair bundles with minimal product ingredients or chemical processing for easier blending.
Preparing Your Toolkit and Workspace
Setting up your workspace properly can mean the difference between a smooth installation and a frustrating tangle of thread and hair. Find a spot with a great lighting setup—natural light works wonders, but a bright lamp helps too.
Sterilize your curved needle, scissors, and pins with rubbing alcohol. Keep everything within arm’s reach on a clean towel for workspace organization.
Your neck and back will thank you for choosing a comfortable chair that promotes ergonomic practices throughout the process.
How to Prep Your Hair for a Sew In
Getting your hair ready is just as important as the installation itself. Proper prep helps your sew in last longer and keeps your natural hair healthy underneath.
Let’s walk through the essential steps you’ll need to take before you start braiding.
Washing and Conditioning Natural Hair
Think of this step as laying the foundation for a house—if your natural hair isn’t clean and properly conditioned before installation, everything built on top of it won’t last as long or look as good.
Start with a clarifying shampoo to remove product buildup from your scalp, then follow up with a moisturizing conditioner that’ll boost moisture retention and support scalp health.
Detangling and Drying Techniques
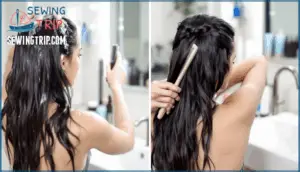
Once your hair is clean and conditioned, it’s time to detangle—and trust me, skipping this step is like trying to braid a bird’s nest. Start with a wide-toothed comb and work from the ends up to avoid breakage. Apply a leave-in conditioner to make hair detangling easier.
Let your hair air dry completely to prevent heat damage, or use a blow dryer on low if you’re short on time.
Sectioning and Applying Protective Products
Your hair is prepped and detangled—now it’s time to divide and conquer by sectioning it properly before those braids go in. Proper hair preparation sets the foundation for a secure sew-in that lasts.
- Quadrant division: Split hair into four equal sections using parting precision for even distribution
- Apply leave-in conditioner to each hair section for moisture retention
- Add heat protectant if you straightened hair earlier
- Use lightweight oil for scalp protection without heavy buildup
- Product layering: Work from scalp to ends, making sure of thorough coverage
Clip each section securely to keep your workspace organized.
Choosing The Best Braiding Pattern
The braiding pattern you pick becomes the invisible foundation that holds everything together, so let’s find the right fit for your hair type and the look you’re going for. Cornrows straight back work best for most sew-ins and suit any facial shape.
Consider your hair density—thicker hair needs a larger braid size for scalp health, while finer textures benefit from smaller, tighter cornrows. Circular patterns offer adaptability and work great for styling options when braiding natural hair during preparation.
Step-by-Step Guide to Installing a Sew In
Now that your hair is prepped and ready, it’s time to get those extensions in place. This is where the magic happens, but don’t worry—we’ll break it down into manageable steps so you won’t feel lost.
Let’s walk through each part of the installation process together.
Braiding Your Natural Hair
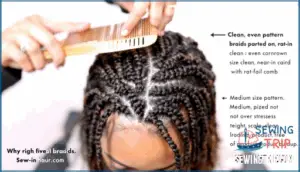
Start by creating your cornrow foundation—this is where your sew-in will literally live, so getting it right matters more than you might think. Choose braiding patterns that match your hair density and desired style—beehive cornrows work great for full coverage, while straight-back cornrows suit side parts.
Keep your braid size medium and consistent for even weight distribution. Make sure there’s no product buildup beforehand, as clean braids protect your scalp health.
Take your time weaving them—tight enough to grip extensions securely, but never so tight they’re pulling.
Securing The Braids for Stability
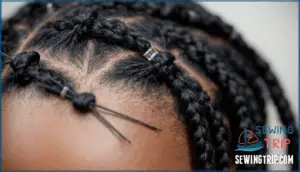
After those braids are in place, it’s time to lock them down so they don’t budge an inch while you’re stitching in your extensions. Knot security is your best friend here—tie off each cornrow end with a tight knot using thread or elastic bands. This braid reinforcement keeps everything stable without compromising scalp protection.
Here’s what to focus on:
- Tension control: Check that braids feel snug but never painful—your scalp shouldn’t ache.
- Pattern adaptability: Secure ends based on your chosen layout, whether beehive or straight-back.
- Double-knotting: Extra security prevents unraveling mid-wear.
Proper knot security means your hair cornrow braid foundation stays rock-solid through styling and daily wear.
Sewing in The Hair Extensions
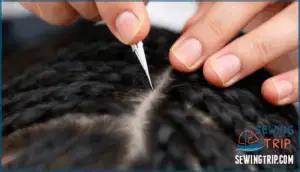
Now that your braids are locked down tight, grab your curved needle and thread—it’s time to actually attach those wefts and bring your new look to life. Start at the nape, working upward row by row. Thread through the braid, catch the weft track, then loop back—keeping your stitches close together for solid weft attachment.
Follow your braid patterns precisely as you weave each track. The sewin process for beginners gets easier with each row—you’ll find your rhythm fast. Keep checking that sew ins feel secure but never tight enough to hurt.
| Step | Action | Why It Matters |
|---|---|---|
| Position weft | Align track along cornrow | Makes for smooth extension blending |
| First stitch | Anchor end securely | Prevents shifting during wear |
| Spacing | Stitch every ¼ inch | Maintains hair density and scalp health |
| Tension check | Pull gently, don’t yank | Protects natural hair and comfort |
| Final knot | Double-tie thread end | Locks hair wefts in place |
Blending and Styling for a Natural Look
When your last weft is secure, the real magic happens—blending those hair extensions with your natural hair so no one can spot where one ends and the other begins. Texture matching is huge here; if your leave-out doesn’t match the extension pattern, try flexi rods or a flat iron to sync things up.
Layering techniques help too—snip strategically to remove harsh lines and create flow. To achieve a natural look, it’s important to match the extension color to your natural hair.
Use styling tools like wide-tooth combs and heat protectant to keep everything smooth. With solid longevity maintenance, your sew-ins can look fresh for weeks.
Caring for and Maintaining Your Sew In
Getting your sew in installed is just the beginning—keeping it fresh and fabulous takes a little know-how.
The right care routine will help your extensions last longer and keep your natural hair healthy underneath.
Let’s walk through the key steps to maintain your sew in from day one until it’s time to take it out.
Daily and Weekly Maintenance Tips
Taking care of your sew-in isn’t a set-it-and-forget-it kind of deal—it needs a little love throughout the week to stay fresh, healthy, and looking fabulous. Here’s what your hair care routine should include:
- Moisturize your scalp 2-3 times weekly to prevent dryness and itching
- Detangle extensions gently with a wide-tooth comb to avoid matting
- Cleanse carefully every 1-2 weeks using diluted shampoo to prevent product buildup
- Maintain moisture balance by spritzing with leave-in conditioner between washes
Protecting Hair While Sleeping
One toss-and-turn session without the right protection can leave your gorgeous sew-in looking tangled, frizzy, and worn out by morning. That’s why wrapping your hair with a silk or satin scarf or bonnet before bed is non-negotiable.
These materials reduce friction, lock in moisture retention, and keep your braids secure—making your nighttime routine just as important as your daily hair care.
When and How to Remove a Sew In
Knowing when to take your sew-in out is just as important as putting it in—leave it too long, and you’re risking matted braids, thinning edges, and damage that’ll set your hair goals back months. Most sew-ins have an extension lifespan of 6-8 weeks, but your scalp health and product buildup will tell you when it’s time for safe removal.
Leave your sew-in in too long, and you’re risking matted braids, thinning edges, and damage that’ll set your hair goals back months
Here’s how to remove your sew-in without damaging your natural hair:
- Cut the thread carefully – Use small scissors to snip the thread holding each weft, avoiding your natural hair completely.
- Remove wefts gently – Pull the extensions away slowly once the thread is cut to prevent tugging on braids.
- Unravel braids with care – Apply leave-in conditioner or oil to soften braids before carefully unbraiding each cornrow.
- Cleanse thoroughly – Wash your hair with clarifying shampoo to remove buildup and refresh your scalp after weeks of weaving.
- Deep condition and rest – Give your hair a moisture treatment and let it breathe for at least two weeks before considering reinstallation options for caring for sew-ins properly and maintaining sew-in maintenance and aftercare for damage prevention.
Troubleshooting Common Issues
Even if your install looks perfect at first, issues can pop up. Scalp irritation affects 54% of sew-in wearers—usually from product buildup or tension. Weft slippage happens when stitches loosen, while blending problems show visible tracks.
For breakage prevention, moisturize regularly and avoid overwashing. If your scalp stays tender past 48 hours or extensions shed excessively, loosen braids or consult your stylist to protect your scalp health and prevent hair damage.
Frequently Asked Questions (FAQs)
What are some easy sewing projects for beginners?
Most beginner sewing projects flop—not from lack of skill, but from choosing the wrong first project.
Simple pillowcases, fabric coasters, and basic scrunchies teach essential techniques without frustration.
Tote bags and drawstring bags build confidence through practical, wearable results.
What is the best sewing machine for beginners?
Look for beginner-friendly machines with straight and zigzag stitches, easy bobbin loading, and speed control.
Durability considerations matter—choosing a sewing machine with a metal frame guarantees consistent machine stitch quality.
Key features for a beginner machine simplify learning basics.
What is the best way to learn how to sew?
Think of it like learning to ride a bike—you’ve got to actually do it. Start with online courses for beginner sewing techniques, then practice with simple projects like pillowcases or tote bags.
Join sewing communities or mentorship programs for feedback and support. Everyone’s learning styles differ, so try hands-on practice alongside sewing for beginners tutorials to build confidence fast.
What is the difference between a sew in and a weave?
You’ve probably heard these terms used like they’re the same thing—and honestly, most people do mix them up. Here’s the scoop: a sew in is actually a specific type of weave.
Weaves are the umbrella term for any method of adding hair extensions, whether you’re using glue, tape, or thread. Sew ins specifically mean you’re stitching those wefts onto cornrowed natural hair with a needle and thread, making them one of the safest and longest-lasting install methods out there.
How long does a sew in last?
Your sew-in will usually last for four to six weeks before needing a refresh. Extension quality, hair growth rate, and how well you maintain it all affect longevity factors.
Sleeping with a satin bonnet and regular moisturizing help your sew-in hair extensions stay looking fresh longer.
How much does a sew in cost?
Most sew-ins cost between $100 and $500, depending on installation costs, hair quality, and your stylist’s experience. Human hair extensions with professional weaving cost more than synthetic hair extensions.
Don’t forget to budget for maintenance expenses and removal fees—or try DIY savings if you’re confident!
What are the best hair types for a sew in?
Maya’s type 3c curls blended seamlessly with her human hair extensions—yours can too.
Curly and coily textures (3a through 4a) work best for sew ins because they maintain cornrow braids securely and blend naturally with human hair extensions, creating authentic results where synthetic blends often fall short.
How do I care for my sew in after it’s been installed?
Keep your weave fresh by washing every two weeks with sulfate-free products, deep conditioning regularly, and moisturizing your scalp.
Always wrap your hair in a satin scarf at night to prevent frizz and extend your sew in’s lifespan.
How long does a sew in typically last?
Your sew in will be your best friend for 6-8 weeks with proper TLC. Extension Quality, Growth Rate, and Lifestyle Factors all play a role—caring for sewins through consistent sewin maintenance and aftercare keeps them fresh longer, maximizing the benefits of sewins before Reapplication Timing.
Can you wash your hair with a sew in?
Yes, you can wash your hair with a sew in! Focus sulfate-free shampoo on your scalp to prevent product buildup, then deep condition the extensions.
Washing frequency depends on your hair care routine—proper sewin maintenance and aftercare keep both scalp and hair healthy.
Conclusion
Practice makes perfect, and your first sew-in is just the beginning of your protective style journey. Learning how to do a sew-in for beginners takes patience, but each installation gets faster and cleaner.
Don’t stress about perfect braids or impeccable wefts right away—your hands will find their rhythm. Give yourself grace through the learning curve, keep your natural hair healthy underneath, and remember that even salon pros started exactly where you’re now. You’ve got this.
- https://www.fortunebusinessinsights.com/human-hair-extension-market-106648
- https://www.linkedin.com/pulse/human-hair-extension-market-size-share-trends-20252032-fnfresearch-zrqaf
- https://www.grandviewresearch.com/industry-analysis/hair-wigs-extensions-market-report
- https://www.onychair.com/difference-between-synthetic-hair-and-human-hair-extensions-blend/
- https://luxuryforprincess.com/us/blog/post/how-much-are-hair-extensions

