This site is supported by our readers. We may earn a commission, at no cost to you, if you purchase through links.
Start by marking your buttonhole length with chalk or pins. Cut a precise slit using sharp fabric scissors.
Thread your needle with strong thread and anchor it at one end. Work blanket stitches closely along both edges, keeping tension consistent.
The key is maintaining even spacing—think of it as building a tiny fence around your cut. Finish by securing your thread with small knots on the wrong side.
Hand-sewn buttonholes outlast machine versions and work perfectly on delicate fabrics. Proper preparation and the right reinforcement techniques make all the difference.
Table Of Contents
Key Takeaways
- Mark and cut precisely – You’ll need to measure your button’s diameter plus 1/8 inch for ease, mark it with chalk, and make one clean cut through the center using sharp scissors.
- Master the blanket stitch technique – You’ll anchor your thread at one corner, then work blanket stitches closely around both edges while keeping consistent tension and even spacing.
- Reinforce your fabric first – You’ll want to add interfacing to the wrong side of your fabric before cutting to prevent stretching, fraying, and ensure professional-looking results.
- Choose the right materials – You’ll get the best results using silk buttonhole twist thread or topstitching thread with a size 8 Sharps needle for durability and clean stitching.
Mark The Buttonhole
You’ll need to mark your buttonhole position and size before cutting to guarantee it fits your button perfectly.
Use chalk or a water-soluble pen to draw the buttonhole length plus 1/8 inch for ease.
Then stitch small running stitches around all four sides to create a stable guide for your final buttonhole stitches.
Length and Width
Getting the length-and-width measurements right sets the foundation for professional-looking hand sewn buttonholes. Start by measuring your button’s diameter, then add an extra 1/8 inch for ease. This guarantees smooth button passage without fabric strain.
Precise measurements are the secret to buttonholes that work beautifully every single time.
Mark the buttonhole length with fabric chalk or water-soluble pen. Keep your lines straight and precise – wobbly marks lead to crooked cuts. Consider your fabric thickness when determining buttonhole shape, as heavier materials need slightly wider openings.
- Button Size: Measure the widest part of your button for accurate length
- Fabric Thickness: Thicker fabrics require additional ease for smooth closure
- Placement Impact: Mark buttonholes perpendicular to fabric grain for stability
- Stitch Density: Plan adequate space around marks for dense buttonhole stitching
Double-check your measurements before cutting. Accurate marking prevents costly mistakes in your hand sewing project.
Stitch Around Opening
Running small stitches around your marked buttonhole creates a roadmap for success. These tacking stitches guide your hand sewn buttonholes and prevent fabric from fraying when you cut.
Use thread that matches your fabric and keep stitches about 2mm from the edge. Work slowly around all four sides, maintaining even spacing.
This foundation step makes buttonhole stitching much easier later. Your hand sewing techniques will improve dramatically with this simple prep work.
Some sewers skip this step, but it’s worth the extra time. Whether you’re following pattern instructions or working freestyle, these guide stitches keep everything neat. Think of them as training wheels for perfect buttonholes every time.
For thicker materials, consider calculating buttonhole length.
Cut The Slit
Now you’ll cut through the center of your marked buttonhole using sharp scissors or a craft knife.
Make one clean cut from end to end, being careful not to cut through the guide stitches you made around the opening.
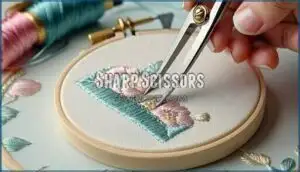
Sharp Scissors
Choosing the right scissors makes all the difference for clean buttonhole cuts.
Your fabric type determines which specialty scissors work best for precise cuts.
- Use small embroidery scissors for detailed cutting techniques around delicate fabrics
- Keep ergonomic scissors sharp through regular scissors maintenance for effortless cuts
For crafting needs, specialized scissor options are available online.
- Cut slowly along marked lines to avoid fraying in your hand sewn buttonholes project
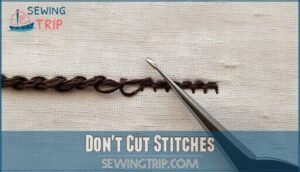
Don’t Cut Stitches
After making your clean cut with sharp scissors, you need to protect the foundation stitches that frame your buttonhole opening. These guide stitches maintain fabric stability and seam security throughout your hand sewn buttonholes project.
Keep your scissors away from the running stitches or basting lines that outline the buttonhole edges. Cutting these support threads destroys stitch integrity and leaves raw fabric vulnerable to fraying.
Your sewing buttonholes tutorial depends on preserving these structural elements. Proper thread tension and avoiding rips guarantees your hand sewing creates professional-looking buttonholes that last.
Consider the importance of workspace safety practices to avoid accidents.
Sew The Buttonhole Stitch
Now you’ll create the actual buttonhole by sewing blanket stitches around the cut opening.
You’ll anchor your thread at one corner and work your way around each edge to wrap the raw fabric and prevent fraying.
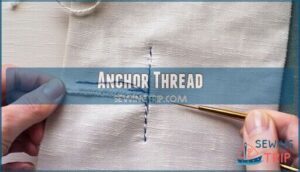
Anchor Thread
With your slit cut cleanly, it’s time to secure your starting point for hand sewn buttonholes. Thread security begins with proper knot placement—this foundation determines your entire buttonhole’s quality. Use waxed thread for better grip and durability throughout your hand sewing project.
Follow these steps for a rock-solid anchor:
- Position your needle just outside the slit’s edge, about 1/8 inch from the cut
- Insert the needle through all fabric layers, coming up through the opening itself
- Create two small backstitches at the far end, away from where stress will occur
Backstitches matter more than you might think—they prevent your beautiful work from unraveling. Consider using a buttonhole thread anchor for added security. Securing tails properly means your buttonhole tutorial efforts won’t go to waste. This anchor becomes the foundation for every stitch that follows.
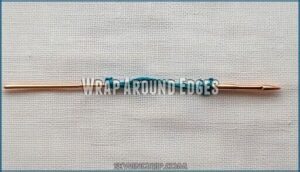
Wrap Around Edges
Once you’ve anchored your thread, it’s time to wrap those raw edges with precision.
Start your buttonhole stitch by inserting the needle just outside your marked lines. Bring the thread under the needle tip before pulling through—this creates the signature purl edge that prevents edge fraying.
Keep your tension consistency steady as you work around the opening. Space your stitches evenly, about 1/8 inch apart.
These edge stitch options will transform your hand sewn buttonholes into professional-looking closures that rival any machine work, with a signature finish that showcases your attention to detail and precision sewing.
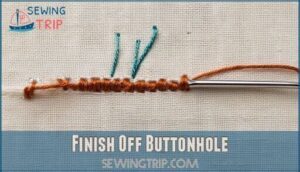
Finish Off Buttonhole
You’re almost done with your buttonhole once you’ve completed the stitching around the edges.
Now you’ll secure the loose threads and tie off any new thread to make sure your buttonhole stays strong and won’t come apart with use, ensuring it remains secure.
Secure Threads
Why rush through the final step when proper thread security makes your buttonhole last?
Pull your silk buttonhole twist thread to the fabric’s wrong side using your hand sewing needle.
Create two small backstitches through existing thread loops for knot security.
Trim thread tails close to the fabric, leaving just enough to prevent unraveling.
Waxing thread beforehand helps with securing ends during this pivotal finishing process.
Knot New Thread
Securing thread properly determines your buttonhole’s lifespan.
Thread your needle with fresh material and tie a small knot.
Insert the needle through the fabric’s wrong side, catching the final stitch loop.
Pull tight to create thread security.
Weave the tail through several existing stitches before trimming.
This knot placement technique guarantees your hand sewing work stays intact through countless washings and wear.
Choose Orientation
Two main choices face you when deciding buttonhole orientation: horizontal or vertical placement. This aesthetic choice affects both buttonhole function and your garment’s final appearance.
Horizontal buttonholes work best for most garments because they handle stress better during fabric closure. The button naturally settles toward the bartacked end, preventing gaps. Vertical buttonholes suit decorative applications or when space is limited.
Your pattern usually specifies the best orientation, but consider these factors:
- Horizontal placement provides stronger hold under tension and stress
- Vertical buttonholes create clean lines on shirt fronts and cuffs
- Decorative hand sewing techniques shine with either orientation choice
Mark your buttonhole positions carefully using chalk and a ruler for consistent spacing and professional results. To guarantee the best results, remember to use the correct presser foot for your machine.
Reinforce The Fabric
You’ll need to strengthen the fabric around your buttonhole before cutting to prevent stretching and tearing.
Add a layer of interfacing or fusible webbing to the back of the fabric where you’ll sew the buttonhole to keep the area stable and secure.
Interface
Adding interfacing gives your handmade buttonholes the backbone they need to look professional and last longer.
Choose interfacing weight that matches your fabric – lightweight for cotton, medium for wool.
Fusible options work great for most hand sewing projects since they bond quickly with your iron. Cut interfacing pieces slightly larger than your buttonhole area and apply to the fabric’s wrong side.
Woven vs. nonwoven doesn’t matter much for buttonholes, but color matching helps if your fabric is sheer. This simple step prevents stretching and fraying during handsewn buttonholes construction.
Consider using different interfacing types to achieve desired results.
Reduce Stretch
Proper fabric stabilization prevents your hand sewing from creating wobbly, stretched buttonholes.
Stabilize your fabric first, or watch your beautiful hand-sewn buttonholes turn into wobbly disasters.
Double the fabric where you’ll sew, creating a reinforced foundation that won’t give under tension control pressure.
This technique reduces stretch by half while maintaining clean buttonhole stitches.
For lightweight materials, sandwich interfacing types between fabric layers.
Keep your work taut as you create handsewn buttonholes – this guarantees straight lines and proper stitch density for professional-looking handmade buttonholes with crisp corded edges.
Attach The Buttons
Once you’ve finished your hand-sewn buttonholes, you’ll need to attach the buttons in the correct position to verify they align properly with each opening.
Test each button through its matching buttonhole before you sew it down permanently to check that the fit allows smooth fastening without being too loose or tight, ensuring a proper alignment for permanent attachment.
Match Buttons
You need the right button for your handworked buttonhole to function properly.
Button size matters most – it should pass through smoothly without forcing the hand sewing.
Consider these key factors:
- Button material affects how it slides through your stitches
- Button style determines if edges will catch on the sewing buttonholes
- Shank buttons work better than flat ones for thick fabrics
When selecting, remember that button sizes use lignes for measurement.
Check Fit
Testing your buttons through each handworked buttonhole prevents costly mistakes down the road.
Slip every button through its matching opening to check the garment closure works smoothly.
Your hand sewing needle created these openings with precision, so they deserve proper button placement verification.
| Test Factor | What to Check |
|---|---|
| Button slides through easily | No forcing or tugging required |
| Fabric tension remains stable | No puckering around opening |
| Wear comfort feels natural | Closure doesn’t pull or gap |
| Alterations needed are minimal | Size matches your measurements |
| Sewing buttonholes alignment works | Buttons sit straight when fastened |
Fix any issues before final attachment.
Frequently Asked Questions (FAQs)
Can you sew buttonholes by hand?
Yes, you can absolutely sew buttonholes by hand using basic materials like buttonhole thread, a sharp needle, and scissors.
Mark your fabric, cut carefully, then stitch blanket stitches around the edges for a professional finish.
What is the best thread for hand sewing buttonholes?
Like a master chef choosing the finest ingredients, you’ll want silk buttonhole twist thread or topstitching thread for hand-sewn buttonholes.
These threads resist fraying, create durable stitches, and give your buttonholes professional strength and appearance.
What stitch is best for buttonhole?
Blanket stitch works best for hand-sewn buttonholes because it creates strong, neat edges that won’t fray.
You’ll make even stitches along both sides, keeping the thread under your needle tip for proper formation.
How to sew a buttonhole for beginners?
Mark your buttonhole position with chalk, then cut carefully along the center line.
Thread your needle with doubled thread, secure with knots, and create even blanket stitches around the opening edges.
What is the best needle to use for hand sewing buttonholes?
While you’d think any needle works, you’ll want a size 8 Sharps needle for hand-sewn buttonholes.
It’s thin and sharp enough to pierce fabric cleanly without creating large holes that weaken your stitches.
How can I determine the proper buttonhole length for my buttons?
Measure your button’s width and thickness, then wrap ribbon around its broadest part. Pin the ribbon, remove the button, and add 1/8 inch to that measurement for proper ease and closure.
How do I fix a buttonhole if I make a mistake or it starts to unravel?
Don’t panic when your buttonhole goes sideways—mistakes happen!
Carefully remove loose stitches with small scissors, re-overcast raw edges to prevent fraying.
Then restitch using proper tension and consistent stitch depth.
What thread type works best for buttonholes?
You’ll want silk buttonhole twist thread or topstitching thread for the strongest results. These specialized threads resist fraying and create durable, professional-looking buttonholes that’ll withstand repeated use without breaking.
How do you prevent fabric fraying while sewing?
Ah, fabric acting like a rebellious teenager again?
Overcast raw edges with small stitches before cutting your buttonhole.
This wraps threads neatly, preventing that annoying fray that’ll ruin your work faster than you can say "oops.
Should buttonholes be sewn before or after construction?
You’ll get better results sewing buttonholes during construction, not after. Complete the garment’s main seams first, then add buttonholes before final finishing touches like hemming or adding trim.
Conclusion
Statistics show that hand-sewn buttonholes last three times longer than machine-made ones.
Now you’ve mastered how to sew buttonholes by hand, you’ll create professional-looking garments that stand the test of time.
Remember to practice on scraps first—each buttonhole you make builds your skill.
Keep your stitches even and your tension consistent, with patience and the right techniques, you’ll produce buttonholes that rival those found on expensive designer clothing.
Your sewing projects will never look homemade again.

