This site is supported by our readers. We may earn a commission, at no cost to you, if you purchase through links.
You’ll cut fabric pieces for the head, body, arms, and legs using a simple pattern.
Master the whipstitch technique—it’s your best friend for creating strong seams that won’t split during playtime.
Start by sewing the head pieces together, leaving an opening for stuffing.
Next, assemble the body and limbs separately before attaching everything.
Stuff firmly but not too tight, or your bear won’t be cuddly.
The magic happens when you add facial features and those final personality touches that transform fabric scraps into something special.
Table Of Contents
- Key Takeaways
- Supplies Needed for Sewing a Teddy Bear
- Preparing The Bear Fabric
- Whipstitch Technique for Repairing Bears
- Alternate Stitching Techniques
- Finishing Touches After Sewing
- Sewing The Teddy Bear Head
- Assembling The Teddy Bear Body
- Attaching The Head to The Body
- Stuffing The Teddy Bear
- Presenting Your New Handmade Teddy Bear
- Frequently Asked Questions (FAQs)
- Conclusion
Key Takeaways
- Master the whipstitch technique – You’ll create strong, durable seams that won’t split during play by using consistent 2-3mm intervals and doubled thread on high-stress areas, such as arms and legs.
- Prepare your fabric properly – You’ll achieve professional results by preshrinking all materials, ironing them flat, and brushing fuzzy fabrics in one direction before cutting your pattern pieces.
- Stuff gradually and evenly – You’ll avoid lumpy bears by pulling apart small tufts of polyester fiberfill before inserting, working slowly with 150-300 grams total, while testing firmness as you go.
- Focus on head assembly precision – You’ll create a balanced, adorable face by positioning safety eyes 2/5 down from the top, spacing them 1-1.25 inches apart, and maintaining symmetrical ear placement throughout construction.
Supplies Needed for Sewing a Teddy Bear
Before you start creating your cuddly companion, let’s gather your sewing supplies. You’ll need two yards of fleece fabric in your favorite color – think cozy blanket vibes that’ll make your bear irresistible to snuggle.
Fabric Choices matter here: fleece works beautifully for beginners, while faux fur adds extra charm. Your Sewing Tools should include sharp fabric scissors, pins, and a measuring tape.
Thread Selection is vital – match your thread color to your fabric for nearly invisible seams. Needle Types vary, but a universal needle handles most fabrics perfectly. Don’t forget 18mm plastic safety eyes and felt for the nose.
Bear Filling requires polyester stuffing – grab extra since you’ll likely underestimate how much fluff one little bear can hold! Having quality sewing supplies organized beforehand transforms this project from stressful to enjoyable.
Trust me, nothing beats the satisfaction of creating something this special with your own hands. Understanding the importance of jointed teddy bear construction can help you create a more realistic and movable teddy bear.
Preparing The Bear Fabric
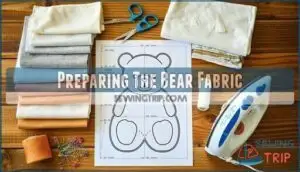
Now that you’ve gathered your supplies, let’s get your fabric ready for action. Fabric Selection starts with choosing the right Material Choices – Cotton Options like flannel work great, but Fleece Preparation is where beginners really shine since it doesn’t fray.
Before you touch that bear sewing pattern, here’s a pro tip: preshrink your Soft Fabric first. Toss it in the washer and dryer using your normal settings. Trust me, you don’t want your finished bear shrinking into a mini-me version after the first wash!
Fabric preparation means smoothing out every wrinkle and bump. Iron your sewing bear fabric flat – those lumps will mess with your pattern pieces faster than you can say "wonky bear ear."
When working with fuzzy fabrics, brush the pile in one direction before cutting. This simple step makes all the difference in how professional your finished bear looks. To achieve the best results, understanding delicate fabric handling is essential for a successful sewing project.
Whipstitch Technique for Repairing Bears
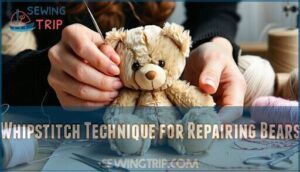
With your fabric prepped and ready, it’s time to master the whipstitch—your go-to technique for bear repair and seam reinforcement. This hand sewing method creates incredibly strong bonds that’ll keep your teddy together through countless adventures.
Start by threading your needle with matching thread and knotting the end. Position your needle 3-5mm from the existing seam for maximum structural integrity. Loop the thread over the fabric edges at 2-3mm intervals, maintaining consistent tension to prevent puckering. Think of it like lacing up sneakers—steady rhythm, even spacing.
Like lacing sneakers, whipstitch creates steady rhythm and unbreakable bonds in your bear repairs.
Keep that fuzzy fur out of your stitches by gently brushing it away as you work. Nobody wants a matted mess! For teddy fixing success, use doubled thread on high-stress areas like arms and legs. This fabric mending technique works wonders on torn seams and loose joints.
To achieve professional results, understanding hand stitching techniques is essential for any sewing project. Finish by overlapping your last few stitches and securing with a lockstitch. Your bear sewing tutorial journey continues as you master this essential stitch type for professional-looking repairs.
Alternate Stitching Techniques
Beyond whipstitch, you’ll master several powerful hand sewing techniques that transform your teddy bear from good to absolutely adorable. Running Stitch works perfectly for basting pieces before permanent assembly—think of it as your safety net.
When you need serious strength, Backstitch becomes your best friend, creating machine-like durability on limbs that’ll endure countless hugs.
Slip Stitch and Blind Hem techniques create those professional invisible closures that make people wonder "how’d they do that?" Meanwhile, Overlock-style hand stitching prevents fuzzy fabrics from unraveling into a mess.
Here’s what’ll make your heart sing during this sewing tutorial:
- Watching tiny stitches disappear like magic tricks
- Creating strong seams that’ll outlast childhood adventures
- Mastering sewing techniques your grandmother would applaud
- Building stitching patience that pays off beautifully
Mastering hand stitching techniques is essential for creating durable and adorable teddy bears. Match thread colors closely—contrasting thread screams "amateur hour." Keep stitches small and consistent, checking for puckering as you work. These sewing patterns demand precision, but with practice, your hand sewing will rival any machine’s perfection.
Finishing Touches After Sewing
Nothing beats that satisfying moment when you’ve completed all the sewing and can finally polish your creation.
Every thread you’ve sewn carries your heart—this moment marks the transformation from fabric to beloved companion.
Start by trimming threads close to the fabric using small scissors—this simple step transforms your bear from homemade to professional-looking. Gently fluff matted fur around seams with your fingers or a soft brush, redistributing any clumped areas.
These finishing touches hide your sewing techniques beautifully. Check that stuffing sits evenly throughout and seams lie flat. Your teddy bear eyes and nose placement should look balanced.
These final fabric trimming and bear embellishments steps guarantee your handcrafted friend is ready for countless hugs and adventures ahead. To achieve a professional finish, mastering seam finishes for delicate fabrics is essential for any sewing project, ensuring your creation is truly ready for countless hugs and adventures ahead with a beautiful professional finish.
Sewing The Teddy Bear Head
Creating the perfect teddy bear head requires patience and precision—it’s where your fuzzy friend truly comes to life. Start by positioning your head pattern pieces with symmetrical placement to maintain balanced facial features. Pay close attention to grain alignment, as this prevents awkward distortion after stuffing.
Essential Bear Head Assembly Steps:
- Ear Construction – Sew ears first using backstitch for curved seams, then attach to side head panels
- Face Details – Position safety eyes 2/5 down from top, spacing them 1-1.25" apart for realistic proportions
- Head Assembly – Join 3-4 head panels using small whipstitches, maintaining ¼" to ½" seam allowance
- Nose Placement – Embroider nose using satin stitch over doubled thread for durability
- Eye Attachment – Secure safety eyes through tightly closed seams before final stuffing
Understanding the jointed teddy bear construction is vital for a professional finish. Remember, this sewing teddy bear tutorial emphasizes taking your time—rushing leads to wonky faces that’ll haunt your dreams! These bear sewing tips maintain your teddy bear sewing kit investment pays off beautifully.
Assembling The Teddy Bear Body
Once you’ve mastered assembling the head, it’s time to tackle the body assembly—where your bear truly takes shape.
Start with the belly center seam for your bear framework, then focus on sewing limbs by attaching arms and legs to the front piece with right sides together. This fabric alignment step is essential for symmetry.
For joint construction, mark your shoulder and hip connection points before stitching—these anchor points distribute stress evenly when stuffed. Pin weighted pieces firmly during assembly to prevent shifting. Use backstitch for durability, especially at limb attachment areas where little hands will tug and squeeze.
Sew your back piece next, connecting arms with careful attention to matching seam lines. Leave strategic gaps in limbs for turning and future stuffing techniques. Remember, precision now saves headaches later—nobody wants a lopsided bear that looks like it’s doing yoga! Check bilateral symmetry before moving forward.
Ensuring proper seam allowance techniques is vital for a professional-looking teddy bear.
Attaching The Head to The Body
Now that your bear’s body is complete, it’s time to unite the head with the torso – the moment when your fuzzy friend truly comes to life! This Head Alignment step requires patience, but the payoff is worth it.
Start by positioning the head against the neck opening, checking that facial features align properly with your Body Placement. The nose should face forward, not tilted sideways like your bear’s having an off day! Pin the head securely, maintaining your Seam Allowance around the neck opening.
Here’s your sewing bear tutorial checklist for perfect attaching head results:
- Match seam lines – Align head and body seams for symmetrical appearance
- Use ladder stitch – Hand-sew invisibly around the neck joint for professional finish
- Test Joint Construction – Gently rotate head to confirm secure Attachment Methods
Work slowly around the circumference, keeping stitches small and tight. This bear sewing guide technique creates the strongest connection between head and body, setting up your sewing bear pattern for the final transformation ahead.
Understanding proper sewing techniques is vital for a professional finish.
Stuffing The Teddy Bear
With your teddy bear’s head securely attached, it’s time to bring your creation to life through proper stuffing. This step transforms your flat fabric pieces into a cuddly companion.
Start with polyester fiberfill, the gold standard for bear stuffing. Pull apart small tufts before inserting – this prevents lumpy spots that’ll make your bear look like it survived a pillow fight. Begin stuffing the head and limbs first, using chopsticks or specialized stuffing tools to push filling into tight corners and paws.
Work gradually, adding small amounts at a time. You’ll need roughly 150-300 grams for a medium bear, depending on your Bear Weights preference. Focus on distributing stuffing evenly throughout each section. The key Filling Techniques involve gentle rotation and flexing while stuffing to avoid air pockets.
Test firmness by gently squeezing – your bear should compress slightly without permanent deformation. Different Fiber Choices and Polyfill Options affect final texture, but consistent distribution matters most. Keep stuffing openings accessible until you achieve the perfect plumpness using proper stuffing technique. Understanding the importance of seam allowance is vital for a professional-looking teddy bear that can withstand stuffing and movement.
Presenting Your New Handmade Teddy Bear
Your finished creation deserves a presentation as special as the love you’ve sewn into every stitch. This handmade teddy bear represents hours of careful craftsmanship and thoughtful attention to detail.
Start your bear display with proper gift wrapping – choose a beautiful box lined with tissue paper or create a cozy basket bed. Add photo props like miniature furniture or colorful backgrounds to capture that first magical moment. Bear customization continues even after completion: tie a ribbon around the neck, add a tiny vest, or attach a heart-shaped tag with the recipient’s name.
Creative presentation ideas make all the difference. Consider staging a "bear introduction ceremony" where you formally introduce your cuddly toy to its new family. Take photos throughout the gifting process – these memories become treasures themselves.
Understanding jointed teddy bear construction is essential for creating a professional-looking and movable teddy bear.
Your personalized gift carries something store-bought bears never can: genuine handmade charm. Whether presenting teddy bear gifts to children or adults, remember you’ve created more than a toy – you’ve crafted a future heirloom filled with your care and creativity.
Frequently Asked Questions (FAQs)
How to make a simple fabric teddy bear?
Creating your own cuddly companion is like planting seeds of joy that’ll bloom into cherished memories.
You’ll need one yard of soft fabric, stuffing, thread, and basic sewing skills to bring your bear to life through careful cutting, stitching, and stuffing.
How long does sewing a teddy bear take?
You’ll need 3-6 hours for your first bear, depending on your skill level.
Beginners should plan a full weekend afternoon, while experienced sewers can knock one out in an evening session.
Can beginners make jointed movable teddy bears?
Jointed bears aren’t beginner-friendly since they require precise joint placement, specialized hardware, and advanced sewing skills.
You’ll need cotter pins, washers, and joint discs that demand exact positioning.
Start with basic bears first, then tackle jointed versions once you’ve mastered fundamental techniques.
Whats the best fabric for washable bears?
Like finding that perfect security blanket for childhood comfort, you’ll want cotton or cotton blends for washable bears.
They’re durable, shrink-resistant, and maintain softness through countless wash cycles, making cuddle time worry-free.
How do you fix uneven stuffing distribution?
Gently massage the stuffed areas through the fabric, redistributing filling with your fingers.
Insert a wooden spoon handle or dowel through openings to push stuffing into corners and limbs for even distribution.
Which bear size works best for gifts?
You’ll find sweet success with 8-12 inch bears – they’re perfectly sized for little hands to cuddle without overwhelming tiny arms, plus they’re manageable for your first sewing adventure.
Conclusion
Practice makes perfect when learning how to sewing bear from scratch.
You’ve now mastered the essential techniques—from cutting precise fabric pieces to creating strong seams with proper stitching methods.
Remember that each bear you create will improve your skills and confidence.
Don’t worry if your first attempt isn’t museum-quality; even experienced sewers started somewhere.
The joy comes from watching fabric transform into a beloved companion.
Keep experimenting with different fabrics, sizes, and facial expressions.
Your handmade teddy bears will bring smiles for years to come.

