This site is supported by our readers. We may earn a commission, at no cost to you, if you purchase through links.
You’ll need 1.5-2.5mm for lightweight fabrics, 2.5-3mm for medium-weight materials, and 3-4mm for heavy fabrics like denim.
Adjust using your machine’s dial or digital controls – mechanical machines use numbered dials while computerized models offer precise settings.
Thread weight and needle size also influence your choice, so match them accordingly.
For basting, use 4-5mm stitches; for topstitching, stick to 3-4mm for visibility.
Test on fabric scraps first to avoid costly mistakes, and find the sweet spot between durability and efficiency lies in understanding fabric behavior.
Table Of Contents
Key Takeaways
- Match your stitch length to fabric weight: use 1.5-2.5mm for lightweight, 2.5-3mm for medium, and 3-4mm for heavy fabrics like denim.
- Always test stitch settings on fabric scraps to avoid puckering, thread breaks, or weak seams before sewing your main project.
- Adjust your machine’s stitch length using the dial or digital controls, and fine-tune tension when changing stitch length or thread weight.
- Use longer stitches (4-5mm) for basting and gathering, and shorter ones (1.8-2mm) for quilt piecing and stay stitching to ensure strength and easy removal when needed.
Sewing Stitch Length Basics
You’ll control stitch length settings to achieve professional-looking seams that match your fabric and project needs.
Understanding how distance between needle entry points affects seam strength and appearance helps you avoid common problems like puckering, thread breaks, or loose stitches that require rework.
Perfect stitch length control eliminates frustrating puckering and thread breaks before they ruin your project.
Definition of Stitch Length
Stitch length is simply the distance between each needle puncture on your fabric, measured in millimeters. Think of it as the gap between dots on a dotted line – you’re controlling how far apart each "dot" sits.
- Needle Entry Points: Each stitch creates two holes where the needle enters and exits
- Millimeter Measurement: Modern machines display stitch length in mm (e.g., 2.4mm = one stitch)
- Stitch Regulation: Your machine’s stitch length dial or digital control adjusts this distance precisely
Understanding stitch length settings is essential for achieving professional sewing results.
Measurement Units for Stitch Length
Most sewing machines use millimeter measurement as their standard unit, with typical settings ranging from 0-7mm.
You’ll encounter two primary systems: modern machines display millimeters directly, while older models use stitches per inch (SPI).
For length conversion between these metric units, use this SPI calculation: divide 25.4 by your millimeter setting.
A standard stitch length of 2.5mm equals roughly 10 SPI, giving you precise stitch length settings control.
Importance of Stitch Length in Sewing
Mastering proper adjustment transforms your sewing from frustrating guesswork into precision craftsmanship.
When you nail the right length, you’ll see immediate improvements in these critical areas:
Perfect stitch length turns frustrating sewing struggles into smooth, professional results you’ll actually be proud of.
- Stitch Quality – Perfect tension balance prevents puckering and creates strong, even seams
- Thread Breakage – Proper stitch per inch ratios reduce stress on thread during high sewing speed
- Stitch Accuracy – Consistent automatic stitch length maintains uniform fabric tension across different sewing stitch types
Adjusting Stitch Length Mechanism
You’ll find two main approaches for controlling stitch length: mechanical machines use rotating dials while computerized models offer digital screens with precise button controls.
Most machines provide preset options and incremental adjustments, making it easy to fine-tune your stitching whether you’re working with a vintage Singer or the latest computerized model.
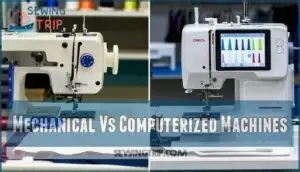
Mechanical Vs Computerized Machines
Between mechanical dials and computerized screens, your choice shapes how precisely you’ll control every stitch.
Mechanical machines use physical dials for stitch length selector adjustments, while computerized models feature digital interface designs with motor speed integration for enhanced stitch regulators.
| Machine Type | Control Method | Precision Level |
|---|---|---|
| Mechanical | Physical dial settings | Manual adjustment |
| Computerized | Digital screen controls | Automated precision |
Mechanical sewing machine controls offer tactile feedback through traditional dial settings, but computerized screen interfaces provide finer incremental adjustments.
Your machine controls determine whether you’ll turn a knob or tap buttons for stitch length control.
Understanding the pros and cons of computerized models can help you make an informed decision when choosing a sewing machine.
Using Preset Buttons and Menus
With a simple tap, preset buttons on simpler machines give you instant access to common stitch lengths without menu navigation.
Computerized screens offer user-friendly interfaces where you’ll find stitch length control through intuitive menu systems.
- One-touch convenience – Preset buttons eliminate guesswork for standard projects
- Visual clarity – Computerized screens display exact measurements you can trust
- Quick selection – Machine controls respond instantly to your stitch regulator needs
- Effortless switching – Move between settings without stopping your creative flow
- Confidence boost – Clear stitch length selector options remove intimidation factors
Understanding the correct stitch length mechanism is essential for achieving perfect stitches in various sewing projects.
Incremental Adjustments and Indicator Lights
Modern machines offer precise stitch length control through incremental steps, typically adjusting in 0.5mm increments.
Your stitch length regulator provides fine-tuned adjustment techniques, while indicator lights clearly show your current setting.
These precision control features eliminate guesswork—you’ll see exactly where your stitch length adjustment lands.
Test your sewing machine settings on fabric scraps, since your stitch length indicator guarantees consistent results every time.
Optimal Stitch Lengths by Fabric
You’ll achieve better results when you match your stitch length to your fabric’s weight and structure.
Different materials need specific stitch lengths to prevent puckering, skipped stitches, or weak seams that’ll frustrate you later.
Lightweight and Sheer Fabrics
Working with lightweight and sheer fabrics requires careful stitch length adjustment for professional results.
Set your machine between 1.5-2.0mm for silk stitching and delicate fabrics like chiffon or organza. This shorter length prevents puckering while maintaining seam integrity.
Adjust fabric tension to 3-4 and select fine thread for superior results. Test on scraps first—your delicate edging depends on proper sewing speed control and thread tension tips.
For best results, mastering sewing techniques is essential when working with these fabrics.
Medium-Weight and Heavyweight Fabrics
Medium-weight cotton and quilting fabrics work best with a standard 2.5mm stitch length setting, while heavyweight materials like denim need 3.0-4.0mm for proper penetration.
Automatic stitch length features help, but manual sewing stitch control gives you precision for fabric thickness variations.
- Cotton quilting fabrics: Use 2.0-2.5mm stitch length for clean seams
- Denim stitching: Set 3.0-3.5mm to prevent needle breakage and bunching
- Canvas and upholstery: Increase to 3.5-4.0mm for heavyweight seams
- Stitch tension adjustment: Higher settings needed for thicker materials
- Medium weight knits: Use 2.5-3.0mm with slight tension reduction
Specialized Fabrics Like Leather and Vinyl
Leather stitching and vinyl sewing demand longer stitch lengths—typically 3-4mm—to prevent tearing these synthetic materials.
Short stitches create perforation lines that’ll rip under stress. Heavy duty fabrics need space between needle punches.
Test your stitch length adjustment on scraps first, especially with thick layered fabrics. Uneven stitch lengths spell trouble for leather projects, so consistency matters more than speed. Leather projects require careful consideration of stitch length to avoid damage.
Choosing Right Stitch Length
You’ll master perfect stitches when you consider three key factors: thread weight, needle size, and your project’s purpose.
The right stitch length depends on whether you’re creating functional seams or decorative topstitching that everyone will see.
Thread Weight and Needle Size Factors
Your thread weight and needle size work hand-in-hand with stitch length adjustment to create perfect seams.
Heavier threads need longer stitches to avoid bunching, while delicate threads require shorter lengths for control. Match your needle size to both thread and fabric thickness for ideal stitch density.
- Heavy thread (40 weight or lower): Use 3.0-4.0mm stitch length with size 90/14 needles
- Medium thread (50-60 weight): Set 2.5-3.0mm length with size 80/12 needles
- Fine thread (80+ weight): Choose 2.0-2.5mm length with size 70/10 needles
Aesthetic Considerations in Visible Stitching
For visible decorative stitches, longer stitch lengths create bold, dramatic lines that grab attention.
Short stitches produce subtle, refined effects perfect for delicate work.
Match your stitch density to fabric texture—dense stitches on smooth fabrics, spaced stitches on textured ones.
Color matching versus contrasting threads dramatically affects seam visibility and overall aesthetic impact.
Purpose of The Stitch and Fabric Type
Your stitch-choice strategy depends on matching seam strength to fabric demands and project expectations.
Different sewing techniques require specific stitch length adjustments for ideal fabric type compatibility.
- Seam Integrity: Heavyweight denim needs 3.0mm stitches, while delicate silk requires 1.5mm for durability
- Fabric Stretch: Knits perform best with 2.5-3.0mm lengths to accommodate movement without breaking
- Thread Tension: Thicker threads demand longer stitches (3.0-4.0mm) to prevent bunching and maintain proper stitch formation
Understanding the fabric selection process is vital for achieving the desired outcome in sewing projects.
Stitch Length for Specific Techniques
Different sewing techniques need specific stitch lengths to work properly and look professional.
You’ll get better results when you match your stitch length to what you’re actually making, whether it’s precise quilt piecing or temporary basting stitches.
Quilt Piecing and Topstitching
Precision in quilt piecing demands shorter stitch lengths for stronger quilt seams.
Use 1.8-2.0mm for piecing, ensuring secure fabric selection and proper stitch tension.
For topstitching, increase to 2.5-3.5mm depending on thread choice and visibility needs.
Your sewing machine stitches should complement the fabric weight while maintaining consistent stitch length control throughout your project.
| Technique | Stitch Length |
|---|---|
| Quilt Piecing | 1.8-2.0mm |
| Paper Piecing | 1.3-1.6mm |
| Topstitching Light Fabric | 2.5-3.0mm |
| Topstitching Heavy Fabric | 3.0-3.5mm |
| Stay Stitching | 1.5-2.0mm |
Basting and Gathering Stitches
For temporary seams and basting tips, you’ll want your machine’s longest stitch length settings—typically 4.0mm or higher.
This makes stitch removal effortless when you’re ready to adjust fit or remove gathering stitches.
Your sewing stitch regulator should max out for gathering stitch work, creating loose loops that pull fabric smoothly without damaging delicate materials.
Fabric control becomes easier with these temporary seams since you’re not committing to permanent stitching yet.
Decorative Stitching and Stay Stitching
When decorating fabric with embellishments, mastering stitch length control transforms ordinary seams into stunning showcases.
For stay stitching, use shorter lengths of 1.5-2.0mm to secure fabric edges without distortion. Decorative stitches demand experimentation—longer lengths create bold thread effects, while shorter ones produce refined details.
Stitch Length Guidelines:
- Stay stitching: 1.5-2.0mm prevents stretching on curved necklines and armholes
- Decorative topstitching: 2.5-3.5mm showcases contrasting threads beautifully
- Fabric embellishments: 3.0-4.0mm accommodates thicker decorative threads
- Intricate patterns: 1.8-2.2mm guarantees crisp, defined stitch variations
- Bold decorative seams: 3.5-4.0mm creates dramatic visual impact on garments
Advanced Stitch Length Control Tips
You’ve mastered the basics, but advanced control turns good stitching into exceptional craftsmanship.
These pro-level techniques help you tackle tricky fabrics and solve frustrating stitch problems that even experienced sewers encounter, which is a key part of achieving exceptional results.
Brand-Specific Features and Settings
Different sewing machine brands offer unique stitch length control features that can enhance your precision.
Understanding these variations helps you maximize your machine’s potential and achieve consistent results.
| Brand | Notable Features | Control Method |
|---|---|---|
| Brother | Auto-tension with stitch length memory | Digital display with +/- buttons |
| Singer | One-step buttonhole with length override | Dial system with preset markers |
| Janome | Superior feed system integration | Touchscreen with fine adjustments |
Popular sewing machine brands like Brother, Singer, and Janome each incorporate distinct stitch length regulators and custom controls.
Brother models often feature automatic tension adjustments that sync with your chosen stitch length, while Singer machines typically include preset sewing modes optimized for common fabric types.
Janome’s brand specific features focus on precise feed dog coordination with their advanced machine settings, allowing micro-adjustments that other manufacturers mightn’t offer through their standard sewing machine settings interface.
When selecting a sewing machine, considering the advanced sewing machines features is vital to guarantee you find the right fit for your sewing needs.
Customizing Stitch Length for Unique Fabrics
While machine settings cover standard fabrics, unique materials demand customized approaches that go beyond manufacturer recommendations.
Your fabric density and stretch properties directly influence ideal stitch length choices.
Here’s how to master stitch length for challenging fabrics:
- Test fabric density – Dense materials like canvas need 3.0-3.5mm lengths to prevent bunching
- Adjust for fabric stretch – Knits require 2.0-2.5mm with proper needle selection for flexibility
- Consider thread tension – Heavy threads need longer stitches (3.0-4.0mm) to accommodate bulk
- Account for stitch variance – Coated fabrics show better results with consistent 3.5mm settings
- Use your stitch length regulator – Fine-tune incrementally while monitoring feed dog performance
Understanding proper sewing machine settings is vital for achieving perfect stitches on various fabrics.
Troubleshooting Common Stitch Length Issues
When uneven stitch lengths plague your project, you’ll recognize the warning signs quickly.
Stitch Skipping often signals needle or threading problems, while Fabric Puckering indicates tension imbalances. Feed dogs struggling with thick layers create consistency nightmares you can’t ignore.
| Problem | Common Cause | Quick Fix |
|---|---|---|
| Stitch Skipping | Wrong needle size/damaged needle | Replace with correct needle for fabric weight |
| Tension Issues | Incorrect threading/dirty tension discs | Re-thread completely, clean tension assembly |
| Fabric Puckering | Too-tight presser foot pressure | Reduce pressure, test on fabric scraps |
| Inconsistent lengths over seams | Feed dogs can’t grip thick layers | Use walking foot, sew slowly over bulk |
Frequently Asked Questions (FAQs)
How to decide stitch length?
You’ll match stitch length to your fabric weight and project purpose. Use 0-5mm for lightweight fabrics, 5-0mm for medium weights, and 0-0mm for heavy materials like denim.
Which sewing machine setting adjusts the length of stitches?
Picture turning a precision dial that transforms your fabric into perfectly aligned stitches.
You’ll find the stitch length control on your machine’s dial, touchscreen, or button panel, allowing you to adjust distances between needle entry points from 0-7mm for different fabrics, which enables you to achieve perfectly aligned stitches.
Can stitch length affect thread tension settings?
Yes, stitch length can indirectly affect tension.
Longer stitches use more thread per inch, which may require slight tension adjustments.
You’ll typically need to fine-tune tension when switching between substantially different stitch lengths.
How does stitch length impact seam durability?
Shorter stitches create stronger seams by increasing thread density and reducing stress points.
You’ll find 5-2mm lengths prevent seam failure in delicate fabrics, while 5-3mm works for medium-weight materials.
Conclusion
Perfect precision proves paramount when pursuing professional sewing results.
You’ve mastered the fundamentals of sewing stitch length control tips through understanding fabric weights, machine adjustments, and technique-specific requirements.
Your newfound knowledge transforms amateur attempts into expert execution. Remember to test settings on scraps before committing to final projects.
With practice, you’ll instinctively select appropriate lengths for any fabric or technique. These control tips guarantee consistently beautiful, durable seams that’ll make your sewing projects shine with professional quality and lasting strength.
- https://www.quiltingboard.com/main-f1/what-length-stitch-do-you-use-t7632.html
- https://www.doinaalexei.com/understanding-stitch-length-and-tension.html
- https://sew4home.com/how-and-why-to-set-your-sewing-machines-stitch-length/
- https://www.youtube.com/watch?v=HW-clECNFfY
- https://www.tiktok.com/@jesssica_shaw/video/7288721425706569006

