This site is supported by our readers. We may earn a commission, at no cost to you, if you purchase through links.
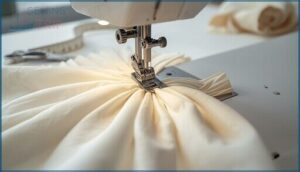
Machine smocking transforms flat fabric into textured, elasticized panels without the hours of hand-stitching traditional smocking requires. The technique relies on controlled pleating and strategic machine stitches that lock gathers into place while maintaining flexibility.
You create the same honeycomb patterns and gathered elegance in a fraction of the time, which opens up possibilities for everything from children’s dresses to decorative pillow covers.
Once you master the rhythm of marking grids, forming consistent pleats, and selecting the right decorative stitches, you’ll have a flexible skill that adds dimension and professional polish to any sewing project.
Table Of Contents
Key Takeaways
- Machine smocking creates textured, elastic fabric panels by combining precise grid marking, controlled pleating, and strategic decorative stitches—delivering hand-smocking results in a fraction of the time when you master the rhythm of preparation and execution.
- Your fabric choice and preparation determine success: lightweight cotton or linen with plain weave holds pleats best, but you must pre-shrink, cut on-grain, and multiply your finished width by three to four times to account for gathering.
- Proper machine setup transforms amateur work into professional results—use 40-weight thread with 70/10 needles on light fabrics, test tension on scraps first, and maintain consistent stitch length between 2.0 and 2.5 mm while adjusting presser foot pressure for layered work.
- Final finishing protects your effort: carefully remove temporary gathering stitches with embroidery scissors to avoid distorting pleats, press each row individually with a dry cloth at the correct temperature, and hand wash in cold water or use a mesh bag on delicate cycle to preserve thread integrity and pleat structure.
Essential Tools and Materials for Machine Smocking
Getting your tools lined up before you start makes machine smocking way less frustrating. You don’t need a ton of specialty items, but the few you do need will make or break your results.
Let’s walk through the fabric, thread, and marking supplies that’ll set you up for success.
Start with quality cotton or linen and consider essential sewing tips for beginner-friendly fabrics that work well with hand stitching.
Choosing The Right Fabric for Smocking
Your fabric selection sets the foundation for crisp, lasting smocking. Choose lightweight cotton or linen with a plain weave for pleat stability and fabric durability. These materials offer ideal fabric manipulation without distortion.
Smooth surfaces glide under your machine foot, ensuring even gathers. Pre-shrink your smocking fabric before pleating to maintain depth after washing. Stable weaves resist puckering and create professional results.
For guidance on recommended fabrics and how their characteristics impact smocking, see this overview of broadcloth fabric options.
Selecting Suitable Threads and Needles
Your thread and needle combination determines stitch quality and fabric compatibility across every pleat. Match thread weight to needle sizes for smooth gathering—40-weight polyester pairs with size 70/10 needles on lightweight cottons, while 30-weight needs 80/12 for midweight fabrics.
- Use polyester or cotton blends as embroidery thread for durability
- Choose ballpoint needles for elastic thread on stretch materials
- Pair sharp needles with gathering thread on woven linens
- Adjust smocking tension settings to prevent thread breakage
Must-Have Marking Tools and Accessories
Your precision relies on tools that keep grids straight and pleats uniform. Fabric markers like chalk or water-soluble pens mark guide lines that vanish after laundering, while iron-on dots transfer exact pleat intersections with low heat. Grid alignment aids—clear rulers and temporary-hold pins—prevent shifting during gathering thread work.
| Tool Type | Best Use |
|---|---|
| Water-soluble pens | Temporary marks that wash away |
| Iron-on dots | Heat-transfer grid precision |
| Clear grid rulers | Even pleat spacing layout |
| Chalk markers | Erasable lines on most fabrics |
| Basting stitches | Temporary grid guides |
Preparing Fabric and Marking The Smocking Grid
Getting your fabric ready is the foundation that makes or breaks your smocking project. You’ll need to measure accurately, mark a precise grid, and set yourself up for evenly spaced pleats that look professional.
If you’re working on delicate or detailed fabric manipulation, check out these sewing tips for intricate designs to avoid common mistakes that throw off your grid.
Let’s walk through the prep work that turns plain fabric into a perfectly smocked piece.
Measuring and Cutting Fabric for Smocking
Before you pleat a single fold, you need the right amount of fabric in your hands. Start by deciding your finished smocking width and multiply that measurement by three to four times to account for pleat depth and gathering stitches.
Consider these critical fabric calculation steps:
- Always align cuts parallel to the grain for stable, straight pleats
- Add seam allowances to your finished panel width
- Pre-wash a sample swatch to account for fabric shrinkage
- Record pleat depth targets to maintain consistency across rows
- Measure twice before cutting to avoid wasting yardage
Square your cut edge with a ruler to prevent distorted smocking patterns later. Beginners may benefit from reviewing to secure the best results.
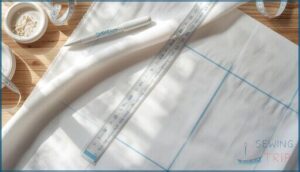
Marking The Grid With Pens or Iron-on Dots
Clean fabric preparation sets the stage for grid marking tools that define your smocking pattern. Use a water-soluble pen to mark dots in even rows, testing on scrap fabric first to confirm visibility.
For iron-on methods, position dots on the wrong side and press at 180 to 220 degrees Celsius. Dot placement precision ensures consistent pleats across your sewing techniques and fabric manipulation work.
Tips for Accurate and Even Grid Placement
Before you begin stitching, lock down your grid alignment by choosing a fixed corner as your origin point. Fabric tension stays steady when you lightly starch or interface the wrong side so pleats don’t drift.
- Mark with a fine-tip non-permanent pen in a single pass to avoid smear
- Use a metal ruler with a non-slip grip for perfectly straight lines
- Check grid squareness by measuring diagonals of several squares
- Set consistent spacing like 1/4 inch and verify at multiple checkpoints
- Attach an adjustable guide bar to your sewing machine bed for even rows
These steps guarantee pleat depth consistency and smocking accuracy across your entire smocking pattern.
Creating Pleats and Gathering Fabric on The Machine
Once your fabric is marked and ready, the real transformation begins. Creating uniform pleats is the foundation of professional-looking smocking, and your sewing machine can handle most of the work with the right technique.
Here’s how to gather your fabric into perfect, even pleats that set the stage for beautiful stitching.
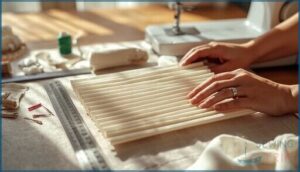
Techniques for Pleating Fabric Evenly
Your smocking accuracy starts with pleat formation, and that means controlling every fold from the start. Use a pleating ruler to mark uniform intervals along your fabric edge, then align each fold with the same measurement to lock in even spacing.
Press each pleat before you move to the next. Check pleat depth with a gauge to maintain fabric stability across all rows.
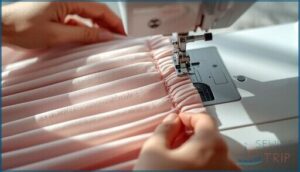
Using Gathering Stitches to Form Pleats
Set your machine to a long stitch length—around 3.5 to 4.0 mm—and sew two parallel rows near the fabric edge. Pull the bobbin threads evenly from both ends to gather the fabric into uniform folds.
This gathering technique creates the foundation for pleat formation and gives you complete stitch control over fabric manipulation. Keep tension consistent so your pleats form with equal depth and stability across every row.
Managing Pleat Depth and Spacing Consistency
Control your pleat depth by adjusting presser foot pressure and keeping a consistent feed speed through the sewing machine. Use a pleater foot set to 3 to 5 mm for light fabrics, maintaining uniform pleat alignment across every row.
Test smocking tension and stitch consistency on a sample swatch first, checking that gathers form evenly without fabric stretch. This foundation ensures professional smocking techniques.
Stitching Smocking Patterns With a Sewing Machine
Now that your fabric is prepped and pleated, it’s time to stitch. Your machine settings and stitch choices make all the difference between amateur puckers and professional gathers.
Here’s how to set up your machine, choose the right stitches, and troubleshoot problems as you go.
Selecting Decorative and Elastic Smocking Stitches
Your machine’s decorative stitches open up a world of smocking patterns. Choose zigzag or built-in decorative stitches that cradle elastic thread without snapping it. The Honeycomb stitch creates a soft, hexagonal grid, while the Wave stitch forms fluid, organic lines.
Test stitch tension on scrap fabric first—lighter tension prevents gather collapse. Match your stitch choice to fabric compatibility for sewing machine smocking that lasts.
Adjusting Machine Settings for Best Results
Once you’ve picked your stitch, fine-tuning your sewing machine tips transforms good smocking into great. Proper machine calibration and fabric compatibility for sewing machine smocking depend on these settings:
- Thread tension between 4 and 6 prevents looping on light fabrics.
- Stitch length of 2.0 to 2.5 mm creates even coverage.
- Needle selection with sharp 75/11 to 90/14 sizes matches your fabric weight.
- Presser foot pressure increased by 0.2 to 0.5 for layered work.
- Test rows on scraps confirm alignment before you commit.
Adjust in small increments and record what works.
Step-by-Step Guide to Stitching Rows of Smocking
Now you’re ready to turn those calibrated settings into finished smocking patterns. Start your first row at the top left of your pleat formation, guiding fabric gathering steadily across. Lock each row with two backstitches, then move down one row alignment mark. Keep your stitch tension consistent and your rhythm even as decorative stitches link gathering stitches into flowing smocking techniques.
| Step | Action |
|---|---|
| Begin row | Start at top left, stitch across pleats |
| Secure end | Backstitch twice to lock thread |
| Move down | Align next row with grid marks |
| Repeat | Maintain tension and spacing throughout |
Troubleshooting Common Smocking Issues
Even perfect setups hit snags. If your smocking stitch errors show uneven pleats, tension’s pulling too tight, or your fabric stretched during pleating, thread breakage causes usually trace back to mismatched needle size or synthetic threads shredding in dense gathers.
Watch for these fabric tension issues:
- Skewed grid lines from excessive stretch
- Loose pleats sagging after stitching
- Twisted rows from overly tight pleat depth control
Adjust immediately to prevent smocking pattern distortions.
Finishing and Caring for Machine Smocked Fabric
Your smocking work isn’t finished once the last row leaves the machine. You need to clean up the temporary stitches, set the gathers properly, and care for the fabric so all your effort lasts.
These final steps protect your smocking and keep it looking crisp through wear and washing.
Removing Temporary Gathering Stitches
Once your decorative smocking rows are complete, you’ll need to remove the temporary gathering stitches without disturbing your pleats. Work one stitch at a time to prevent fabric distortion and maintain pleat alignment. Snip each stitch close to the fabric with small embroidery scissors, then gently pull thread tails with tweezers. This careful stitch removal protects your smocking finishing and preserves the gathers you worked hard to create.
| Step | Tool Needed | Key Action |
|---|---|---|
| 1. Snip knots | Embroidery scissors | Cut close to fabric without snagging pleats |
| 2. Lift threads | Tweezers or needle | Pull thread tails gently away from seam |
| 3. Check alignment | Your eyes | Inspect pleat alignment after each stitch |
| 4. Trim remnants | Sharp scissors | Remove any tiny visible threads flush |
Pressing and Setting The Smocked Area
A good press locks your pleats in place, so set your iron to the fabric’s correct temperature and use a dry pressing cloth. Press each row individually, lifting rather than sliding to keep pleats aligned.
For elastic smocking, skip heavy stabilizers that restrict stretch. Test heat settings on scrap fabric first, then press lightly to set your smocked area without flattening those decorative stitches.
Washing and Maintaining Smocked Garments
Smart fabric care tips protect your smocking thread and keep those pleats sharp for years. Hand wash in cold water with mild detergent, or use a mesh bag on the delicate cycle for garment construction that lasts.
- Water and detergent: Cold water prevents thread fatigue; choose pH-neutral formulas to protect embroidery
- Drying methods: Air dry flat on a towel, reshaping pleats as they dry
- Color preservation: Wash lights separately and add color catchers for multi-tone smocking
- Garment storage: Fold with tissue paper to prevent snagging and fabric distortion
Tips for Long-Lasting Smocking Results
Smocking durability starts with smart fabric choice and thread selection before you even touch your sewing machine. Cotton poplin or percale with 60 to 80 thread count holds pleats better than stretchy blends, while quality embroidery thread resists breakage during wear.
Check pleat consistency after each wash, and always test a sample swatch following your smocking tutorial to confirm your sewing techniques deliver results that last.
Frequently Asked Questions (FAQs)
How to do smocking on fabric for beginners?
Start with a lightweight cotton and mark evenly spaced dots on your fabric. Thread your needle, gather along the dots, then stitch decorative patterns across the pleats to create stretchy, textured rows.
What is the smoking technique in sewing?
This textile manipulation technique uses controlled fabric gathering and decorative stitch patterns to create elastic properties in woven material. The process builds parallel rows that let fabric stretch while maintaining structure—essential smocking history lives in every pleat.
Can You smock on a sewing machine?
Yes, you can smock on a sewing machine using elastic thread in the bobbin and decorative stitches. Machine smocking techniques create stretch and texture, though they differ from traditional hand smocking methods.
What smocking stitches can you use on a sewing machine?
Your machine can handle zigzag for wave patterns, cable stitch with elongated settings, diamond smocking using alternating widths, lattice effects combining decorative stitches, and hybrid stitches pairing elastic threads with embroidery stitches for stretch.
What is smocking in sewing?
You might think smocking is outdated, but this embroidery technique gathers fabric with decorative stitches to create elastic, textured panels.
It’s a timeless method combining fabric gathering, textile manipulation, and smock techniques for functional beauty.
Can you smoke on a sewing machine?
No, smoking near your sewing machine creates serious fire safety risks and health concerns. Cigarette smoke damages fabric, clogs machine parts with residue, and poses sewing hazards that could ignite flammable materials.
Can smocking be done on a sewing machine?
Absolutely. Modern sewing techniques make machine smocking entirely feasible, blending tradition with efficiency.
Your machine manages pleating and stitching rows faster than hand methods, though the process differs from classic hand-worked smocking patterns.
What stitch is used for smocking?
You’ll work with cable stitch, outline stitches, stem stitch, and wave patterns to create decorative stitches.
Honeycomb effect adds texture, while these embroidery stitches for smocking combine to produce flexible, beautiful results through proven stitching techniques.
How to do elastic smocking on a sewing machine?
Hand-cranking and store-bought bobbins seem worlds apart, yet both anchor elastic smocking.
Wind elastic thread onto your bobbin, thread regular cotton on top, then adjust stitch length and tension for beautiful, stretchy shirring results.
What thread do you use for smocking?
Choose cotton perle or embroidery floss for hand smocking.
For machine work, use elastic thread in the bobbin and standard sewing thread on top, ensuring proper thread tension for even gathers.
Conclusion
Think of machine smocking like teaching your fabric to accordion-fold on command—each stitch locks texture into place while keeping movement alive.
You’ve now got the full roadmap for how to do smocking on a sewing machine, from grid marking through final pressing. Test your tension on scraps first, keep your pleats consistent, and don’t rush the setup.
Master these fundamentals, and you’ll turn plain yardage into dimensional showpieces that flex, breathe, and hold their shape beautifully.

