This site is supported by our readers. We may earn a commission, at no cost to you, if you purchase through links.
 Learning how to sew a pillowcase is like riding a bike—once you get the hang of it, you’ll wonder why you ever bought them! Start by cutting your fabric 33 inches by 21 inches for a standard pillow.
Take that top edge and fold it down about 4 inches, then flip it over once more—this creates your clean cuff.
Now here’s where it gets fun: lay your fabric with the pretty sides facing each other, but keep that cuffed end wide open. Grab your sewing machine and run a straight line along the bottom and down the side, staying about half an inch from the edge.
Turn your pillowcase right side out, push out the corners with a chopstick, and press with an iron. The secret lies in mastering the burrito method and French seams for professional-looking results.
Table Of Contents
- Key Takeaways
- Essential Tools and Materials for Sewing Pillowcases
- How to Cut and Prepare Fabric Pieces
- Step-by-Step Guide to Sewing a Pillowcase
- What is The Burrito Method for Pillowcases?
- How to Finish Pillowcase Seams Professionally
- Personalizing and Customizing Your Pillowcase
- Frequently Asked Questions (FAQs)
- Conclusion
Key Takeaways
- You’ll need basic supplies: Cut your fabric to 33×21 inches, gather quilting cotton, sharp scissors, pins, matching thread, and use a ½-inch seam allowance for professional results.
- Master the burrito method: Roll your fabric layers like a burrito to create perfectly enclosed seams without raw edges showing—this technique prevents fraying and gives you that store-bought look.
- Use French seams for durability: Stitch wrong sides together at ¼ inch, trim, flip right sides together, then stitch again at ⅜ inch to completely encase raw edges and prevent unraveling.
- Personalize with custom touches: Add embroidered monograms, fabric paint designs, or decorative appliques to transform your basic pillowcase into unique bedding that matches your style and room décor.
Essential Tools and Materials for Sewing Pillowcases
You’ll need just a few basic supplies to turn fabric into cozy pillowcases, and trust me, gathering everything beforehand saves you from that frantic search for scissors mid-project.
Stock up on about one yard of quilting cotton, sharp fabric scissors, straight pins, matching thread, and a reliable sewing machine with a fresh needle.
Choosing The Right Fabric
Fabric selection sets the foundation for your pillowcase project. Choose quilting cotton for beginners—it’s forgiving and works nicely. Look for fabric weight around 4-5 ounces with a thread count between 200-300.
Consider print direction when cutting; directional patterns need extra yardage. Check fiber content labels, as 100% cotton offers breathability. The weave type affects drape, so percale works well for crisp edges in textile arts projects.
For a soft and durable option, consider cotton, as it’s a popular choice.
Must-Have Sewing Tools and Supplies
Every pillowcase project starts with gathering essential tools to make your sewing smooth and successful. You’ll need these basics:
- Rotary cutters or fabric scissors for clean cuts
- Measuring tools like rulers and tape measures
- Pin types including straight pins for holding fabric
- Sewing machines (any basic model works great)
- Seam ripper for fixing mistakes
With the right tools in hand, you’re all set to turn plain fabric into pillowcases that look store-bought.
Selecting Thread and Needles
Your thread choice matters more than you’d think. Cotton thread works best with cotton fabric, creating strong, lasting seams. Choose all-purpose polyester thread for mixed fabrics. Match thread color to your fabric or go one shade darker.
Use universal needles (size 80/12) for quilting cotton – they handle most sewing machine tension adjustments perfectly. Sharp needles help prevent snags and help create clean stitches.
How to Cut and Prepare Fabric Pieces
You’ll start by measuring your fabric pieces carefully, since accurate cuts make the difference between a professional-looking pillowcase and one that looks homemade in all the wrong ways.
Once you’ve marked your measurements, you’ll use sharp scissors or a rotary cutter to create clean, straight edges that’ll sew together beautifully.
Measuring and Marking Fabric Accurately
Now that you’ve gathered your materials, let’s nail down your measurements. Start by identifying the fabric’s grain line – it runs parallel to the selvage edge and keeps your pillowcase square.
Use a quilting ruler and fabric marking tools like washable chalk to mark your cutting lines. For accurate seam allowance, measure exactly ½ inch from each edge.
Pattern placement matters too – center any directional prints before marking.
Cutting Techniques for Straight Edges
Sharp fabric scissors are your best friend here, but a rotary cutter with a cutting mat makes pillowcase cutting a breeze. Line up your fabric grain alignment with the mat’s grid lines, then use pattern weighting to secure fabric.
Keep your cutting mat care routine simple—clean regularly for accurate measuring tools. This cutting technique ensures professional-looking pillowcase edges every time.
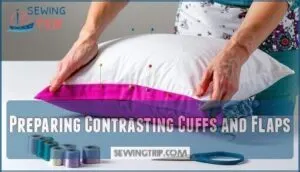
Preparing Contrasting Cuffs and Flaps
For contrasting cuffs and flaps, choose fabric that complements your main pillowcase fabric. Cut your cuff fabric to 42 inches by 9 inches for standard pillowcases.
Pattern matching tips include aligning directional prints before cutting. Secure flap edges with precise measurements—this prevents wonky corners later.
Contrasting color palettes add visual interest to basic sewing tutorials.
Step-by-Step Guide to Sewing a Pillowcase
Now you’ll take your prepared fabric pieces and transform them into a beautiful pillowcase using precise ½-inch seam allowances and careful pinning techniques.
These three essential steps—pinning your layers correctly, sewing straight main seams, and creating that perfect cuff—will give you professional results that’ll make you wonder why you ever bought store-bought pillowcases.
Pinning and Layering The Fabric
Your fabric’s foundation begins with proper pinning techniques and layering order. Start by placing your main fabric and cuff pieces right sides together, ensuring perfect fabric alignment along raw edges. This prevents slippage during sewing and creates professional results.
Good pinning is your best friend here – it stops fabric from wandering around and keeps those seam allowances neat and tidy.
- Pin every 3-4 inches along the matched edges, perpendicular to the seam line
- Layer the cuff fabric on top of the main pillowcase piece for easy handling
- Check alignment twice before moving to your sewing machine – measure from each corner
Sewing The Main Seams
With your fabric pinned and layered, you’re ready to tackle those main seams. Use ½-inch seam allowances for your pillowcase, maintaining straight stitch types throughout. Keep fabric rolling minimal to prevent puckering—your machine will thank you! Consider corner reinforcement for durability.
Keep that seam ripper handy for any mishaps during these important sewing projects.
Creating a Neat Cuff
Now you’ll create that professional cuff that makes your pillowcase look store-bought. The cuff fabric choice matters—opt for contrasting colors or matching tones. Here’s your roadmap:
- Fold the cuff fabric 4 inches down, creating a clean hem
- Pin along the fold, preventing cuff slippage during sewing
- Stitch ¼ inch from the folded edge using straight stitches
- Press the cuff flat with an iron for crisp edges
- Attach to main fabric using French seams for durability
Accurate cuff measurement ensures your pillow cover making looks polished every time.
What is The Burrito Method for Pillowcases?
The burrito method gets its name because you’ll roll your fabric layers like a burrito, creating perfectly enclosed seams without any raw edges showing inside your finished pillowcase.
You’ll layer your main fabric and cuff pieces, roll everything together, then stitch along one edge to create a professional-looking seam that would make your grandmother proud.
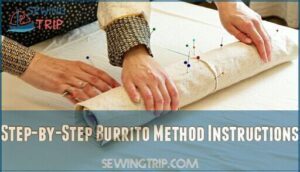
Step-by-Step Burrito Method Instructions
Think of the Burrito Method as rolling up your favorite snack! Lay out the main pillowcase fabric, place the cuff on top, and roll everything tightly inside.
Align the raw edges, pin, and sew with a ½-inch seam allowance—watch for tangles! This Rolling Technique makes fabric manipulation a breeze and keeps even sewing beginners from getting twisted.
Benefits of The Burrito Method
The burrito method beats traditional pillowcase sewing hands down. Instead of fighting with loose fabric edges, you get complete control from start to finish.
The technique creates enclosed seams that look professionally made while cutting your sewing time in half. It’s a game-changer for anyone who’s wrestled with standard methods:
- No raw edges peek through your finished seams
- Fabric stays perfectly aligned during stitching
- One continuous motion creates the entire pillowcase
- Enclosed construction prevents fraying and increases durability
Troubleshooting Common Issues
Even seasoned sewers hit snags with the burrito method. When your pillowcase goes sideways, don’t panic—most issues have quick fixes. Regular sewing machine maintenance can help prevent jams and other issues, so consider cleaning and oiling your machine frequently.
| Problem | Solution |
|---|---|
| Seam Puckering | Lower sewing machine tension, use walking foot |
| Uneven Edges | Pin every 3 inches, check fabric grain alignment |
| Fabric Slippage | Use spray basting or more pins on slippery materials |
| Thread Breaks | Switch to quality thread, check needle size |
| Tension Problems | Clean machine, rethread completely before adjusting |
Keep your seam ripper handy—it’s your best friend when stitches go rogue.
How to Finish Pillowcase Seams Professionally
You’ve sewn your pillowcase seams, but now it’s time to make them look store-bought with professional finishing techniques.
Raw edges that fray after washing can turn your beautiful handmade pillowcase into a messy disappointment, so you’ll want to seal those seams properly using French seams, serging, or zig-zag stitching.
Using French Seams
When you want pillowcases that’ll actually last, French seams are your secret weapon. They create clean, durable edges that look professionally made – and honestly, the fabric you choose becomes way less important once you nail this technique.
Here’s how to do it:
- Start by stitching the fabric wrong sides together at 1/4 inch
- Trim that seam down to 1/8 inch
- Flip it so right sides are together, then press it flat
- Stitch again at 3/8 inch – this traps all those raw edges inside
Your machine will handle this smoothly, and you’ll end up with seams that outlast your favorite binge-watch series.
Serging and Zig-Zag Edge Finishes
If you don’t own a serger, don’t worry! Your regular sewing machine can handle edge finishing beautifully. Set your zig-zag width to 3-4mm and adjust stitch density for medium coverage on your pillowcase fabric.
Test serger tension settings on scraps first—loose tension creates puckering, while tight tension breaks threads.
For decorative serging, experiment with contrasting thread colors. The differential feed helps prevent stretching on lightweight textile materials during finishing.
Pressing for a Crisp Finish
The final step in professional home sewing projects involves proper pressing. Your fabric type determines the correct iron temperature and steam settings. Using a pressing cloth protects delicate textile fibers during seam pressing.
- Set iron temperature based on fabric care label
- Use steam settings for cotton pillowcase materials
- Place pressing cloth over seams before ironing
- Press seams open for flat, crisp edges
With these pressing steps, your beginner pillowcase project will look professionally finished.
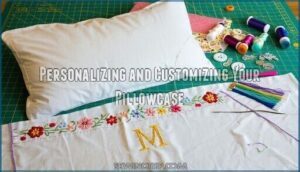
Personalizing and Customizing Your Pillowcase
You can transform your basic pillowcase into something special by adding decorative touches like embroidered monograms, fabric paint designs, or colorful appliques that reflect your personal style.
These customization techniques let you create unique bedding that matches your room’s decor, and most can be done with supplies you already have at home.
Adding Embellishments and Decorative Stitches
Several decorative stitch options can transform your plain pillowcase into textile arts magic. Consider embellishment placement carefully—corners and cuff edges work best for beginners in sewing.
Check fabric compatibility before starting any embroidery or needlework. Use stabilizer usage under lightweight fabrics to prevent puckering.
Match thread choices to your decorative vision, contrasting colors pop beautifully against solid backgrounds.
Appliques, Monograms, and Fabric Paint
You can make your pillowcase truly yours with DIY appliques, monograms, and fabric paint. Cut fabric shapes for appliques and stitch them on before assembling your pillowcase.
Choose monogram fonts that match your style—simple block letters work great for beginners.
Create custom stencils for fabric paint designs, or freehand your artwork. These individual touches transform basic textile arts into unique crafting masterpieces that reflect your personality perfectly.
Upcycling and Eco-Friendly Fabric Choices
Transform your old clothes into pillowcase magic with fabric scraps from worn-out sheets or t-shirts. These DIY Projects turn forgotten linens into fresh home decor, making Textile Crafting both budget-friendly and earth-conscious.
Sustainable Fabric Sourcing means choosing organic cotton for its breathability and chemical-free benefits. Natural Dyeing Methods using coffee or turmeric create unique colors while reducing Textile Waste.
Frequently Asked Questions (FAQs)
What is the best type of fabric to use for a pillowcase?
Picture soft cotton threads weaving together like a cloud.
You’ll want quilting cotton for your first pillowcase—it’s beginner-friendly, widely available, and stands up to washing beautifully without shrinking or puckering.
How do I make sure my pillowcase fits my pillow perfectly?
Measure your pillow first, then add 4 inches to the length and 1 inch to the width for seam allowances. You’ll get that snug, hotel-quality fit every time.
What is the best way to sew a pillowcase with a flap closure?
Cut your fabric 21×33 inches.
Fold a 4-inch flap at one end, then fold the opposite end over to create overlap.
Pin sides, stitch with ½-inch seams, and turn right-side out.
How can I add personalized details to my pillowcase?
Your fabric becomes a canvas for creativity—embroider initials using contrasting thread, add decorative trim along the cuff edge, or use fabric paint for custom designs. You’ll create something uniquely yours.
What are some tips and tricks for sewing the perfect pillowcase?
You’ll nail it by using ½-inch seam allowances consistently, pressing seams flat after each step, and choosing French seams for durability. Don’t rush—steady stitching beats speed every time.
How do you wash homemade pillowcases properly?
Wash your handmade pillowcases in cool water with gentle detergent. Turn them inside out first to protect seams. Skip fabric softener—it weakens cotton fibers over time.
What size pillow fits in standard pillowcases?
Like finding the perfect puzzle piece, standard pillowcases accommodate pillows measuring 20×26 inches.
You’ll get a snug fit that won’t slip off during sleep, keeping your pillow protected and comfortable all night long.
Can you make pillowcases without a machine?
You can hand-sew pillowcases using a backstitch or running stitch. It’ll take longer than machine sewing, but you’ll get that satisfying handmade touch with just needle and thread.
How do you fix uneven pillowcase seams?
Funny how wonky seams happen even to experienced sewers! First, check if you’re pulling fabric while stitching. Remove uneven stitches carefully with a seam ripper.
Re-pin your fabric layers properly, then sew slowly with consistent seam allowances using your machine’s seam guide.
Whats the best way to store pillowcases?
Store pillowcases by folding them neatly and placing them inside matching sheet sets. This keeps everything organized and prevents wrinkles.
You can also roll them tightly for compact storage in linen closets.
Conclusion
Once you learn to sew your first pillowcase, there’s a good chance you’ll keep going. The satisfaction of creating something useful with your own hands tends to stick. You’ve picked up the core skills now – measuring and cutting fabric precisely, creating clean cuffs that won’t fray, and mastering techniques like the burrito method and French seams that give your work a professional finish.
Once you master that first pillowcase, you’ll discover the addictive satisfaction of creating something beautiful and useful with your own hands
These skills translate to other home projects too. You’ll save money compared to buying new linens, plus you get to choose exactly the fabrics and colors you want.
Grab some fabric scraps and start your next pillowcase project today!
- https://digitalcommons.usu.edu/cgi/viewcontent.cgi?article=2455&context=extension_curall
- https://www.datahorizzonresearch.com/pillowcase-market-52233
- https://nollapelli.com/blogs/news/why-pillowcase-fabric-matters
- https://www.verifiedmarketreports.com/blog/top-7-trends-redefining-the-pillowcase-market/
- https://www.papernstitchblog.com/pillow-talk-make-standard-pillowcases-fabric/


