This site is supported by our readers. We may earn a commission, at no cost to you, if you purchase through links.

Start by preparing your denim, cutting, and marking it accurately. Choose the right thread, needle, and sewing techniques, like pressing and seam finishing.
Understanding denim’s characteristics and using the right tools will help you master different sewing methods.
As you work on your jeans, you’ll encounter various challenges, but don’t worry, you’ll find solutions, and soon you’ll be crafting your perfect pair, with skills that will take your sewing to the next level, and that’s just the beginning.
Table Of Contents
- Key Takeaways
- Preparing Your Denim
- Sewing Techniques
- Choosing a Jeans Pattern
- Understanding Denim
- Tools and Equipment for Sewing Jeans
- Different Sewing Methods and Seams for Jeans
- Common Challenges in Sewing Jeans
- Selvedge and Thread Choices for Jeans
- Tips for Making Jeans at Home
- Troubleshooting and Undoing Sewing on Jeans
- Frequently Asked Questions (FAQs)
- Conclusion
Key Takeaways
- You’ll need to prepare your denim fabric carefully, including pretreating, cutting, and marking it accurately, to ensure a precise and professional finish for your jeans.
- Choosing the right tools and equipment, such as a heavy-duty sewing machine, denim needles, and specialized threads, is crucial for handling thick denim fabric and achieving strong seams.
- Mastering various sewing techniques, including topstitching, serging, and seam finishing, will help you create a durable and professional-looking pair of jeans that will last.
- Don’t be discouraged by common challenges like improper fit, uneven topstitching, and seam puckering – with practice and patience, you’ll overcome these hurdles and develop the skills to sew high-quality jeans that fit perfectly and look great.
Preparing Your Denim
Before you start sewing, pretreat your denim, cut it carefully, and mark all pattern pieces for accuracy.
Pretreat and prepare your denim for a precise and professional finish.
Prepare the fabric by washing and pressing, then lay it flat and follow your pattern instructions to guarantee a precise fit, this will help you achieve a precise outcome.
Pretreating
To start, pretreat your denim fabric by washing it in warm water to prevent shrinkage and dye bleeding.
This step, called preshrinking, stabilizes the denim and avoids color fading.
By doing this, you guarantee your denim swatch won’t shrink or lose its color after sewing, making it easier to work with your sewing machine and tools.
Cutting
When cutting denim, lay it flat, ensuring grain alignment.
Use sharp tools, like a fabric cutter, to cut out your pattern, minimizing fabric waste.
Place notches carefully, then cut fabric layers, keeping your jeans sewing project on track with precise notch placement and accurate cutting tools.
Marking
When preparing your denim, consider using fabric chalk for precise lines.
- Use water-soluble chalk
- Test on scraps
- Mark before washing
- Use tailor’s chalk for dark denim.
This guarantees placement accuracy and prevents fading marks, making your jeans sewing tutorial easier with your sewing machine and sewing tools, including tailors chalk to pin and mark pattern.
Interfacing
You’re now ready to interface your denim.
Choose the right fusible option, like tricot, for areas needing reinforcement.
Select a weight that suits your jeans sewing tutorial, such as lightweight for shirts or medium weight for pants.
Place interfacing along the grainline, ensuring stretch and flexibility.
Follow the instructions for fusing, and you’ll be sewing jeans like a pro, making the jeans making process easier, especially when sew jeans at home with your sewing machine jeans.
Sewing Techniques
You’re now moving on to the sewing techniques, where you’ll learn how to work with denim effectively.
You’ll discover the importance of using the right thread, needle, and pressing methods to achieve a professional finish on your jeans.
Thread
When sewing jeans, you’ll need thread that can withstand friction.
Choose a poly-cotton thread in tan or golden hues for topstitching.
Match thread weight to needle size, like a Jeans needle 80/12 with Tex 30-40 thread.
For reliable stitching, consider specialized jeans thread.
Select a suitable thread material and spool size for your sewing machine, considering thread color and topstitching thread for a professional finish.
Needle
You’ll need the right needle for denim.
Consider these:
- Needle Types
- Needle Size
- Needle Maintenance
- Needle Brands
- Needle Storage
Choose a denim needle, like Schmetz, for your sewing machine to guarantee smooth sewing.
You can find a suitable denim needle online.
Pressing
You’ll master pressing techniques for sewing jeans.
Use pressing tools and fabric steaming with an iron to achieve crisp seams.
- Press seams open
- Use a clapper
- Apply steam before topstitching for a professional finish on denim fabric.
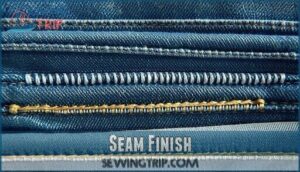
Seam Finish
You’re refining your denim seams.
| Method | Description |
|---|---|
| Serging | Clean finish |
| Flat felled | Strong seam |
| Overlocking | Secure edges |
| Bias binding | Decorative touch |
Use these techniques for a professional finish when sewing jeans, ensuring a clean, strong seam.
Hem
When finishing your denim fabric, consider these hemming techniques:
- Blind hem
- Original hem
- Stacked hems.
Use hemming tools to achieve the desired length, and press the hem for a tidy finish.
For assistance, you can find the right denim hemming tools.
You can also try cuffed hems for a unique look, and remember that hemming jeans is easy with a sewing machine, just be careful not to stretch the denim fabric.
Choosing a Jeans Pattern
You’re choosing a jeans pattern, and bear in mind your desired fit and style.
You’ll select from various patterns, such as Leonora, Weston, or Adelaide, to find the one that suits your needs and skill level.
Leonora
You’re looking for a great jeans pattern, and Leonora is a fantastic choice.
This pattern offers a fitted silhouette through the waist and hips, with a straight leg from the knee down.
You can easily modify it into skinny jeans for a trendy look.
Leonora features a faux fly, yokes, and finished inside leg seam, making it a great option for sewing jeans.
With the right denim fabric and sewing machine, you can create a stylish and comfortable pair of jeans using the Leonora pattern, experimenting with different Leonora hacks, modifications, and fabrics to achieve your desired Leonora style.
The pattern includes features like flat felled seams for durability.
Weston
The Weston pattern delivers a classic slim-tapered fit that’s perfect for both beginners and experienced sewists tackling sewing jeans projects.
This versatile DIY jeans pattern works beautifully with stretch denim fabric and accommodates various customization options through your sewing machine.
Here are five key features that make the Weston stand out:
- Weston Fit – Slim silhouette with tapered legs that molds to your body over time
- Weston Details – Embroidered rear pocket insignia and branded rivets for authentic western styling
- Weston Customization – Adjustable waistbands and pocket placements for personalized comfort
- Weston Fabrics – Compatible with stretch denim containing 1-5% elastane for flexibility
- Weston Hardware – YKK zippers and reinforced metal buttons guarantee long-lasting durability
The pattern’s blend of viscose, cotton, lyocell, polyester, and elastane creates soft, fade-resistant results.
You’ll appreciate the silicone wash treatment that enhances hand feel while maintaining the classic denim aesthetic through proper sewing patterns and techniques.
The pattern is available as a high-waisted shorts pattern in sizes 0-26.
Adelaide
After exploring the structured, classic lines of Weston, take inspiration from the Adelaide dress pattern for a fresh spin on sewing jeans.
Adelaide features breezy denim fabric, a full skirt, and playful adjustable straps. Consider visible topstitching and playful Adelaide hardware for a retro edge.
Adjust your muslin for fit before cutting—precision here pays off. Adelaide pockets hold small essentials, and well-placed yokes add shape without fuss.
Try innovative jeans construction methods on your sewing machine for best results. Many sewers also look for a suitable childrens skinny jeans sewing pattern.
Understanding Denim
You’ll work with denim, a heavy cotton fabric made with a strong twill weave, giving jeans their classic look and durability.
Denim’s strong twill weave creates a classic look and durability
Knowing its thickness and diagonal grain pattern helps you cut, sew, and finish jeans that last.
Origins of Denim
You explore denim’s origins, discovering it emerged in Nîmes, France, as a twill weave fabric.
Denim’s durability made it ideal for labor clothing, contributing to its global popularity as a jeans fabric, with its unique denim weight and sewing requirements making it a staple in denim sewing and jeans sewing, particularly due to its durability.
Characteristics of Denim
Understanding the history brings us to what makes denim fabric truly special.
Denim’s signature characteristics stem from its 3×1 twill weave structure, where warp threads pass over three weft threads and under one.
This creates the diagonal ribbing pattern that gives denim its strength.
Denim weight typically ranges from 12-16 ounces per square yard for jeans, with heavyweight denim offering superior durability.
The best fabric jeans use indigo dyeing on warp threads while leaving weft threads undyed, creating the classic blue exterior with white interior.
Weave variations like 2×1 twill produce lighter fabrics, while traditional cotton construction provides breathability.
Quality denim develops unique fading patterns through wear, though you’ll face shrinkage factors of 3-5% after washing.
These denim characteristics make it perfect for garments requiring both comfort and longevity.
Tools and Equipment for Sewing Jeans
Now that you understand denim’s unique properties, you’ll need specialized equipment to handle this challenging fabric successfully. Your regular sewing supplies won’t cut it when working with heavyweight denim fabric.
Start with the right sewing machine needles. Denim needles sized 90/14 to 100/16 punch through multiple layers without breaking or skipping stitches. Your standard machine needle simply can’t handle denim’s density.
Heavy-duty thread prevents breakage during construction. Polyester or cotton-wrapped polyester works best for durability. Don’t skimp here – weak thread creates weak seams.
Essential tools for professional results:
- Heavy machines – Industrial or heavy-duty domestic models handle thick seams
- Cutting tools – Sharp rotary cutters and fabric shears for clean edges
- Rivet tools – Hammer and setter for authentic hardware installation
- Button installation kit – Proper tools for secure closures
- Pressing equipment – Steam iron, clapper, and ham for crisp seams
Your sewing machine’s presser foot matters too. A jeans foot feeds fabric evenly, preventing puckering. Without proper equipment, you’ll fight the fabric instead of controlling it.
Different Sewing Methods and Seams for Jeans
You’re now ready to master different sewing methods and seams for jeans.
Perfect your topstitching techniques to reinforce seams and add style.
Consider serged edges for stretch denim or flat-felled seams for a clean finish.
Strategically place rivets at stress points to increase longevity.
Use chain stitch or other sewing techniques to secure seams.
Topstitching techniques can elevate your denim fabric, making your sewing jeans project stand out.
With your sewing machine and sewing patterns, you can create durable, stylish jeans.
Focus on rivet placement, serged edges, and topstitching to take your sewing techniques to the next level.
To guarantee a polished finish, consider employing advanced techniques like adding facings.
Common Challenges in Sewing Jeans
Sewing jeans can be tricky. You’ll face challenges like improper fit, uneven topstitching, and seam puckering.
Here are 5 common issues:
- Fabric Bulk
- Needle Breaks
- Topstitching Issues
- Rivet Installation
- Zipper Problems.
Mastering sewing techniques and using the right needles and sewing machine will help. Practice makes perfect, so don’t be discouraged by initial mistakes. With patience, you’ll overcome these hurdles and create great denim fabric garments, improving your sewing jeans skills.
Selvedge and Thread Choices for Jeans
Selvedge denim brings authenticity to your jeans project. You’ll recognize genuine selvedge by the narrow band of tightly woven fabric with red or orange thread along the cuffs—this Selvedge ID sets different denim brands and mills apart.
The self-edge prevents fraying and adds structure to your garment. Thread Weight matters substantially when working with heavyduty denim. Match lightweight thread to lighter denim fabric and heavyweight thread to thicker materials for ideal strength.
For Color Matching, choose construction thread that blends with your denim while allowing Topstitch Options like contrasting gold or navy Cone Thread for decorative elements. Polyester threads offer durability for demanding projects.
Topstitching thread should be thicker than regular construction thread to create those classic jeans details. Test your stitch settings on fabric scraps first—denim’s twill weave can be finicky with tension adjustments. Remember that proper selvedge denim sewing requires patience, but the professional results make every careful stitch worthwhile.
Tips for Making Jeans at Home
Perfect denim fabric selection sets the foundation for successful DIY jeans. Your workspace setup should include adequate lighting and a sturdy cutting surface. Quality denim fabric paired with the right sewing machine makes all the difference.
Start with stitch practice on fabric scraps before tackling your actual project. This builds confidence and prevents costly mistakes on your good material.
Here’s your roadmap to jeans success:
- Choose appropriate denim weight – Match fabric thickness to your sewing patterns requirements
- Practice pattern alterations – Test fit adjustments on muslin before cutting expensive fabric
- Maintain your tools – Sharp needles and clean machines prevent skipped stitches
- Follow proven sewing tips – Use heavy-duty thread and proper seam allowances
Tool maintenance keeps your equipment running smoothly throughout the construction process. Regular cleaning and needle changes prevent fabric snags and uneven stitching.
Troubleshooting and Undoing Sewing on Jeans
In the thick of denim projects, nothing tests your patience like fixing mistakes.
When seam ripping, slide the tool gently under stitches to avoid fabric damage or thread snags—slow and steady wins this race.
If your needle breaks or skips stitches, double-check your sewing machine’s threading and bobbin tension.
For wonky topstitching, use a chalk pencil to mark a straight line before retrying.
Remove bulky hem allowances before hemming again.
Adjust presser foot pressure if the fabric drags.
To prevent fabric damage, it’s best to lift individual stitches with a seam ripper.
Treat errors as valuable lessons—it’s all part of learning smart sewing techniques and using the right sewing tools and materials for clean results.
| Problem | Solution | Tip |
|---|---|---|
| Seam Ripping | Use seam ripper slowly | Lift fabric often |
| Needle Breaks | Re-thread, new needle | Use right size, avoid forcing |
| Skipped Stitches | Recheck bobbin/tension | Clean machine, use quality thread |
Frequently Asked Questions (FAQs)
What can you sew with denim?
Like a blank canvas, denim awaits your creativity, and you can sew durable garments, accessories, or home decor items, bringing your unique vision to life with this versatile fabric.
How to sew the seam on the inside of jeans legs?
You’ll sew the inseam with a 1/4 inch seam allowance, pressing open the seam for a classic finish and durable construction, then topstitch for a professional look.
Can a sewing machine sew jeans?
You’ll be surprised, but yes, a sturdy sewing machine can handle denim, allowing you to sew jeans with the right needles and techniques.
How to sew jeans?
You’ll need to prepare your fabric, cut out patterns, and sew pieces together, using techniques like topstitching and serging to create a durable, professional-looking pair of jeans.
Can I sew jeans on a regular sewing machine?
You can sew jeans on a regular machine, but it’s vital to use the right needle and thread to handle thick denim fabric successfully.
What stitch is best for sewing jeans?
You’ll want to use a heavy-duty stitch, like a denim or jeans stitch, with a sturdy thread to guarantee strong seams that can withstand wear and tear on your jeans.
Is it worth it to sew ripped jeans?
You decide if repairing ripped jeans is worth it, considering time, fabric condition, and personal attachment to the garment, before investing effort into mending or repurposing them creatively.
Do you need a special needle to sew jeans?
You’ll require a heavy-duty denim needle, like a 90/14 or 100/16, to successfully sew through thick denim fabric, ensuring strong and durable stitches in your jeans.
What fabric works best for summer jeans?
You’ll find lightweight denim or stretch denim works best for summer jeans, offering comfort and flexibility in warmer weather.
Can I use regular sewing machine for jeans?
You’ll likely struggle with a regular sewing machine, as denim’s thickness demands a sturdy machine capable of handling heavy fabrics smoothly.
Conclusion
Mastering the art of sewing jeans requires patience.
You’ll learn how to sewing jeans with practice, choosing the right tools, and techniques.
By following these steps, you’ll create your perfect pair, taking your skills to the next level with this valuable how to sewing jeans guide.


