This site is supported by our readers. We may earn a commission, at no cost to you, if you purchase through links.

You’re cruising along on a seam, hit the pedal, and the handwheel freezes like it’s stuck in molasses. Maybe it grinds. Maybe it won’t budge at all. Nine times out of ten, it’s not the motor dying on you—it’s a thread nest, a lint clump, or a belt that’s given up.
Most sewing machine handwheel problems trace back to small stuff hiding in tight spaces: under the needle plate, behind the pulley, wound around a bobbin case that’s seen better days. Ignore it and you risk straining the motor or throwing the timing off entirely.
Grab your screwdriver and a pair of tweezers. Time to find out what’s really jamming things up—and get that wheel spinning free again.
Table Of Contents
Key Takeaways
- Most stuck handwheels come down to small stuff like tangled thread nests, packed lint, or a worn drive belt—not a dying motor, so check those before anything else.
- Always unplug your machine and wait a full 60 seconds before digging in, since that short pause protects both you and the machine.
- Test the handwheel by hand without thread loaded first—smooth turning rules out gears and bearings, while grinding or stiffness points you toward a specific fix.
- Regular upkeep (weekly lint checks, monthly oiling, breaks every 45-60 minutes during long sessions) keeps handwheel problems from becoming a repeat headache.
Common Causes of Sewing Machine Handwheel Problems

A stiff handwheel doesn’t happen for no reason. Something specific is grabbing, binding, or overheating inside that machine. Here are the five usual suspects worth checking first.
Before you dig into the motor or gears, this guide on fixing a broken sewing machine hand wheel walks through diagnosing debris buildup, dried-out lubrication, and jammed thread bits step by step.
Thread Jams Beneath Needle Plate
Nine times out of ten, a stuck handwheel means thread jammed under the needle plate. Culprits include bad threading, a dull needle snagging thread, lint buildup, or a misthreaded bobbin case backing up. Check:
- Thread path alignment
- Bobbin case seating
- Needle condition
- Presser foot tension
Clear nests before forcing the handwheel — you’ll strip gears fighting a tangle.
Regular maintenance helps prevent machine maintenance neglect.
Lint Around Handwheel Assembly
Cleared the thread nest but wheel still drags? Check for lint packed behind the wheel, where it hides at the shaft and collar.
Humidity makes it clump. Oil turns it to paste, tightening shaft clearance.
| Cause | Fix |
|---|---|
| Dust in collar | Brush, compressed air |
| Oil-lint paste | Wipe, re-lube properly |
| Tight clearance | Remove wheel, clean shaft |
Worn or Broken Drive Belt
Wheel clean but motor runs while it barely turns? Suspect the drive belt.
Look for cracks, glazing, or fraying — a belt wear inspection catches these early. Check belt routing verification, alignment, and tension; loose belts slip, tight ones strain bearings.
Cracks past 2mm mean drive belt replacement. Match width and length exactly during the belt replacement procedure.
Machine Overheating and Seizing
Belt’s fine but wheel still fights you? Think heat.
Long runs push the motor past its rating, and overheating locks the handwheel tight until things cool. Heat also causes thermal expansion, tightening clearances around shafts.
Bearings seize when lubricant gets contaminated or runs dry — metal grinding on metal. Stop, unplug, let it rest before forcing anything.
Wrong Bobbin or Damaged Needle
A tiny culprit, big headache: wrong bobbin or a bent or dull needle.
Do a quick Bobbin Insertion Check and confirm Bobbin Thread Direction — backwards feeding jams the hook fast.
Run a Needle Size Match, keep the Needle Clamp Tight, and finish with a Needle Point Inspection. Skip these and you’re inviting thread jams and tangled thread right alongside your usual wrong bobbin woes.
How to Diagnose a Stuck Handwheel
A stuck handwheel feels like bad news, but don’t panic yet. Most cases come down to a handful of usual suspects, and you can rule them out fast with your own two hands. Work through these five checks in order before you touch a screwdriver.
Turn Off and Unplug Machine

Before you touch that handwheel, kill the power. Switch the machine off first, then pull the plug — never the other way around while it’s running, or you risk arcing that can fry the belt.
Give it a full 60 seconds before handling anything internal. That short pause protects you and your machine.
Check When Jamming Occurs

Where does the wheel bind — needle up, needle down, or mid-turn? That’s your first clue. A jam right at needle-down often means tangled thread under the plate.
Stiffness that repeats with certain fabrics points to tension issues.
Slow, gritty resistance while turning by hand usually means lint, not a jammed thread obstruction.
Remove Bobbin and Needle
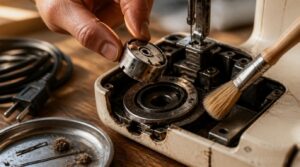
Time to go digging. Power off, machine unplugged — no exceptions.
- Raise needle fully
- Pull bobbin case straight up
- Loosen needle clamp screw
- Slide needle out
- Brush lint from shuttle area
Clear pins and thread scraps first. Check the bobbin case for burrs while you’re in there — damaged parts hide future jams.
Test Handwheel Without Thread

Grab the handwheel and turn it slowly, one full revolution, no thread loaded. Smooth means no internal obstruction. Binding or grinding points to bearings or gears.
| Feel | Likely Cause |
|---|---|
| Smooth | No obstruction |
| Grinding | Gear/bearing wear |
| Stiff throughout | Needs lubrication |
| Sticky spots | Trapped debris |
| Loose/wobbly | Worn shaft |
Keep it unplugged. Record what you feel before moving on.
Inspect Belt and Moving Parts
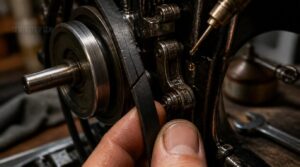
With the machine still unplugged, eyeball the drive belt for cracks, glazing, or missing chunks. Check pulley alignment and belt tension—too loose causes slip, too tight strains bearings.
- Bearing wear: listen for grinding
- Shaft inspection: check for wobble
- Look for dry or gritty linkage points needing lubrication
Note anything off before cleaning or lubricating.
How to Fix a Stiff Handwheel

Once you know what’s causing the stiffness, fixing it is mostly hands-on work. No fancy tools required, just patience and a few basic steps. Here’s how to get that handwheel spinning free again.
Clear Thread Nests Safely
Before touching anything, unplug the machine. That tangled thread under the plate isn’t going anywhere, and you don’t need a shock while you dig it out.
Lift the nest out with tweezers, dispose of it, then brush loose fibers off the feed dogs. Check the bobbin case for stragglers. Rethread front to back, seat it in the tension discs, and turn the handwheel by hand before running scrap fabric.
Clean Lint From Mechanisms
Once the thread’s cleared, lint is the next culprit. It packs into tension discs, gear teeth, and bearing surfaces, turning smooth motion into something stuck in molasses.
Lint sneaks into tension discs, gear teeth, and bearings until smooth motion turns to molasses
- Blow lint from tension discs, brush belt surfaces, pick gear teeth clean
- Never use metal tools near gears
- Wipe bearings with a dry cloth only
Rotate the handwheel by hand afterward to confirm it moves freely.
Rethread Needle and Bobbin
With lint gone, follow the upper thread path exactly as marked, seating it firmly in the tension discs before the needle eye. Insert a fresh needle to correct depth, then draw up the bobbin thread.
| Step | Action |
|---|---|
| 1 | Seat bobbin case, align lock |
| 2 | Draw up bobbin thread |
| 3 | Test handwheel rotation |
Lubricate Approved Oiling Points
Once it turns freely by hand, oil it right. Grab sewing machine oil, never anything household.
- Oil handwheel shaft at bearing surfaces
- Apply bearing oil, one drop, wipe excess
- Lubricate gear couplings behind the handwheel
- Oil feed dog pivots for smooth advancement
- Touch belt pulley contacts, not the belt itself
Reapply every 6-12 months. Overdo it and lint just sticks worse next time.
Let an Overheated Machine Cool
Under a hot handwheel lies a motor that’s basically thrown a tantrum. Give it a cool down period: 15-30 minutes, machine off, no fabric loaded.
Set up ventilation, 6 inches clearance, fan nearby. Monitor temperature with an infrared thermometer, below 122°F.
| Check | Target |
|---|---|
| Surface temp | Under 122°F |
| Wait time | 20-40 min |
| Belt | No glazing |
| Handwheel | Spins smooth |
Do a post-cooling inspection before resuming.
Advanced Handwheel and Drive Repairs

Basic cleaning didn’t cut it? Time to get your hands dirty and go deeper into the machine. Here’s what to check once you’re past the easy fixes.
Remove Handwheel and Collar
Ready to go deeper? Pulling a sewing machine handwheel off its shaft isn’t scary once you know the order.
Unplug the machine first—safety precautions checklist step one, always.
Remove the stop motion knob and set screw, then lift the collar with a hex key or collar remover tool.
Slide the wheel straight off.
Inspect the shaft for burrs, store parts labeled, and reinstall in reverse order.
Inspect Belt for Damage
With the wheel off, the drive belt sits right there in plain view. Run your thumb along the surface feeling for cracks or splits, then flip it over and check for glazing—a shiny, slick back means heat and slippage.
Look at the edges for fraying, and eyeball the pulley grooves for chips. A worn belt gets replaced, no debate.
Check Gears, Shafts, and Bearings
Everything mechanical wears eventually, and your gearbox is no exception. Spin the handwheel by hand: teeth should mesh evenly, shafts run true, bearings turn silent.
- Gear Meshing Check: even tooth contact, no pitting
- Shaft Alignment Test: runout under 0.02 mm
- Bearing Wear Inspection: listen for grinding, feel for roughness
Also review lubrication condition — clean film, no metallic debris hiding in there.
Correct Handwheel Alignment
A crooked handwheel feels gritty no matter how much you’ve cleaned or oiled it. Check alignment tolerance — 0.1 to 0.2 mm off spindle axis causes rubbing. Confirm collar seating flush against the shaft shoulder, no gaps. Verify belt pulley alignment and gear mesh. Measure runout with a dial indicator: keep it under 0.05 mm.
Adjust Needle Bar Timing
A stiff handwheel sometimes traces back to bad timing, not grime. Loosen the set screw, align timing marks with the hook, and check needle bar height at its lowest point. Run a hook clearance check, add gear train lubrication, then confirm with a test swatch.
Good sewing machine troubleshooting steps end with clean, consistent stitches.
Preventing Future Handwheel Problems

Fixing a stuck handwheel feels great, but you don’t want to do it every month. A little routine care keeps thread nests, lint, and worn parts from creeping back in. Here’s what that upkeep actually looks like.
Follow a Regular Cleaning Schedule
Nine times out of ten, a fixed cleaning day beats "I’ll get to it later." Pick one and stick with it.
- Weekly: lint removal
- Monthly: belt check
- Quarterly: shaft lubrication
- Bi-annual: deep clean
- Annual: professional inspection
Skip a step and lint wins the fight. Simple as that.
Lubricate as Manufacturer Recommended
That monthly belt check pairs well with oiling day — do both together and you won’t forget either one.
Grab light machine oil, low viscosity, non-drying. Skip heavier oils; they gum up tiny parts. Put 1-2 drops on the handwheel shaft monthly. Check your manual for other approved lubrication points. Some machines need oiling every 8-10 hours of heavy use. Stick to manufacturer-approved oil only.
Use Compatible Bobbins and Needles
While you’ve got the oil out, check your bobbin too. Wrong bobbin size jams the works and strains the handwheel same as tangled thread does.
Match bobbin class to your model — Class 15 or 130/705H, whatever your manual specifies. Pair needle and thread weight correctly, replace bent needles, and verify bobbin rotation direction. Mismatched parts grind gears that turn your handwheel.
Avoid Continuous Sewing Sessions
Bobbins and needles sorted, look at your habits next. Marathon sewing sessions build heat fast, and heat is what makes a handwheel seize up.
Take a 5 to 10 minute break every 45 to 60 minutes. Stretch your wrists and shoulders, hydrate, rotate tasks. Break long seams into shorter sessions — your machine (and your hands) will thank you.
Know When to Seek Repairs
Sometimes DIY fixes just won’t cut it, and that’s fine to admit.
Call a technician when you hit:
- Persistent stiffness after cleaning and oiling
- Grinding or clunking noises, or overheating smells
- Timing issues causing skipped stitches
Visible gear damage or a seized mechanical issue after basic troubleshooting means it’s time for professional help — better safe than sorry.
Frequently Asked Questions (FAQs)
Why is the handwheel on my sewing machine hard to turn?
Like a stiff old doorknob fighting the lock, a handwheel hard to turn usually points to thread nests, lint or dirt buildup, a worn-out belt, or a mechanical issue needing a thread tension check and cleaning and lubrication.
How to fix a sewing machine handwheel?
Unplug the machine, pull the needle plate, and clear thread nests. Brush out lint, then rethread properly. Add oil to lubrication points, let overheated parts cool, and check thread tension adjustment before sewing again.
How to fix a seized up sewing machine?
Cool the machine down, then check for thread jams and clean out lint. Try a manual override technique, turning the handwheel gently by hand. If it’s truly seized up, an emergency reset or professional inspection gets it moving again.
Why is my handwheel not working?
Stuck in a wheel rut? Ninety percent of the time it’s a thread jam beneath the needle plate, tangled bobbin thread, or thread tension gone haywire. Check needle plate clearance and bobbin winding before blaming the belt.
Why is my sewing machine handwheel hard to turn?
Nine times out of ten, a tangled thread nest hiding under the needle plate or bobbin case is the culprit. Run a quick thread tension check, clear lint, then hit the shaft lubrication points before testing again.
Why did my sewing machine lock up?
Nine times out of ten, a tangled thread nest built up under the needle plate or bobbin case, jamming the shuttle hook. Check thread tension and bobbin alignment before forcing the handwheel.
Why is my Singer 4423 handwheel hard to turn?
That stiffness usually comes down to thread tangles hiding beneath the needle plate or in the bobbin case. Check there first, then inspect the drive belt and shaft lubrication points before assuming your machine needs deeper repair.
What happens if a sewing machine handwheel is disengaged?
A free-spinning wheel doesn’t mean it’s broken. It usually means clutch engagement is off. The needle shaft stalls, fabric feeding stops, and you’re just winding bobbins while the motor idles.
What if a handwheel is stuck on a sewing machine?
Isn’t it just peachy when your machine throws a tantrum? Don’t panic. Power down first, then start with a needle plate inspection and bobbin case review. Nine times out of ten, thread jams are the culprit.
What is a sewing machine handwheel?
That big wheel on the right side is your handwheel — turn it toward you to raise or lower the needle by hand, giving precise control for stitch positioning, threading, and starting seams exactly where you want them.
Conclusion
Ever notice how the smallest culprit causes the biggest tantrum? That’s the honest truth behind most sewing machine handwheel problems—a stray thread, a lint clump, a dry gear. Fix the small stuff first, and the big scary fixes rarely show up.
Your handwheel should spin like butter, not fight you every stitch. Build a cleaning habit, oil the right spots, and listen when it grinds. That wheel isn’t stubborn. It’s just asking for attention.