This site is supported by our readers. We may earn a commission, at no cost to you, if you purchase through links.
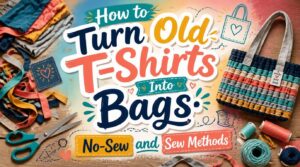
That drawer of concert tees and college shirts you can’t wear but can’t toss? It’s basically a bag factory waiting to happen. One old shirt, some scissors, and twenty minutes gets you a sturdy tote that outlasts anything from the store.
Grocery stores keep charging for bags, landfills keep filling with cotton, and somehow most people still haven’t connected those dots. Learning to turn old tshirts into bags solves both problems at once, no sewing machine required if you don’t want one.
Grab a shirt you don’t love anymore, and let’s get cutting.
Table Of Contents
Key Takeaways
- Choosing the right shirt matters most: pick a larger, thicker cotton or blend tee with strong seams, wash it first, then cut sleeves, widen the neckline, and knot fringe strips for a sturdy no-sew tote in about ten minutes.
- Sewing the bag instead of knotting it—stitching the bottom seam, reinforcing handle openings, and zigzagging raw edges—creates a stronger tote that can hold significantly more weight.
- A no-sew knotted bag typically holds 5-15 pounds, while a sewn version with reinforced straps can carry 20-40 pounds, so the construction method should match how much weight you plan to carry.
- Simple customizations like sleeve pouches, produce bag slits, and drawstring closures let you tailor one t-shirt bag for groceries, produce, or everyday essentials while cutting down on textile waste and single-use plastic.
Choose The Right T-Shirt

Not every old t-shirt is cut out for bag duty, so it pays to grab the right one before you start snipping. A few quick checks now will save you a saggy, stretched-out mess later. Here’s what to look for before that shirt becomes your next go-to tote.
Cotton Versus Blends
Grab that old tshirt from your closet and check the tag first, because cotton versus blends actually matters here.
If it’s mostly cotton, you’re in luck—check out these tips for upcycling old fabrics into new projects before you toss it in the donation pile.
Soft cotton jersey breathes better and feels cooler, but blends fight wrinkles and shrink less in the wash. Blends also grip dye longer, so colors stay vivid through your upcycling clothing adventures. Pure cotton’s your friend for softness; blends win on fabric longevity. Plus, pure cotton offers excellent moisture absorption for added comfort.
Check Fabric Thickness
Once you’ve settled on cotton or a mix, feel matters more than labels. Pinch the fabric between your fingers—thicker knits hold up better as bags, while thin jersey stretches fast under weight. A quick gauge check beats guessing:
- Jersey knits: roughly 0.4-0.6mm
- Heavier blends: can exceed 1.0mm
- Rib knits feel denser than jersey
- Washing changes thickness slightly
- Match needle size to thickness
Avoid Weak Seams
Flip the shirt inside out and check the side seams before you cut anything.
Factory seams with uneven stitching or loose thread tension tear fast under weight. Look for tight, even stitches, ideally with a zigzag stitch or bar tacks at the shoulders.
Weak seam allowance means a saggy bag later, so skip shirts where seams pucker or gap when stretched.
Pick Larger Shirt Sizes
Once you’ve checked seams, size matters just as much. Grab a medium instead of a small, and you’ll get shoulder ease for comfy carrying, room for layering, and fabric that won’t strain when loaded.
Bigger sizes mean:
- Broader chest coverage for sturdier panels
- Extra length for deeper bags
- Wiggle room that offsets shrinkage later
Your upcycled tshirt bag will thank you.
Wash Before Cutting
Toss that shirt in the wash before scissors ever touch it. This step removes sweat, dirt, and detergent residue that mess with dye and grip during textile repurposing.
| Skip Washing | Wash First |
|---|---|
| Uneven cuts | Accurate lines |
| Fiber shrinkage later | Relaxed fibers now |
| Germs linger | Clean, safe prep |
Pre-washed jersey lies flatter, so your DIY tutorial cuts stay straight and your reusable upcycle bag holds its shape.
After washing, dry your jersey fabric flat and pull it gently into shape to keep those crisp edges from curling before you cut.
Gather Tools and Supplies

Before you cut a single stitch, let’s round up what you’ll actually need. Nothing fancy here, just a few basics you probably already have kicking around the house. Here’s your quick checklist to get set up right.
Sharp Fabric Scissors
Sharp fabric scissors make or break this project. Look for high carbon steel blades (they hold an edge through dozens of cuts) with an ergonomic handle for comfort. Micro serrations grip slippery jersey knit nicely.
- Clean cuts mean neater fringe
- Comfortable grips ease long cutting sessions
- Serrated edges stop knit from sliding
- Sharp blades prevent frustrating snags
Oil the pivot occasionally, and store with covers.
Measuring Tape
Grab a tape measure before you cut anything—guessing gets messy fast. Look for tempered steel blades for durability, and check both metric and imperial markings so your nosew tshirt bag or tshirt backpack comes out even.
Pull the hook snug against fabric edges for hook accuracy tips, read at eye level to avoid parallax errors, and trust the locking mechanism reliability when marking upcycling projects for reusable shopping bags.
Fabric Marker
Ever tried marking dark cotton with a pale marker and just… nothing shows? A good washable marker saves you that headache.
- Bold white lines on navy tees
- Fine tips for tiny cut marks
- Chisel tips for wide panels
- Bright neon on faded fabric
- Smooth ink gliding over jersey knit
For nosew tshirt bag projects, fabric compatibility matters—pick ink made for cotton, and skip heat setting since you won’t be washing this one.
Jersey Sewing Needle
Regular sewing needles punch holes in knit fabric, but a ballpoint jersey needle pushes fibers apart instead, so your soft cotton jersey stays snag-free.
Go with a size 80/12 for most tee weights. This differs from stretch needles, which suit spandex blends better. Change needles every few sewing sessions to avoid skipped stitches when you’re moving beyond no sewing required methods for tote construction.
Optional Lining Fabric
Lining is optional, but it’s the difference between a floppy sack and a real tote. A scrap of cotton percale or nylon ripstop adds structure and protects fragile items.
- Match color for a clean look
- Contrast for visibility
- Choose ripstop for durability
- Prewash cotton to prevent shrinkage
Interfacing between layers boosts stiffness without bulk, giving your reusable bag serious backbone.
Make a No-Sew T-Shirt Bag
No needle, no thread, no problem. Grab your scissors, because you’re about to turn a plain t-shirt into a bag in roughly ten minutes flat. Here’s the step-by-step, from that first cut to the final knot.
Cut Sleeves Off
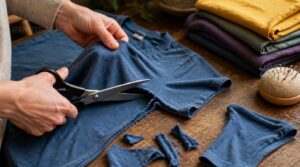
Time to lose those tshirt sleeves. Snip along the underarm seam first—this keeps fabric distortion minimal.
| Cutting Technique | Result |
|---|---|
| Underarm start | Clean shape |
| Follow shoulder seam | Symmetry |
| One continuous piece | Even edges |
| Skip seam lines | Weak spots |
Save that tshirt scrap for pouches later. This is your no sew approach foundation for reusable bags.
Widen The Neckline
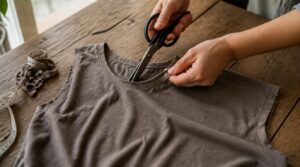
With the sleeves gone, that collar’s next on your list. Cut a shallow curve around the neckline, adding 1 to 2 inches for shoulder coverage. Balancing curves front and back keeps things even, no lopsided bag straps here. Cotton jersey works well with this widening thanks to natural fabric recovery.
- Cut small, check often
- Widen front and back equally
- Save tshirt scraps for pouches
- Avoid overstretching thin fabric
Trim The Bottom
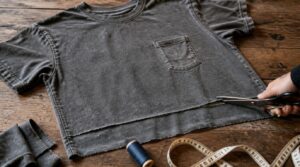
Once the neckline’s done, lay your shirt flat and eyeball the bottom hem. A clean straight cut, aligned with the side seams, keeps your bag standing evenly instead of tilting sideways.
Skip the folded gusset style for now, that’s overkill here. Sharp scissors give the cleanest edge, and a light zigzag later stops fraying if you’re feeling fancy.
Tie Fringe Knots
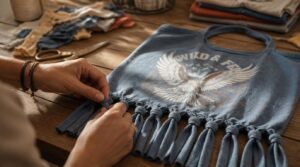
Grab those bottom strips you just cut and start snipping upward, about 3/4 inch wide, all the way to where the hem used to be. This creates your fringe for the nosew t shirt tote bag.
Tie each front-and-back pair into firm double knots, keeping tension even so nothing sags. Work left to right for knotting symmetry, checking edge alignment as you go to preserve fringe integrity.
Close Bottom Gaps
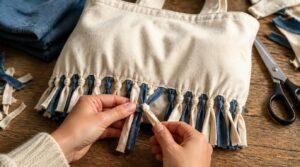
Once every fringe pair’s knotted, check for gaps still peeking through—that’s where bottom edge symmetry matters most. Cross-tie diagonally between neighbors to close them up. This step prevents fringe unraveling and grips fabric stretch under grocery weight.
Tug-test your nosew t shirt tote bag now; a wobbly bottom means retying, not tossing those fabric scraps into the DIY tutorial reject pile.
Sew a Stronger T-Shirt Tote
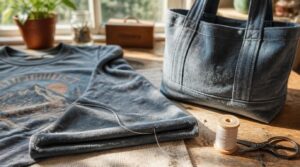
So the no-sew bag is great for a quick fix, but if you want something that survives grocery runs for years, you’ll need to break out a needle. A little bit of stitching turns a floppy shirt into a tote that actually holds its shape. Here’s exactly how to sew it up, step by step.
Turn Shirt Inside Out
Here’s where sewing beats the no-sew approach: turning your shirt inside out first. Pull it through one sleeve so the body flips without tangling, exposing seams and hems. Widen the neckline slightly so shoulder seams sit flat, not bunched. This protects prints from abrasion, changes fabric drape a bit, and gives you clean seams to stitch along.
Stitch The Bottom Seam
Line up the raw edges at the shirt’s base and pin them flat, then run a straight stitch at 2.5-3mm, backstitching both ends. Stretchy fabric? Switch to zigzag for give.
Keep your seam allowance consistent (0.5-1cm) throughout, use polyester thread for strength, and press the finished seam flat before flipping right-side out.
Reinforce Handle Openings
Here’s the truth: straps fail before seams ever do, because that’s where all your grocery weight yanks hardest.
Straps fail before seams ever do—grocery weight always yanks hardest right there
Strap stress points need real reinforcement, not a single stitch line.
- Backstitch anchors at each opening’s base
- Box or bar tack patterns locking corners
- Parallel stitching rows distributing pull force
Add a fabric stay underneath for stability, plus thin padding for comfort. Firm knots work for no-sew bags, but sewn totes need this extra muscle.
Add Zigzag Edges
Raw cut edges on knit fabric love to curl and fray, so a zigzag stitch locks them down fast. Set your machine to a 3-5mm width for grip, or narrower on lightweight tees to avoid puckering.
| Fabric Type | Stitch Width | Result |
|---|---|---|
| Cotton | 3-4mm | Clean, flat edge |
| Mixes | 4-5mm | Stretch accommodated |
| Heavy jersey | 5mm | Extra durability |
| Fine jersey | 2-3mm | Prevents puckering |
| Synthetic mix | 3mm + heat seal | Fray-proof finish |
Attach Optional Lining
Want a bag that holds its shape and hides raw edges? A lightweight lining does both. Pick cotton percale, similar weight to your shirt, right sides together at the top edge, then stitch.
- Cut lining to match shell
- Sew at neckline/sides
- Clip seams, reduce bulk
- Turn right-side out
- Topstitch neckline
Add a small pocket, coordinate colors, and wash separately to prevent bleeding.
Customize and Use Your Bag

Your bag is finished, but that doesn’t mean you’re done having fun with it. A few small tweaks can turn a basic tote into something that fits your exact routine, whether that’s grocery runs or farmers market trips. Here are some easy ways to customize and care for your new bag.
Add Sleeve Pouches
Got leftover sleeve fabric from your no-sew approach? Turn it into a snug little pouch for keys or cards, 1.5–2.5 inches deep, top-stitched with reinforced seams to handle daily use.
| Feature | Spec | Why It Matters |
|---|---|---|
| Depth | 1.5–2.5" | Fits compact items |
| Closure | Snap/elastic | Ergonomic access |
| Fabric | Knit jersey | Preserves stretch |
Make Produce Bag Slits
Once your pouch is stitched, grab those scrap scissors again. Cut slits 2-3 inches above the bottom, 1.5-2 inches tall, at least 1 inch from side seams. Zigzag stitch the edges so cotton jersey won’t fray or stretch. Test durability by tugging gently.
Your produce bag now breathes, no sew waste, just a smart shirt transformation.
Try Drawstring Closures
Slits let air in, but a drawstring closure keeps produce from tumbling out entirely. Thread cotton or polyester cord through a folded casing, cinch, done.
- Cord material: nylon resists moisture
- Casing width: slightly wider than cord
- Toggle vs knots: toggles adjust faster
- Aglets: prevent fraying, ease threading
- Decorative cords: add personality, zero waste
Wash Bags Regularly
That toggle-and-cord setup is only as good as what you put it near.
Grocery runs, especially anything with raw meat, mean washing after every use in warm water to kill bacteria.
Produce bags can stretch that to every one to two weeks with spot cleaning between.
Whatever the schedule, always air dry completely before storing so mildew never gets a foothold.
Sort Bags by Use
One shirt bag rarely does every job well, so give each one a role.
Reserve your sturdiest tote for groceries, keep a mesh produce bag for veggies, and color-code by category to avoid cross-contamination between meat and lunch bags.
Sort by size, too, small for quick trips, large for bulk runs, and rotate seasonal totes so no single reusable shopping bag wears out first.
Frequently Asked Questions (FAQs)
What can I turn my old T-shirt into?
That old tee has more potential than you think: reusable grocery totes, DIY produce bags, drawstring backpacks, hanging storage pouches, or small key pouches.
With a no sew approach or basic stitches, you’re crafting practical DIY crafts, not just tote bags.
How to make a bag from old clothes?
Grab scissors, cut sleeves and neckline, then tie fringe knots along the bottom for a no-sew approach. Prefer durability? Stitch seams instead. Either way, you’ll get sturdy reusable shopping bags while cutting down on textile waste and plastic use.
How to fold a shirt into a bag without sewing?
Think of it like origami with fabric: fold in half, sleeves lining up as future straps, bottom edge intact for natural bottom reinforcement, then knot the sides for solid load distribution—no needle required, just clever folding.
How to make a handbag out of a shirt?
Pick a heavier fabric weight shirt, cut sleeves and neckline wide, then knot fringe strips into a boxed bottom. Strengthen stress points with double knots, vary knotting techniques for handle attachment styles, and you’ve got a handmade, reusable tote.
How much weight can a t-shirt tote hold?
A knotted no-sew bag holds 5-15 pounds, but stitched seams with reinforced straps push capacity to 20-40 pounds. Fabric tensile strength, box-bottom construction, and even weight distribution all determine whether your tote thrives or tears.
Can you make a bag without any sleeves?
Yes—the sleeve-less design works fine, since the body’s fabric surface area gives you enough material for a sturdy tote. Just braid a strap from scrap fabric or knot the shoulders together as an alternative strap method for missing grips.
How long does a no-sew t-shirt bag last?
Like a well-worn pair of jeans, your no-sew bag ages gracefully, then gives out fast. Expect 10-15 pound loads for months with cold washes and tight knots, but watch bottom knots for fraying and pilling signs.
Whats the fastest way to make a t-shirt bag?
Grab a 100% cotton tee, snip sleeves and neckline, cut 1-inch fringe, then knot pairs snake-style. This no-sew method takes about 10 minutes — perfect for reusable shopping bags without touching a needle or thread.
Can old, worn-out t-shirts still be used?
Worn-out shirts often still qualify, so run a quick fabric integrity check first. If holes are small and seams intact, cotton softness usually holds up fine. Heavily rotted or damaged sections belong in the rag pile instead of your bag project.
Conclusion
That faded shirt was headed for the trash, but now it’s the bag on your shoulder at the farmer’s market, proof that nothing scrappy stays useless forever.
Scissors and twenty minutes are all it takes to turn old tshirts into bags that carry groceries and a little pride too.
Skip the store bags. Raid that drawer again. Your closet’s forgotten pile just became your next favorite tote.
- https://mommypotamus.com/no-sew-t-shirt-tote-bag-tutorial
- https://upstyledaily.com/posts/handbags-totes/decorate-restyle-or-refashion/diy-upcycled-t-shirt-bags-sew-and-no-sew-methods-44486662
- https://happiestcamper.com/how-to-make-a-no-sew-t-shirt-bag
- https://www.diyncrafts.com/167313/crafts/diy-reusable-grocery-bags
- https://youmakeitsimple.com/2021/07/02/diy-upcycled-t-shirt-bags-sew-and-no-sew-methods